Test & Verification
Goal:
This document shall outline all measures taken to ensure that the software fulfills the intended purpose and does not have unwanted behavior. Alongside the project there are several techniques and measurements used and different test setups developed, to ensure the expected behavior.
Contents:
Coding Guideline
Goal:
A coding guideline was defined to reduce common programming error and to increase readability and thus understandability of the code.
The to be used coding guideline is found here: link, Version x
The guideline is checked during static analysis step, described below.
Development process
Goal:
All changes to the repository shall be reviewed by an additional person, that is experienced with the software. Hence four-eyes have checked each modification.
The check is documented by means merge- or pull requests of the gitlab/github system.
Static analysis
Goal:
Static analysis shall verify that the coding guideline was fulfilled and common rules of secure and safe programming are followed.
The CI system is responsible of running the check regularly.
GCCs Static Analyzer
On default build with GCCs Static Analyzer enabled
to find common programming issues the project is build on default with GCC’s Static Analyzer enabled
To explicitly disable it for some reasons (i.e perf benchmarks see. profiling) build with
cmake -DENABLE_ANALYZER=off
Testing
Goal:
During tests the capabilities of the software are verified. Basically the question is answered: Does the software (or parts from it) react as intended?
Unit Test test/utest
Goal:
unit-tests verify the the correct function on the lowest level of the software. e.g. they verify that a c function returns the correct values on given input.
The CI system is responsible of running the utests regularly.
Details:
covers all parts of src/
structure is <component-name>/<compilation-unit-name>/public_function_name/case_<error|exterr|successful|…>.c
how to run the utest from git project root:
call |
./ci/run_utest.sh| to run the unit tests for the debug buildcall |
./ci/run_utest.sh Release| to run the unit tests for the release build
coverage is proven by asmcov, because gcov has dependencies on glibc and the test actually mock libc functions to achieve 100% branch coverage. (gcov and libc mocking doesn’t work)
executed by CI-pipeline
controlling the build of unit test with
cmake -DUNIT_TESTS=<on/off> -DINSTALL_UNIT_TEST<on/off>unit tests shall make use of the sanitizers
Coverage by asmcov
To generate a coverage report for the unit tests asmcov is used. The basic steps are:
Run and trace the unit test with
perf-> perf.dataCreate the the instruction stream with perf -> perf.trace
Evaluate test binary and trace with asmcov to get a coverage statement -> asmcov.log
Usage
Currently two usage scenarios are supported:
For the CI build: create coverage for all available unit tests
For the developer: create coverage for a given test or group of tests
To create a complete coverage report for the project simply run:
./ci/create_coverage.sh
The results can be found in ./build-coverage/coverage_results
To create a coverage report for a certain or group of unit test(s) proceed as follows:
build without Address Sanitizer support, to avoid additional code added by the gcc or be aware that probably not 100% branch coverage can be achieved as this code is not under your control.
cmake -B ./build-coverage elos -DCMAKE_BUILD_TYPE=Release
make -C ./build-coverage
run the coverage suite
BUILD_DIR=./build-coverage ./test/coverage/run_asmcov.sh functionName [otherFunctionName] [compilationUnitName]

## only run the test for safuVecCreate
BUILD_DIR=./build-coverage ./test/coverage/run_asmcov.sh vecCreate

## only run the test for safuVecCreate and elosEventSerialize
BUILD_DIR=./build-coverage ./test/coverage/run_asmcov.sh vecCreate eventSerialize

## only run the all tests for the compilation unit vector.c
BUILD_DIR=./build-coverage ./test/coverage/run_asmcov.sh vector

## only run the all tests for the compilation unit vector.c and event.c
BUILD_DIR=./build-coverage ./test/coverage/run_asmcov.sh vector event

## run all test that match the pattern `test_*_utest` and located in build/${BUILD_TYPE}/cmake/test/utest
BUILD_DIR=./build-coverage ./test/coverage/run_asmcov.sh
The results can be found in build/${BUILD_TYPE}/coverage_results
To use a custom install location of asmcov set ASMCOV_DIR and point
to the location where the asmcov binaries are installed.
Integration Test
Goal:
Integration tests verify that the software fulfills all requirements in the final environment.
Integration tests shall be done before release of a new version.
Details:
Integration Tests account for testing usecases that are not covered by smoketests or unittests and ensure elosd works as expected.
Tests need to be target agnostic and therefore are packaged as separate elos-integration-test package.
Robot test framework is used to create integration tests
integration tests shall make use of the sanitizers
Components
The fundamental components required for integration tests are as given
below, apart from these, additional components are added according to
test environment. * Robot test framework - Robot
Framework
is a test automation framework. - Integration tests are written with the
help of Robot test framework. - Robocop -
Robocop static code
analyser for robot framework - Tests written with robotframework are
statically analysed using robocop tool - Robotidy -
Robotidy code
linter for robot framework - code linter for tests written in robot
framework * Integration test package - A test directory has one or more
tests written in robot as well as sub directories containing tests - The
integration test can be found in test/integration - Elos integration
test package consists of all tests in the integration directory * Test
targets - The target has elosd installed and running when integration
tests are executed. They could be - Container - Qemu hardware emulator -
Client hardware
Setup
Integration test setup for elos CI
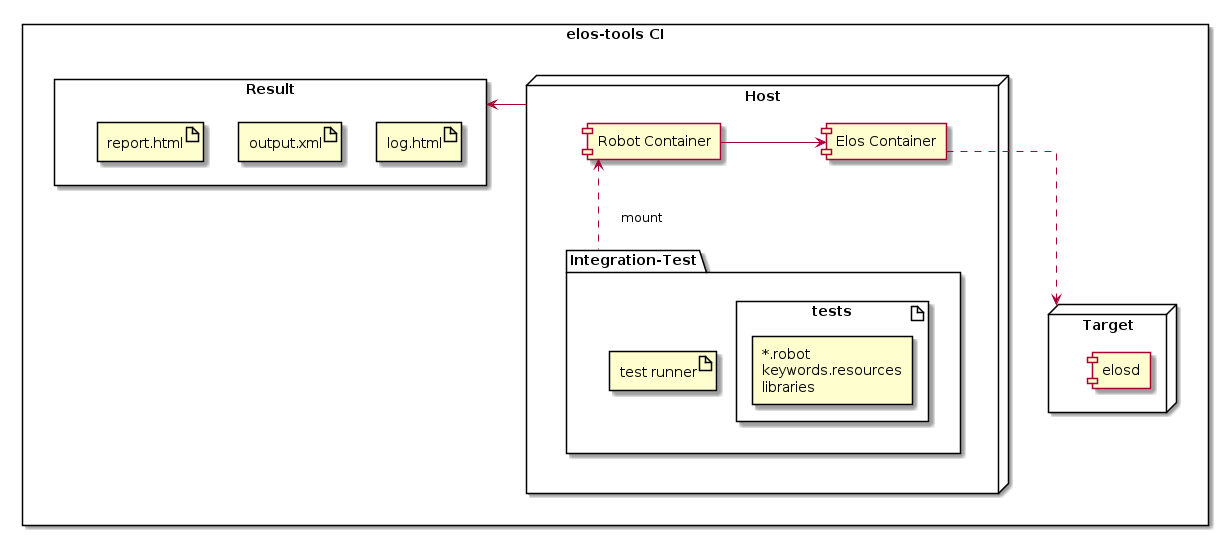
Integration Test Setup
The host system has the elos-integration-test packages and a test-runner script.
The robot container where the robot test framework is installed. The test package directory is mounted on to this container.
The elos container where elosd is installed and running serves as the target.
The test results are stored in
build/[Debug|Release]/result/integration
New tests are added directly in the elos-integration-test package.
Starting the container with robot framework installed, mounts the
test-package automatically. The test runner script is found in
integration/scripts. The target container should be started before
running the test runner script. Starting the target container installs
elosd from source and runs it. The test-runner script requires the
target credentials like username, password and target ip address in
order to run the tests.
Integration test setup for Base OS Lab CI
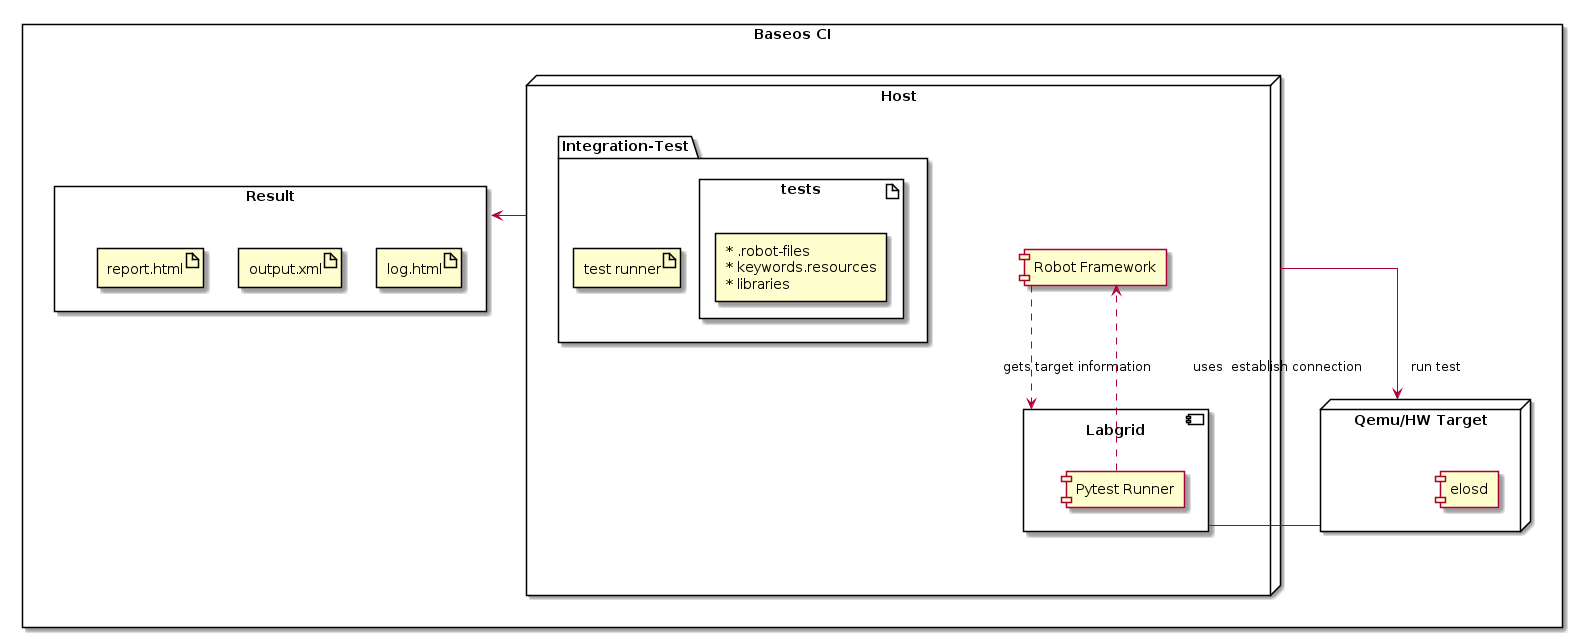
Integration Test BaseOS Lab Setup
The host base-os lab has the following components :
elos-integration-package
Robot framework
Labgrid
Pytest Runner plugin for Labgrid
An hardware emulator (QEMU) or the client hardware will be used as the target.
Test results will be stored in
<<test_image>>/report
The host in base os lab is a container with the robot framework, labgrid and pytest plugin for labgrid installed. The elos-integration-test package is retrieved from elos-tools repository. Labgrid establishes connection with the target which could be a client hardware or qemu image. Upon establishing connection, target information like ip address is retrieved for use by integration tests . The pytest runner plugin is used to run ptests in the target. The call to run robot integration tests is encapsulated in a new test. The test run scripts when called, build and boots the target and runs the test and stores the reult in the host system.
Usage
The integration tests can be run by calling:
cd elos
./ci/run_integration_tests.sh [Release]   # run integration tests automatically
This will start two docker containers and execute the tests.
The results will be stored in
build/[Debug|Release]/result/integration.
In order to manually run the integration tests in the local repository
cd elos
./ci/docker-target-run.sh    # start target container in a terminal
cd elos
./ci/docker-integration-run.sh -l elos-target          # start test container in a separate terminal
./test/integration/scripts/run_integration_tests.sh -h # inside the container run the test runner script
When doing this, the result storage path can be configured by setting
the enviroment variable TEST_OUTPUT for the
run_inetgration_tests.sh script.
CI integration
The ./ci/docker-integration-run.sh can be used to run in some CI environment, however to ensure that used docker container and image names are uniwue and not interfer with different parallel runs of these test suite the follwoing variabeles shall be set.
CI="true"
BUILD_ID="42"
GIT_COMMIT="0000000000000000000000000000000000000000"
These will be used to generate unique docker-container and image names.
The pattern look like ${ELOSD_IMAGE_NAME}-${BUILD_ID}-${GIT_COMMIT}.
(yocto-) baseos-lab integration
To manually run the test in base os lab
cd eb-baseos-lab
./ci/docker-run.sh                     # start host container
                                       # Inside container
./ci/repo-init.sh                      # initialize submodule
./ci/build.sh                          # build target image  **note** - the previous step and this step needs to be run at least once before test run
./ci/qemu-test.sh -i <<image_name>>    # build and boot given qemu image and run integration tests on it.
                                       # To test on all images use --build-all and no image name instead of -i
Writing a Robot Test
The directory structure for integration test is as show below.
test
├── integration
    ├── testmodule
        ├── test.robot
        ├── subtestmodule
            ├── subtest.robot
New test suites are added to test/integration.
Coding Guidelines
The coding guidelines for robot static code analysis are as given in
test/integartion/scripts/robot_linter_config.txt. The guide lines
are quite liberal as default and can be further restricted depending on
the user requirements. The default guidelines are as follows:
The length of a robot keyword is set to 50
A keyword can call a maximum of 20 other keywords inside it.
Since template test cases don’t have keywords, check for too few calls to keywords shall be avoided.
Line width for robot tests are set to 100
static checks shall only report log levels of above warning.
Step by step guide to create and run integration test
An example of a robot test is given below :
*** Settings ***
Documentation      ssh test script
Library            SSHLibrary

*** Variables ***
${host}            192.168.7.1    # replace with target under test (TUT) ip
${username}        root           # replace with TUT  username
${password}        ${EMPTY}       # replace with TUT  password
${alias}           target         # use any appropriate alias for target
${hostname}        qemu-64        # replace with TUT  hostname

*** Test Cases ***
Test SSH Connection
    Open Connection     ${host}        alias=${alias}
    Login               ${username}    ${password}    delay=1
    ${output}=    Is Connected
    Should Be Equal As String    ${output}    ${hostname}
    Close All Connections

*** Keywords ***
Is Connected
    ${value}=         Execute Command    hostname
    RETURN    ${value}
Create file
new_test_suite.robotfile undertest/integration/new_module.Copy the above code into
new_test_suite.robotChange test variables to target under test (TUT) values.
To run test start target elosd container by
./ci/docker-target-run.shfirst.In a separate terminal start robot container by
./ci/docker-integration-run.shInside the robot container run all tests using script
PROJECT="elos" ./scripts/run-integration-tests.shThe test results are stored in
report/new_moduleIn order to run individual test use
robot --outputdir=report/new_module --output=new_test_suite --report=new_test_suite new_test_suite
## In order to run only a testcase from the test suite
robot -t test_case_name --outputdir=report/new_module --output=test_case_name --report=test_case_name new_test_suite
Robot Test Explanation
In Robot Framework, each robot file is a test suite. Likewise, a directory containing .robot files is a master test suite. Unless Robot Framework is given with a single robot file to execute, it wil try to look for robot files recursively. Spaces in filename should be replaced by an underscore.
This test checks ssh connection to a target whose ip, username and
password is known. The test script is divided into 4 sections. *
Settings - The required test settings with the keywords - The
Documentation keyword is a simple test description text - The Library
keyword imports keywords from given argument. The argument for this
keyword is SSHLibrary, which has keywords for a ssh interaction with
given target. - More keyword under settings is found here Additional
Settings
Keywords
* Variables - The variables to be used in this test - The variables
created in the variable section have a test suite scope. - All test
cases inside a robot file can access it. - The variables have read write
permission. - In order to over write a variable defined in the variable
section, the Set Test Variable built in keyword can be used. * Test
case - The actual test case which is written in using available keywords
and arguments. * Keywords - Here keyword can be defined which shall be
used in one or more testcases in the robot file.
In test suits variables and keywords can be added to a *.resource file in order to share them. They are imported into tests that require them, using the resource keyword in the settings section as given below.
* Settings *
Documentation      ssh test script
Resource           keywords.resource
Variables created in .resource files can be of type other than strings.
Robot Test Linter
The code check and linting of robot tests are done as follows:
cd elos
./ci/run_integration_tests_linter.sh [Debug|Release]
This will start the .test/integration/scripts/robot_code_lint.sh
script which will do a static code check on all integration tests. The
results will be stored in
build/[Debug|Release]/result/integration/robot_lint/robot_lint.log,
only when one or more of the tests fail the checks.
After analysing the results, the tests which fail can be fixed using the robotidy linter as geven below
./test/integration/scripts/robot_code_lint.sh --show
This will point out the format errors in the given test.robot and gives suggestions to fix them. If no test is specified all tests wil be checked and suggestion will be shown.
If the fixes suggested are satifactory, then the fixes can be implemented by
./test/integration/scripts/robot_code_lint.sh --show-fix
This will show the suggested changes before writing them to the corresponding test/s.
For other options in the robot_code_lint.sh use
./test/integration/scripts/robot_code_lint.sh --help
Benchmarks
Goal:
Benchmarks record selected key performance indicators (KPI) that are relevant for the resource consumption and performance of the software.
Benchmarks shall be done before release of a new version.
Details:
gives a general overview of how elosd performs
the benchmarks covers the following setups: ** 1 on 1 : 1 subscriber per 1 publisher for 1,2,5,10,100 subscribers and publishers ** 1 on n : n subscriber per 1 publisher for 1,2,5,10,100 subscribers and 1,2 publishers
the results can be found in build/benchmark_results ** report_<messages><subscriber><publisher>.csv containing the plain timestamps for (send,dispatched,received) ** report_<messages><subscriber><publisher>.csv.png a visualization of the csv-report files.
how to run the benchmarks from git project root:
cmake -B build elos
make -C build
./ci/run_benchmarks.sh
Profiling
gives a insides on how elosd spends its time during execution
for profiling perf is used
the results can be found in build-perf/perf_results/<timestamp> ** perf.data is the raw output from perf ** perf_output.txt contains profiling info from perf.data in text form
how to run the benchmarks from git project root:
cd ./test/profiling
sudo ./perf.sh setcap        # Allow profiling without root rights
./perf.sh clean              # Removes build and profiling files
./perf.sh build              # Build the project with the profiling flag
./perf.sh elosd              # Monitor elosd and store the results
./perf.sh hotspot            # Call the 'hotspot' tool with the latest profiling data set
sudo ./perf.sh restorecap    # Restores old capability value
Sanitizers
Goal:
During testing (utest, smoketest, integration tests) some self checking sanitizers shall be used to detect unwanted behavior.
Address Sanitizer
Only the ‘Debug’ target build comes with the Address Sanitizer enabled
to find common memory access/management failures the project is build on default (Debug) with GCC’s Address Sanitizer enabled
the Release target is guaranteed to come without sanitizers in case you want to use other tools like Valgrind (build with
cmake -DCMAKE_BUILD_TYPE=Release)sanitizers shall be used in unit- and integration-tests.
Thread Sanitizer
Only the ‘Tsan’ target build comes with the Thread Sanitizer enabled
Can be used to find data races, erronous mutex accesses and other multi-threading related problems.
Can be built with
./ci/build.sh Tsanor configured withcmake -DCMAKE_BUILD_TYPE=Tsan.Has its own build target due to it being incompatible with other sanitizers like ASAN and Valgrind.
Currently not part of the CI pipeline as we still evaluate its usefulness.