EB corbos Linux SDK
![]()
Overview
EB corbos Linux built on Ubuntu is a long-term maintained embedded Linux distribution focused on automotive ECUs. Elektrobit can provide security patches for a frozen package set for up to 15 years on quite low pricing. To realize this, Elektrobit partners with Canonical. EB corbos Linux uses many Ubuntu packages, qualifies these packages for automotive embedded use-cases in reference images, and adds additional embedded optimized components, to create an industry grade embedded Linux build toolkit.
In contrast to general purpose Linux distributions, EB corbos Linux allows a user to create a completely customer specific image from scratch in a reproducible way. This is realized using this SDK. A free variant of EB corbos Linux is available at the Elektrobit homepage. To kick-start the development of new ECUs, a full EB corbos Linux release also contains pre-qualified reference images which already implement typical automotive use-cases. The free variant doesn’t contain proprietary hardware drivers or pre-qualified reference images. Please contact Elektrobit sales to get a full evaluation package of EB corbos Linux.
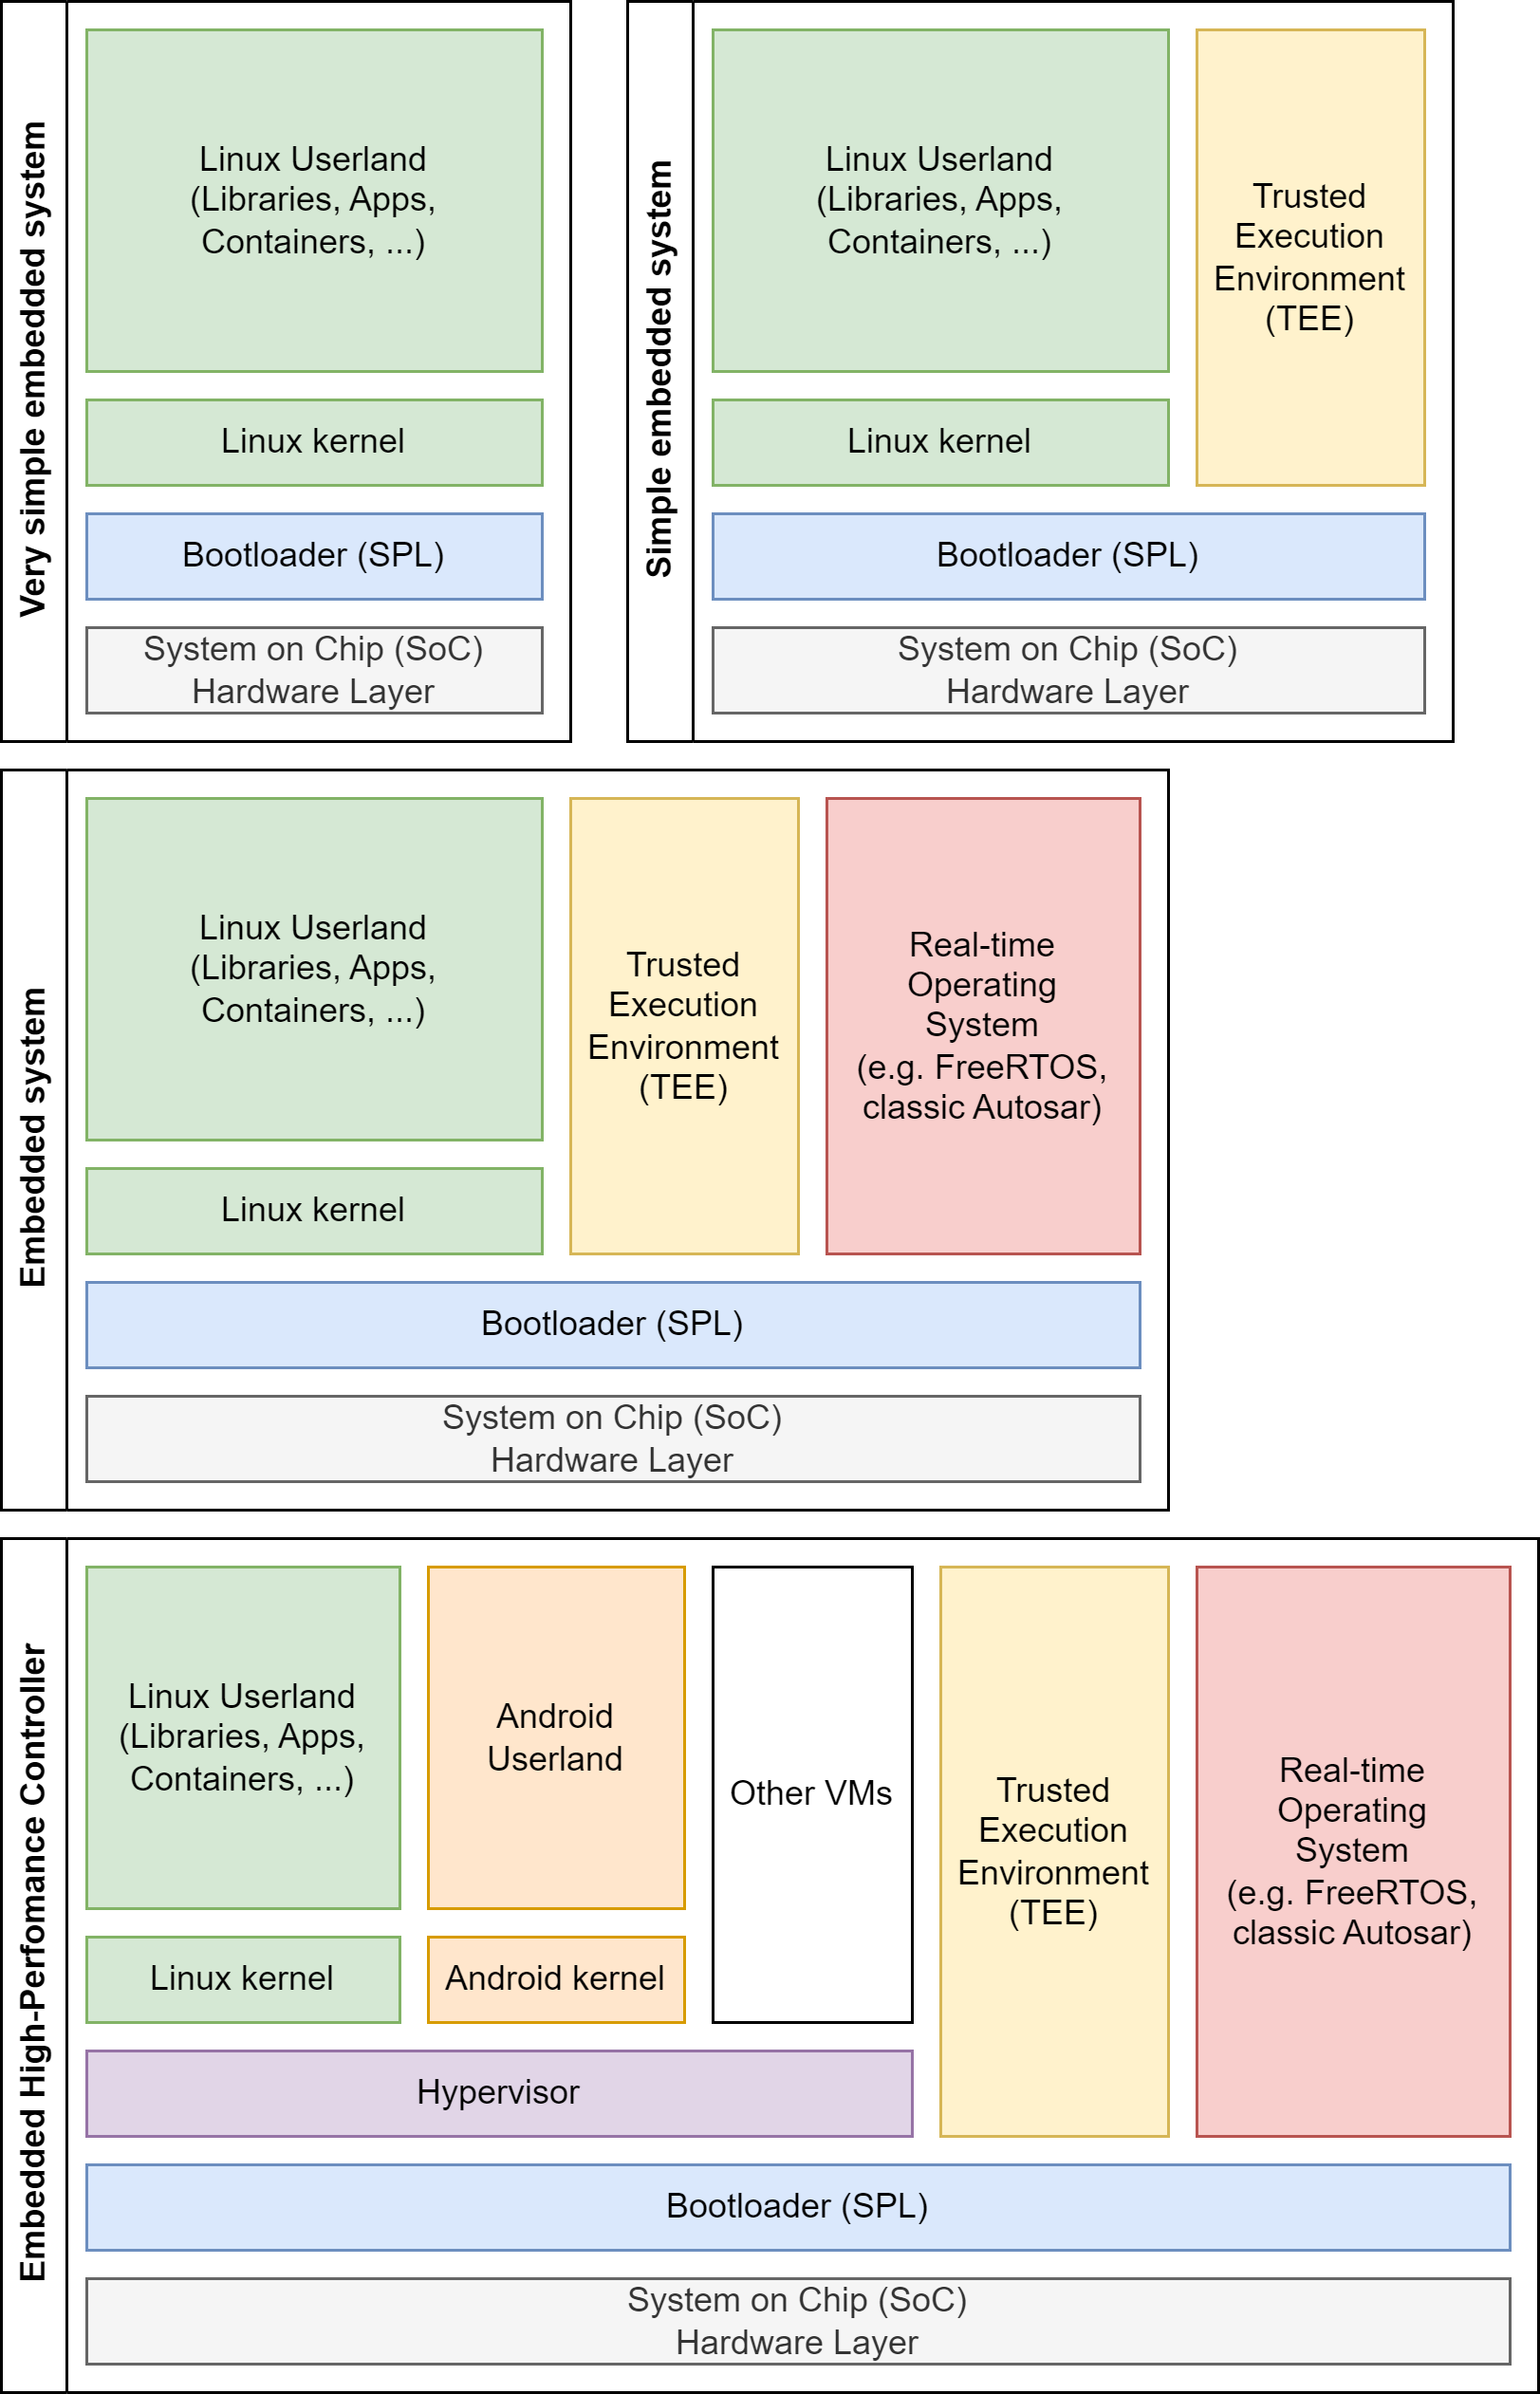
The image above shows a range of embedded system architectures.
Very simple embedded systems run only a bare-metal Linux. An example for such a system is the Raspberry Pi running Raspberry Pi OS. Such images can be easily directly generated with tools like elbe, kiwi-ng or debos, but this architecture doesn’t fit industrial needs.
For real world industrial solutions at least secure boot is required, and typically a Trusted Execution Environment (TEE) is involved in the secure boot process. This is depicted above as a simple embedded system. Such images may already require a more complex partition layout, depending on the bootloader and SoC requirements.
In the automotive world, in addition to a Posix OS, typically also a safety certified realtime OS like classic Autosar is involved. This is depicted above as an embedded system. If this is combined with an A/B schema for the update of the Linux and the classic Autosar the storage layout gets quite complex and can hardly be directly created with the tools mentioned above.
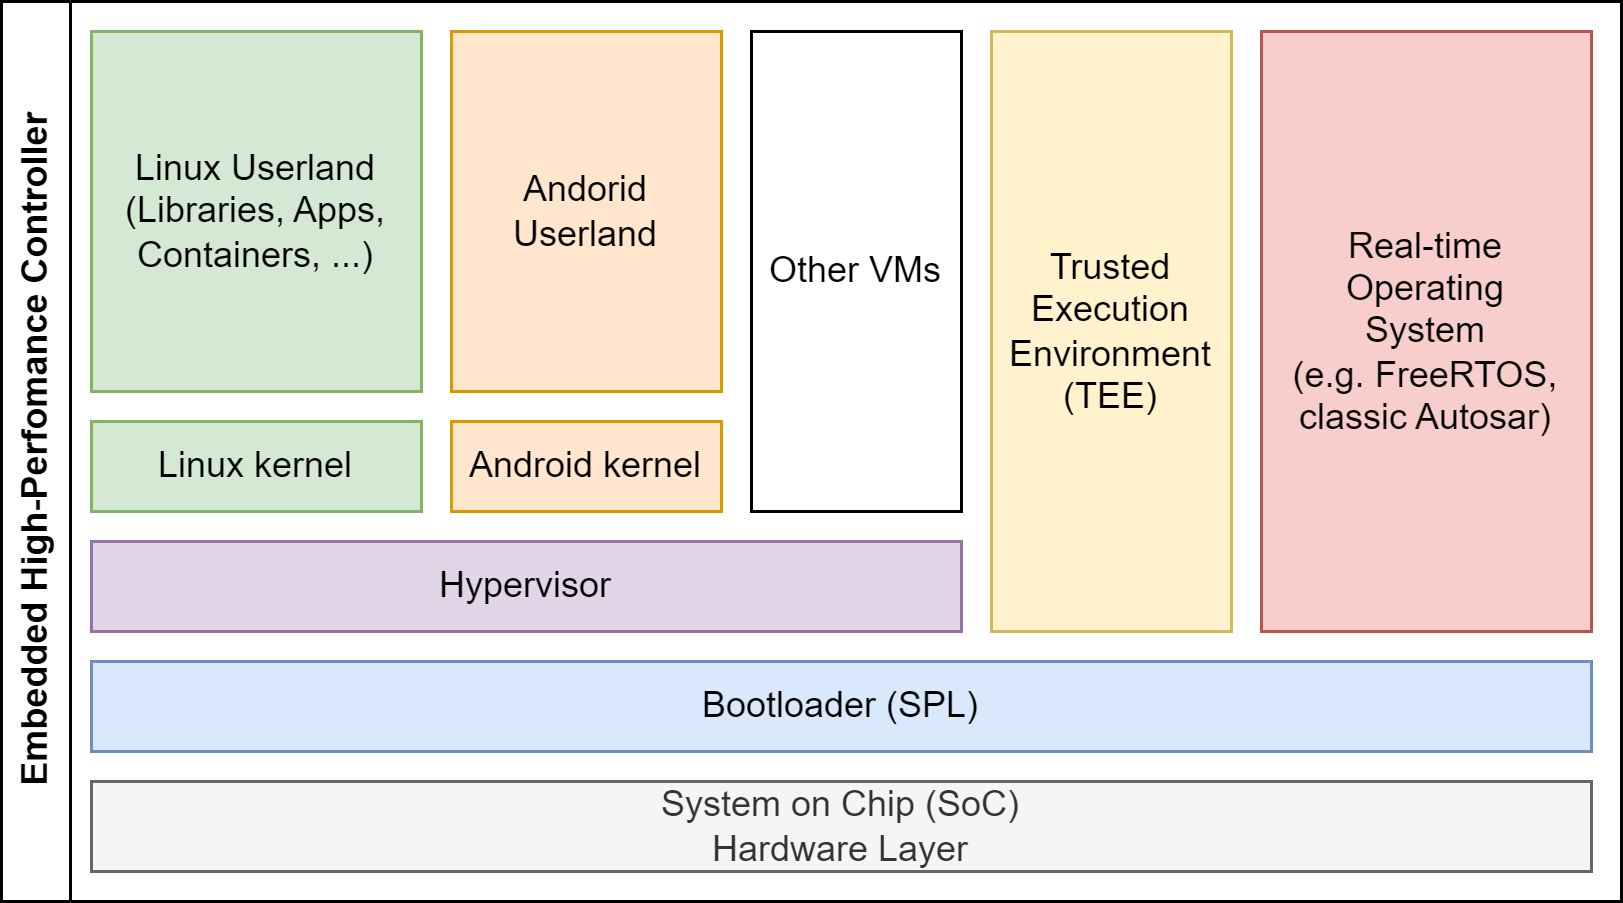
Our day to day business at Elektrobit are automotive high-performance controllers (HPCs). HPCs extend the embedded system architecture with a hypervisor and multiple virtual machines (VMs), like an additional Android VM for infotainment solutions. The target of EB corbos Linux, and this SDK, is to fully support such embedded high-performance controller system architectures, and allow development and maintenance of such systems in an easy, efficient and reliable way.
This repository provides a template workspace to start developing your own Linux images and applications. It’s based on a dev container to provide a consistent build environment. This dev container can also be used stand-alone with other IDEs or in CI environments. For more details about the container and stand-alone usage look at the dev container repository.
Setup
The EB corbos Linux template workspace is tested using Ubuntu 22.04 and Ubuntu 24.04 host environments on x86_64 machines. It was verified once successfully that the container works also on arm64 hosts, but this variant is not covered by continuous testing.
The build host needs to provide a Docker installation and a Python 3 installation, including Python3 venv. Docker needs support for running privileged containers.
The EB corbos Linux template workspace is based on a dev container, and is not using VMs for cross-building. This simplifies the setup and provides good build speed, but it requires support for executing non-native binaries if images for foreign architectures shall be built. To make this work, the host needs to support binfmt. On Ubuntu hosts, binfmt can be enabled by installing the packages binfmt-support and qemu-user-static. To allow mount operations which are required during image build, a privileged execution of the container is necessary, and the /dev folder needs to be bind-mounted into the container to allow access to newly created losetup devices. Running other workloads on the build host may cause issues, since binfmt and losetup configure the kernel and therefore modify the host environment for all running processes and containers.
The following sections assume that you don’t have an Ubuntu 22.04 or 24.04 host OS and use the Remote SSH feature of Visual Studio Code to connect to a remote environment as build host. This will work if you can SSH into the build host and doesn’t require UI-support on the build host. On Windows, WSL2 should also work.
Optional: Prepare Virtual Box VM
If you don’t already have an Ubuntu development host, you can create a new one using VirtualBox, a free hypervisor available for many operating systems.
First download an Ubuntu ISO image. For preparing this section, I used an Ubuntu 24.04 server ISO, since a desktop UI is not needed. Then download and install VirtualBox, and create a new virtual machine with the following options:
- RAM: 8192 MB (less should also work)
- CPU: 3 cores (more is better, less will also work)
- Disc: 100 GB (more is better, less will also work)
- A second, host-only network interface.
Skipping automatic installation will allow you to change the hardware settings before the installation, if you add the second interface after installation, you must configure it manually.
Boot the VM with the Ubuntu ISO image and follow the installation wizard. I have chosen the minimal server variant.
After installation, log in to the VM and install openssh-server, docker and git: sudo apt install openssh-server docker.io git. Get the IP address of the VM by running the command ip addr. The address starting with 192.168. is the one of the host-only interface.
For me, the address was 192.168.56.106.
Enabling nested virtualization for KVM support
The Linux KVM technology allows running virtual machines, for the same CPU architecture as the host, with almost native speed.
To make use of this in VirtualBox, you need to disable the Windows Hypervisor.
Please be aware that this may affect other virtualization tooling like Windows WSL.
To disable the Windows Hypervisor, open a PowerShell as Administrator, and run bcdedit /set hypervisorlaunchtype off. Afterwards, you need to reboot your Windows machine.
After the reboot, you can enable nested virtualization for your VirtualBox VM by editing the machine, choosing System > CPU and enabling the checkbox for nested VT-x/AMD-V.
Setup Visual Studio Code
Install Visual Studio Code on your local machine. It’s available for free for all major operating systems.
Run Visual Studio Code (VS Code) and open the extensions view (CTRL + SHIFT + X). Now install the Remote SSH and the Dev Containers extensions.
If you will not use an remote development host you can skip the next two sections and start with installing the required tools.
Prepare SSH connection
Let’s try to connect to the Ubuntu remote development host.
Open a new terminal in VS Code and type ssh <your user>@<IP of the host>. In my case it is: ssh ebcl@192.168.56.106. If it works, you are asked to accept the key, then you can login with your password.
This will give you a shell on the remote development host.
If you are on Windows, and you get an error that ssh is not available, you can install git for windows. This will also give you a ssh client.
To avoid typing your password all the time, you can authenticate with a key.
To use key authentication, disconnect from the remote host by typing exit, and then run ssh-copy-id <your user>@<IP of the host> in the VS Code shell.
If you are on Windows and get the error that the command ssh-copy-id is not known, you can use type $env:USERPROFILE\.ssh\id_rsa.pub | ssh <your user>@<IP of the host> "cat >> .ssh/authorized_keys". If you don’t have an SSH authentication key, you can create one using the ssh-keygen command.
Connect using VS Code Remote SSH plugin
Now you are ready to use the Remote SSH. Open VS Code, then open the command palette (Ctrl + Shift + P) and choose Remote SSH: Connect to host. Select Add new host and enter <your user>@<IP of the host>. In my case, I entered ebcl@192.168.56.106. Then select Linux as the host OS.
VS Code will install the remote VS Code server on the remote host, and open a window connected to this server.
If it works, you should see SSH: <IP of the host> in the lower left corner.
Pressing on this element will bring up the connection menu.
Install required tools and clone ebcl_template repository
If you start from a plain Ubuntu 22.04 installation, you can install the needed dependencies using the following command: sudo apt install docker.io binfmt-support qemu-user-static.
This should install qemu-aarch64 version 6.2.0.
WARNING:
When using a distribution that provides qemu in a version greater or equal to 8.1.1 (like Ubuntu 24.04) building for arm64 targets is broken due to a bug in qemu. It will fail with a message like W: Failure trying to run: chroot "/tmp/tmpp7s0kahl" /sbin/ldconfig.
We recommend either switching to Ubuntu 22.04 or downgrade qemu (and hold back updates).
This can be done for example using:
sudo apt remove qemu-user-static
wget http://launchpadlibrarian.net/690251791/qemu-user-static_8.0.4+dfsg-1ubuntu3_amd64.deb
sudo apt install ./qemu-user-static_8.0.4+dfsg-1ubuntu3_amd64.deb
sudo apt-mark hold qemu-user-static
The current version of qemu can be checked using qemu-aarch64-static --version.
To use dev containers, your user (on the remote machine) needs to be able to create local Docker containers.
To give your user these rights, you need to add the user to the docker group with the command: sudo usermod -aG docker $USER. The changes become active after a new login.
Close the remote connection using the menu in the lower left corner of your VS Code window and reopen the connection using the command palette or if not using a remote machine simply log out and in again.
To use the SDK, we need git to clone the remote repository (or you download it otherwise), and we need Docker to run the dev container. All other required tools come as part of the container.
Open again a shell on the remote machine, change you your preferred storage location, and clone the ebcl_template repository by running: git clone https://github.com/Elektrobit/ebcl_template.git. This will give you a new folder ebcl_template.
In VS Code, open “File > Open Workspace from File…”, navigate to the ebcl_template folder and select ebcl_sdk.code-workspace. Now you can enter the dev container by opening the remote menu in the lower left corner and selecting “Reopen in Container”. This will automatically run a local build of the EB corbos Linux dev container. The first time, when the container is built completely from scratch, may take quite some time. On my machine it takes about 30 minutes. When you open the workspace a second time, it will be a matter of seconds.
Now you are ready to start development!
Using the EBcL SDK VS Code integration
To use VS Code for developing with the EBcL SDK, choose File > Open Workspace from File and navigate to the ebcl_template location. Select the ebcl_sdk.code-workspace file. This will open the folder bind-mounted in the docker dev container environment.
Now you can use the VS Code build tasks (Ctrl + Shift + B) to build the example images and build and package the example applications.
Using the EBcL SDK container stand-alone.
If you don’t want to use VS Code, or you want to integrate the EBcL SDK in your CI workflows, you can use the dev container stand-alone. For more details on how to do this, take a look at dev container CLI.
EBcL SDK setup customization
When the workspace container is initialized the file ~/.ebcl_config/.env from your host will be sourced. You can specify environment variables to customize the setup of the EBcL SDK. Some of the available environment variables for this customization include:
USER_APP_REPOis a comma-separated list of application git repositories to be cloned into/workspace/apps/user.
Example:
`USER_APP_REPO=https://github.com/user/app1.git,https://github.com/user/app2.git`
USER_IMAGE_REPOis a comma-separated list of application git repositories to be cloned into/workspace/apps/image.
Example:
- Example: `USER_IMAGE_REPO=https://github.com/user/image1.git,https://github.com/user/image2.git`
The dev container CLI
The dev container CLI uses a devcontainer.json, like the one in this workspace, and creates and configures a dev container based on it. This is handy for using the SDK without VS Code UI.
Installation
- docker installation
Ensure to have node version greater 16 and not above 18
sudo apt-get update
sudo apt-get install -y ca-certificates curl gnupg
sudo mkdir -p /etc/apt/keyrings
curl -fsSL https://deb.nodesource.com/gpgkey/nodesource-repo.gpg.key | sudo gpg --dearmor -o /etc/apt/keyrings/nodesource.gpg
export NODE_MAJOR=18
arch=$(dpkg --print-architecture)
echo "deb [arch=$arch signed-by=/etc/apt/keyrings/nodesource.gpg] https://deb.nodesource.com/node_$NODE_MAJOR.x nodistro main" | sudo tee /etc/apt/sources.list.d/nodesource.list
sudo apt-get update
sudo apt-get install nodejs
Then install dev container CLI itself
sudo apt install npm
sudo npm install -g @devcontainers/cli
Setup dev container
- Building:
devcontainer up --workspace-folder ./ebcl_template/ - Execute a command inside
devcontainer exec --workspace-folder ./ebcl_template/ <command>
Build an image
Building an image can be done quite similar to the usual workflow in VS Code.
devcontainer exec --workspace-folder ./ebcl_template/ bash
(venv) ebcl@25b055e27967:/workspace$ cd images/amd64/appdev/qemu/ebcl_1.x_crinit
(venv) ebcl@25b055e27967:/workspace/images/amd64/appdev/qemu/ebcl_1.x_crinit$ task build
Build and deploy an application
Building an application can be done as described as the alternative method in here.
For deploying the built application the following steps can be used:
- Start Qemu in an additional terminal:
devcontainer exec --workspace-folder ./ebcl_template/ bash
(venv) ebcl@25b055e27967:/workspace$ cd images/amd64/appdev/qemu/ebcl_1.x_crinit
(venv) ebcl@25b055e27967:/workspace/images/amd64/appdev/qemu/ebcl_1.x_crinit$ task
- Ensure the ssh connection from your original devcontainer session:
TARGET=<preset> source /workspace/apps/common/deployment.targets && /workspace/apps/common/check_and_update_ssh_key.sh --prefix "$SSH_PREFIX" --port $SSH_PORT --user $SSH_USER --target $TARGET_IP
Where <preset> is the one also used when building the to be deployed application.
- Deploy the application from your original devcontainer session:
TARGET=<preset> source /workspace/apps/common/deployment.targets && $SSH_PREFIX rsync -rlptv -e "ssh -p $SSH_PORT" --exclude */include/* --exclude *.debug /workspace/results/apps/<application>/qemu-aarch64/build/install/ $SSH_USER@[$TARGET_IP]:/
Where <preset> is again the one also used when building the to be deployed application.
- Execute the application in the devcontainer with the QEMU session e.g.,
root@appdev:~# MyJsonApp
Exemplary application linked with jsoncpp library to parse a structure into json document
{
	"age" : 30,
	"city" : "New York",
	"name" : "John Doe"
}
Using EB corbos Linux SDK on arm64
The EB corbos Linux SDK is primary developed and tested on amd64 Linux hosts, but it is also possible to use it on arm64 hosts. It was tested once on a Raspberry Pi 5 8GB successfully.
Prepare the host
Please setup VisualStudio Code and Docker as described in Setup.
Prepare the dev container
The pre-built dev container is only available for amd64 hosts, so first the container needs to be build locally on arm64. First clone the EB corbos linux dev container repository from https://github.com/Elektrobit/ebcl_dev_container. Then build the container for arm64 by running the builder/build_container script.
Prepare the workspace
Next you need the EB corbos Linux template workspace. Clone the template git repository from https://github.com/Elektrobit/ebcl_template. Then open Visual Studio Code and install the dev container extension. Open the workspace file ebcl_sdk.code-workspace. Press the “Reopen in container” button of the popup or open the VS code shell by pressing Ctrl + Shift + P and select the “Reopen in container” command.
Build an arm64 image
Now you can build arm64 images.
Open the folder containing the image description you want to build,
e.g. /workspace/images/arm64/qemu/ebcl/crinit,
in the integrated terminal in the dev container.
Then run make to build the image.
The build results are stored in a new created build subfolder.
In case of QEMU images, the QEMU VM will be started automatically.
Cross-building
Cross building is supported when the host allows execution of binaries of the target architecture.
To allow executing binaries for different architectures, install binfmt support.
On Ubuntu, you can install it by running: sudo apt install binfmt-support qemu qemu-user-static.
Then you can build the image in the same was as the arm64 images.
Open the image folder in the terminal in the dev container,
e.g. /workspace/images/amd64/qemu/ebcl/crinit.
Then run the image build by executing make in the folder.
Developing images
EB corbos Linux is intended as an embedded Linux distribution build kit, like Yocto. Instead of starting from a pre-defined and pre-configured already integrated image, the user can describe the image needed to solve the problem in an easy, clean and maintainable way, and the EB corbos Linux SDK will build exactly this image. In comparison to Yocto, where all packages are built from scratch, EB corbos Linux is using the packages from the Canonical Ubuntu distribution. This has the advantage that the same binaries are used which run on millions of servers in the cloud, and millions of single board computers. The effort to qualify and security-maintain these packages is shared with all these users. To keep all these advantages, it is mandatory to use the pre-built binaries, and accept the limitations caused by this.
We also know from our experience with automotive ECUs that embedded solutions often have very special needs, and that it may be not possible to stick with the defaults set by Canonical Ubuntu in all cases. For such edge cases, the EBcL SDK provides everything to modify a package, and use the modified variant instead of the default package. If this way is chosen, large parts of the benefits of the Canonical packages are dropped, and a solution specific maintenance and qualification is needed, causing effort over the whole lifetime of the embedded solution.
Customers of EB corbos Linux can order such adaptations, including the qualification and maintenance of the customer specific package, as an add-on to the EB corbos Linux base offer. Using the defaults where possible, and adapt where really needed, delivers the needed flexibility for complex embedded solutions, while minimizing the development, qualification and maintenance efforts.
Image concept
EB corbos Linux is designed to build embedded high-performance controllers. Such systems typically use quite powerful and complex arm64 SoCs, and involve hypervisors, real-time operating systems, trusted execution environments, and a non-trivial boot process involving secure boot. The requirements from the SoC and the bootloaders to the required eMMC storage layout is often complex and quite different between different SoCs. To tackle this challenge, EB corbos Linux considers all the different boxes in the diagram above as separate build artifacts, which can be binary integrated into an overall image as the last build step. These build steps are organized using Taskfile, and the EB corbos Linux SDK provides small helper tools to create these artifacts. The integration, if needed, is done using Embdgen, an Elektrobit-launched open-source tool, which is able to create binary images in various formats from different binary artifacts.
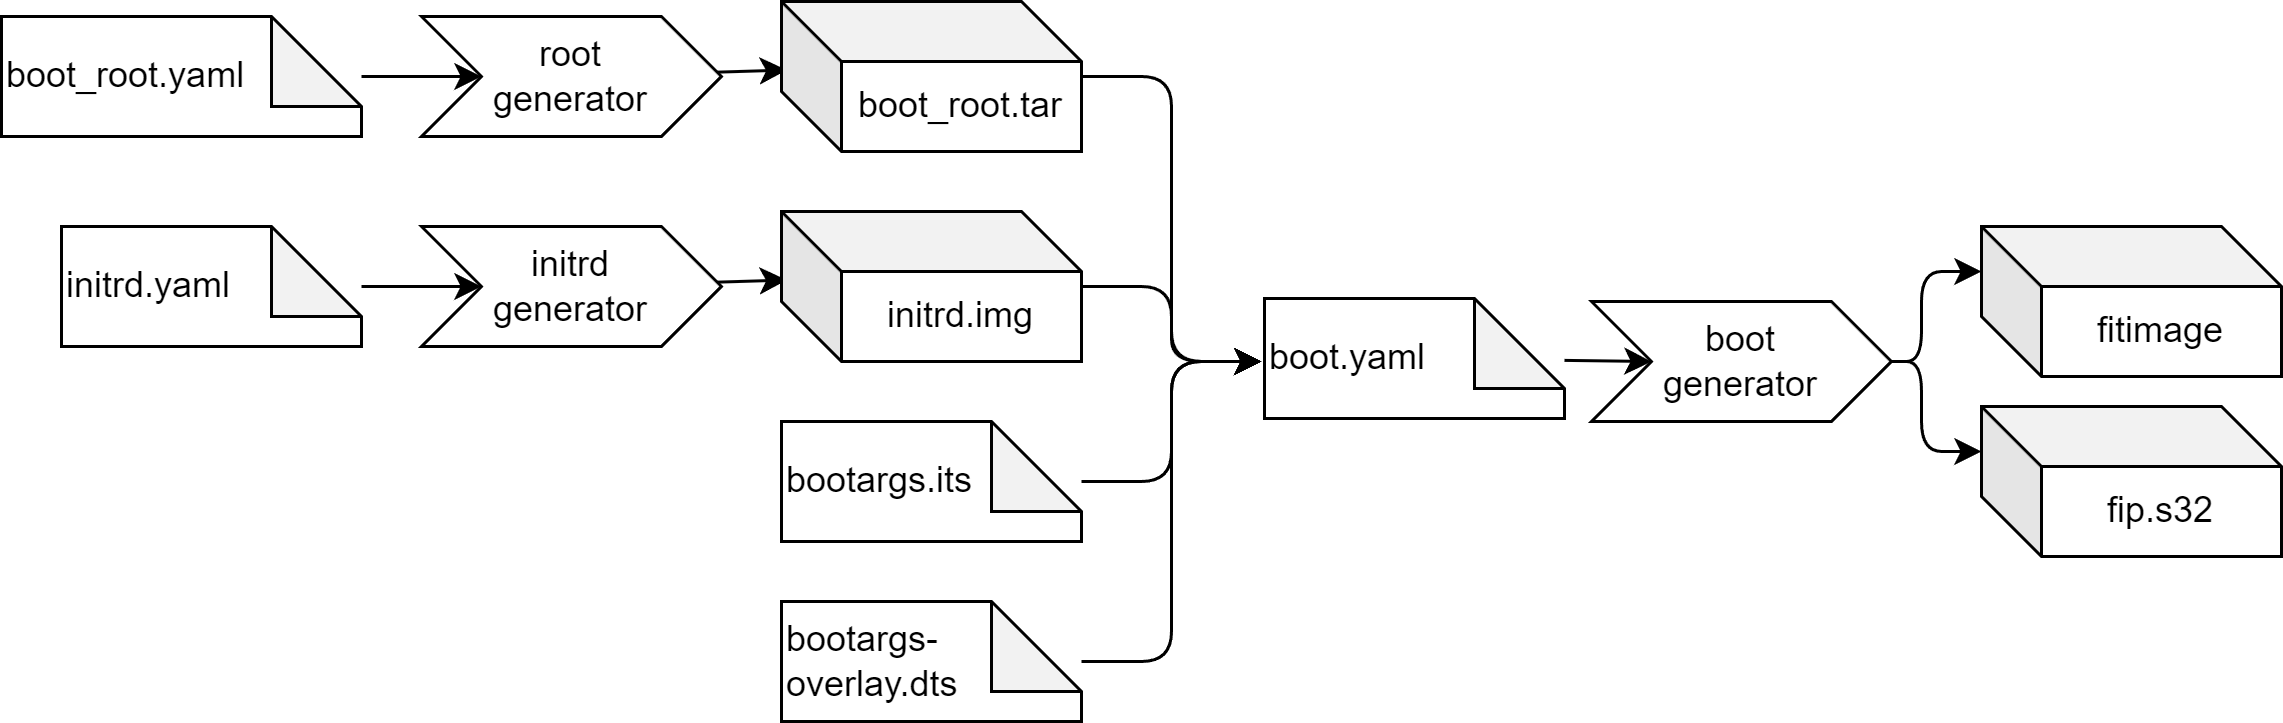
Let’s take a closer look at this build for the very simple QEMU build target. Typically QEMU gets a disc image, a Linux kernel binary and optionally an initrd.img, together with some configuration parameters.
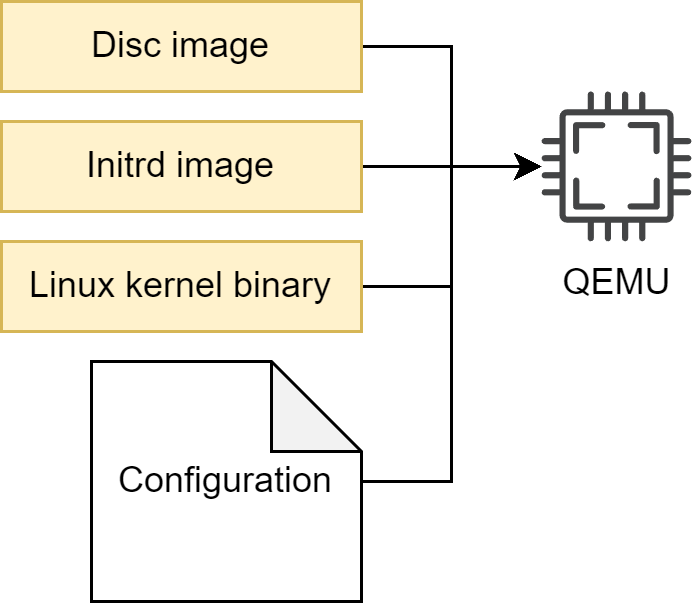
From a run-time point of view, there are dependencies between these three artifacts caused by the used kernel version. The used kernel modules need to fit to the used kernel, and the C library used in the root filesystem must fit to the used kernel interface. From a build-time point of view, and also for our QEMU target point of view, these are three different artifacts. This has an important impact on the development process and workflow. If the initrd behavior shall change, only the initrd image needs to be rebuilt.
EB corbos Linux makes use of a set of small helper tools to support a flexible build flow and optimized build speed and development experience. These tools read yaml configuration files to specify the generated artifacts. To avoid redundant configuration, these configuration files support hierarchical includes. For the QEMU example the full build flow is:
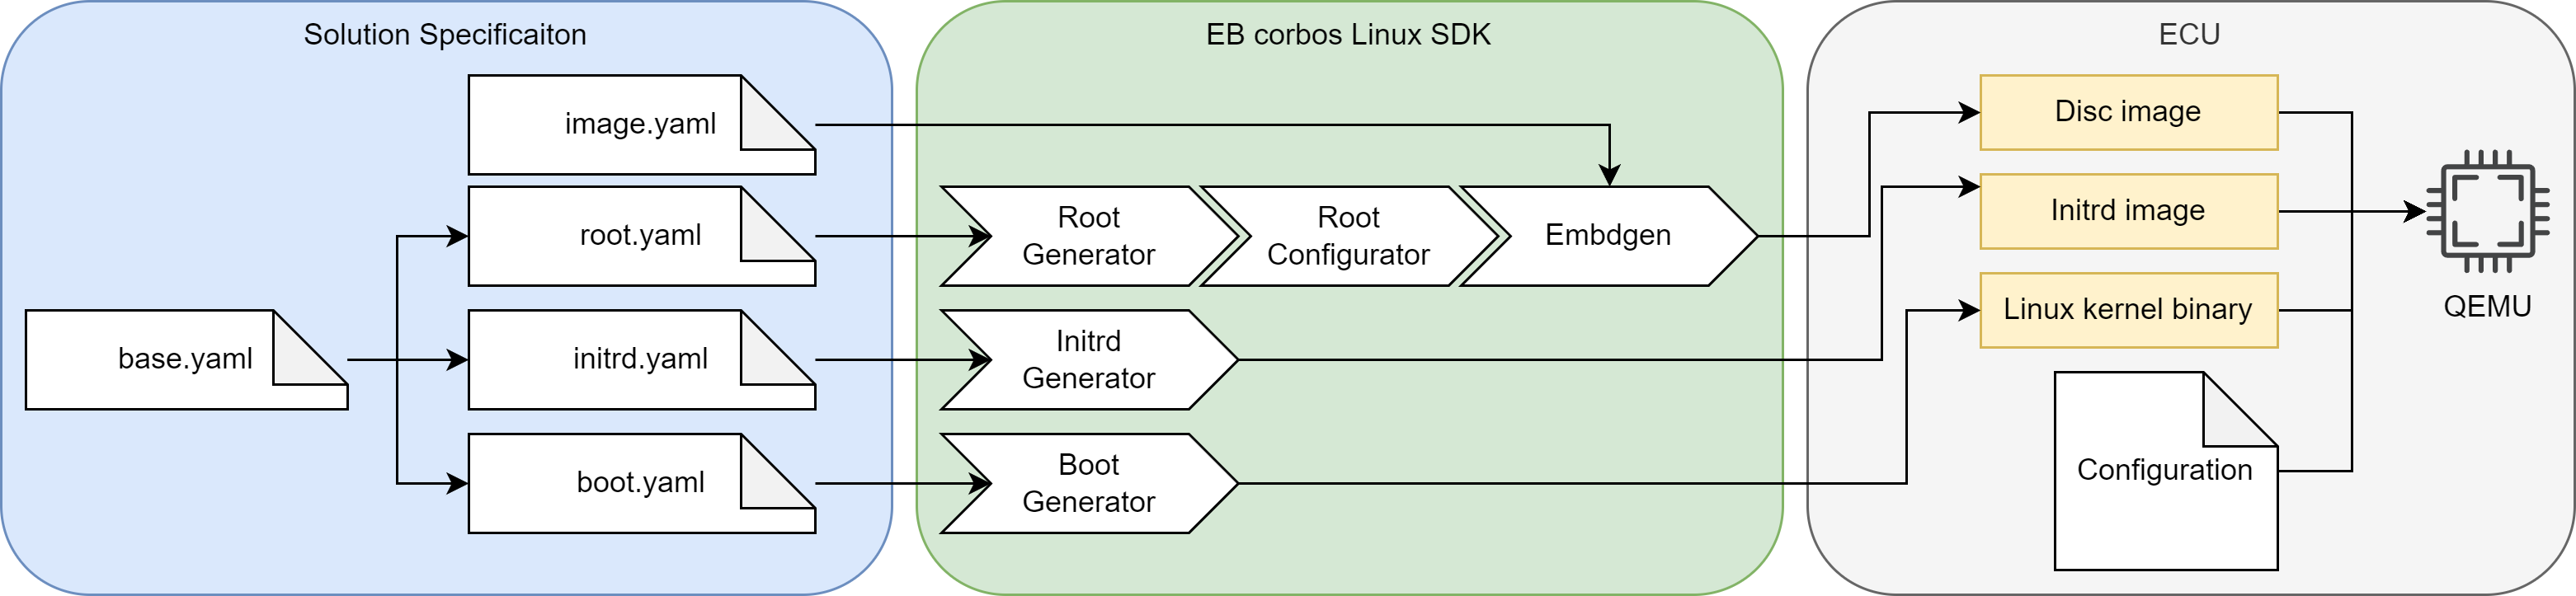
The image.yaml defines the storage layout, and is used as input for the embdgen integration step. The base.yaml contains the common configuration, like used apt repositories, and is included by the specifications of the different artifacts. The root.yaml describes the root filesystem of the Linux VM. This file system is generated using debootstrap, installing additional required packages, and finally applying solution specific configuration, given as overlay files or scripts. The debootstrap and package installation step is handled by the root generator. This quite time-consuming step only needs to be repeated when the package selection is changed. The root configurator applies the solution specific configuration. The output of these two steps is a tarball of the root filesystem content. Embdgen is used to convert this tarball into a disc image. The initrd.yaml specifies the content of the initrd.img. For QEMU, we need to load the virt-IO block driver, to be able to mount the root filesystem. The boot.yaml specifies the kernel which shall be used, and the boot generator is used to download the right Debian packages and extract the kernel binary. The chaining of these tools is done using Taskfile.
Image specification
Let’s take a look at this QEMU build flow example in detail and see how the details of this solution are specified and the roles of the different build helper tools.
Let’s look at it from left to right. The base.yaml specifies the common aspects of all the generated artifacts. It configures the kernel package, the used apt repositories and the target CPU architecture.
# Kernel package to use
kernel: linux-generic
# Apt repositories to use
apt_repos:
  - apt_repo: http://ports.ubuntu.com/ubuntu-ports
    distro: jammy
    components:
      - main
      - universe
  - apt_repo: http://ports.ubuntu.com/ubuntu-ports
    distro: jammy-security
    components:
      - main
      - universe
# CPU architecture
arch: arm64
The boot.yaml builds on top of the base.yaml. It specifies to download the dependencies of the used kernel package, which is necessary if a meta-package is used, and it specifies that the config* and vmlinuz* files from the boot folder shall be used as results. The tar flag specifies that the results shall not be bundled as a tarball, but instead directly copied to the output folder.
# Derive values from base.yaml - relative path
base: base.yaml
# Download dependencies of the kernel package - necessary if meta-package is specified
download_deps: true
# Files to copy from the packages
files:
  - boot/vmlinuz*
  - boot/config*
# Do not pack the files as tar - we need to provide the kernel binary to QEMU
tar: false
The boot generator reads this configuration, and the base.yaml, downloads and extracts the package linux-generic and its dependencies to a temporary folder, and copies the kernel binary and kernel configuration to the given output folder. In general, the boot generator is the tool to automate the build steps of the boot artifacts, like kernel collection and generation of SoC specific binary artifacts.
Let’s now take a look at the initrd.img generation. The initrd images created by the tooling from the server and desktop world are very flexible and complete from a feature point of view, but completely bloated from an embedded point of view. Since we know our target hardware and software in detail, we don’t need flexibility, but typically we want to have the best startup performance we can squeeze out of the used hardware. The initrd generator is a small helper tool to build a minimal initrd.img, to get the best possible startup performance. It also helps to fast and easily customize the initrd content, e.g. for implementing a secure boot solution.
# Derive values from base.yaml - relative path
base: base.yaml
# Root device to mount
root_device: /dev/vda1
# List of kernel modules
modules:
  - kernel/drivers/block/virtio_blk.ko # virtio_blk is needed for QEMU
The initrd specification also derives the values from the base.yaml, and specifies that the /dev/vda1 shall be used as device for the root filesystem. Since the Canonical default kernel has no built-in support for virt-IO block devices, we have to load this driver in the initrd.img, to be able to mount the root filesystem. This is done by specifying the kernel module in the modules list. Because of this line, the initrd generator downloads and extracts the specified kernel package and its dependencies, detects the kernel version, gets the right module, adds it to the initrd.img, and loads it before mounting the root filesystem. How this works in detail will be described in the later chapters.
# Derive the base configuration
base: base.yaml
# Reset the kernel - should not be installed
kernel: null
# Name of the archive.
name: ubuntu
# Packages to install in the root tarball
packages:
  - systemd
  - udev        # udev will create the device node for ttyS0
  - util-linux
# Scripts to configure the root tarball
scripts:
  - name: config_root.sh # Name of the script, relative path to this file
    env: chroot # Type of execution environment
The last missing artifact is our root filesystem. The root.yaml describes the used root filesystem. It doesn’t need to contain a kernel, since the kernel is provided separately to QEMU. For Debian based distributions, a minimal set of required packages are specified by the used base distribution, in our case Ubuntu Jammy. These packages are installed automatically, and we only need to specify what we want to have on top. In this case, it is systemd as init manager, udev to create the device nodes, and util-linux to provide the basic CLI tools. In addition, a config script is specified which adapts the configuration to our needs. This script is executed in a chroot environment. The name is used as the name for the resulting tarball of the root filesystem.
The build flow is using the root generator and the root configurator to separate the installation and configuration steps. The installation step takes much longer than the configuration step, and it only needs to be repeated when the package selection was adapted. This separation allows a fast iterative configuration of the root filesystem.
The last step is to convert the configured root tarball into a disc image. The storage layout is specified in the image.yaml, and is picked up by embdgen. For the QEMU image we use a simple gpt partition table based image with only one partition. This partition is using the ext4 file format, has a size of 2 GB, and is filled with the contents of our root tarball.
# Partition layout of the image
# For more details see https://elektrobit.github.io/embdgen/index.html
image:
  type: gpt
  boot_partition: root

  parts:
    - name: root
      type: partition
      fstype: ext4
      size: 2 GB
      content:
        type: ext4
        content:
          type: archive
          archive: build/ubuntu.config.tar
All together, we have a complete specification of our embedded solution, targeting QEMU as our virtual hardware.
Configuration parameters
The following list gives an overview of the supported configuration parameters for the EB corbos Linux build helper tools. In the round brackets it is noted for which files which option is applicable. Embdgen is developed separately, and the details and options for the storage specification is documented in the embdgen documentation.
-
base (boot/initrd/root/config) [default: None ]: Parent configuration file. If specified, the values from the parent file will be used if not otherwise specified in the current file.
-
arch (boot/initrd/root) [default: arm64 ]: The CPU architecture of the target hardware. The supported values are arm64, amd64 and armhf.
-
use_fakeroot (boot/initrd/root/config) [default: False ]: Use fakeroot in the generator tools where possible, instead of sudo and chroot. This may cause issues for edge-cases.
-
apt_repos (boot/initrd/root) [default: None ]: A list of apt repositories to download the required Debian packages. Example:
apt_repos:
  - apt_repo: http://archive.ubuntu.com/ubuntu
    distro: jammy
    components:
      - main
      - universe
  - apt_repo: http://archive.ubuntu.com/ubuntu
    distro: jammy-security
    components:
      - main
      - universe
In addition, an armored public key file or URL can be given as “key”, and a unarmored gpg file can be given as “gpg”, to authenticate the package sources.
NOTE:
If apt repositories require authentication, credential files (*.conf files in netrc format) can be placed in ~/.ebcl_config/auth.d/ on the host before the container is started or directly created in the /workspace/tools/user_config/auth.d directory of the devcontainer.
Example when using apt repositories from artifactory-central.elektrobit.com:
a) Generate an access token by clicking the Generate an Identity token button in artifactory’s user_profile
b) Add a credential file called artifactory.conf in ~/.ebcl_config/auth.d/ on the host or in /workspace/tools/user_config/auth.d of the devcontainer
machine artifactory-central.elektrobit.com
login <UserID>
password <Access token generated in first step>
-
use_ebcl_apt (boot/initrd/root) [default: No ]: If yes, the public apt repository of the EB corbos Linux will be added. By default, the latest release will be used if the ebcl_version parameter is not given. This is a convenience feature, but be aware that this public apt repository doesn’t provide customer specific or proprietary packages.
-
ebcl_version (boot/initrd/root) [default: latest release ]: EB corbos Linux release version, for the automatically generated apt repository.
-
host_files (boot/initrd/root) [default: None ]: Files to include from the host or container environment. Example:
host_files:
  - source: bootargs-overlay.dts
    destination: boot
  - source: bootargs.its
    destination: boot
The destination is the path in the target root filesystem or chroot environment. In addition, the parameters “mode”, to specify the mode of the file, “uid”, to specify the owner of the file, and “gid”, to specify the owning group of the file, can be used. If an included file also is included in a Package that is installed, the host_files takes precedence.
- files (boot) [default: None ]: Files to get as result from the chroot environment. Example:
files:
  - boot/vmlinuz*
  - boot/config*
These files can be part of an extracted Debian package, or result of a script executed in the chroot environment.
- scripts (boot/initrd/root/config) [default: None ]: The scripts which shall be executed.
scripts:
  - name: config_root.sh
    env: chroot
The supported environments are “chroot”, to run the script in a chroot environment, “fake”, to run the script in a fakeroot environment, “sudo” to run the script with root privileges, or “shell” to run the script in a plain shell environment. For “chroot” the script will be placed at “/” and executed from this folder. For all other environments, the current work directory will be the folder containing the target environment. In addition, parameters which are forwarded to the script can be provided as “params”.
-
template (initrd/root) [default: None ]: A Jinja2 template to create a configuration. In case of the initrd generator, a template for the init script can be provided. In case of the root generator, a template for the kiwi-ng XML image specification can be provided.
-
name (boot/initrd/root) [default: None ]: A name which is used in the filenames of the generated artifacts.
-
download_deps (boot/initrd) [default: True ]: Download the dependencies of the specified packages. This parameter must be True, to use e.g. a meta-package for the kernel binary and modules.
-
base_tarball (boot/initrd) [default: None ]: A base chroot environment for generating the boot artifacts and for the initrd.img. If no base chroot environment is given, a minimal busybox based environment will be used.
-
packages (boot/initrd/root/config) [default: None ]: A list of packages. For the root generator, these packages are installed in the base debootstrap environment. For the initrd generator, these packages will be downloaded, extracted and integrated into the resulting initrd.img. For the boot generator, these packages will be downloaded and extracted to get the kernel binary.
-
kernel (boot/initrd/root) [default: None ]: Name of the kernel package. For the initrd generator, these packages will be downloaded and extracted to a temporary folder to get the required kernel modules.
-
tar (boot) [default: True ]: Flag for packing the boot artifacts as a tarball. If embdgen is used to write the artifacts to an image, this will preserve the owner and mode of the artifacts.
-
busybox (initrd) [default: busybox-static ]: Name of the busybox package for the minimal busybox environment.
-
modules (initrd) [default: None ]: List of kernel modules to add and load from the initrd.img. Example:
modules:
  - kernel/drivers/virtio/virtio.ko
  - kernel/drivers/virtio/virtio_ring.ko
  - kernel/drivers/block/virtio_blk.ko
  - kernel/net/core/failover.ko
  - kernel/drivers/net/net_failover.ko
  - kernel/drivers/net/virtio_net.ko
-
root_device (initrd) [default: None ]: Name of the root device to mount.
-
devices (initrd) [default: None ]: List of device nodes to add. Example:
devices:
  - name: mmcblk1
    type: block
    major: 8
    minor: 0
  - name: console
    type: char
    major: 5
    minor: 1
In addition, the parameters “mode”, to specify the mode of the device node, “uid”, to specify the owner of the device node, and “gid”, to specify the owning group of the device node, can be used.
-
kernel_version (initrd) [default: auto detected ]: The kernel version of the copied modules.
-
modules_folder (initrd) [default: None ]: A folder in the host or container environment containing the kernel modules. This can be used to provide modules from a local kernel build. Example:
modules_folder: $$RESULTS$$
The string $$RESULTS$$ will be replaced with the path to the output folder, for all paths given in yaml config files of the build tools.
-
result_pattern (root) [default: auto detected ]: A name pattern to match the build result, e.g. *.tar.xz for kiwi-ng tbz builds.
-
image (boot/initrd/root/config) [default: None ]: A kiwi-ng XML image description. This parameter can be used to integrate old image descriptions into new build flows.
-
berrymill_conf (root) [default: None ]: A berrymill.conf used for berrymill build. If none is given, the configuration will be automatically generated using the provided apt repositories. This parameter can be used to integrate old image descriptions into new build flows.
-
use_berrymill (root) [default: True ]: Flag to use berrymill for kiwi-ng build. If this flag is set to false, kiwi-ng will be called without the berrymill wrapper.
-
use_bootstrap_package (root) [default: True ]: Flag if a bootstrap package shall be used for kiwi-ng builds. If this flag is set to True, one of the specified repositories needs to provide the bootstrap package.
-
bootstrap_package (root) [default: bootstrap-root-ubuntu-jammy ]: Name of the bootstrap package for the kiwi-ng build.
-
bootstrap (root) [default: None ]: List of additional bootstrap packages for the kiwi-ng build.
-
kiwi_root_overlays (root) [default: None ]: List of root overlay folders for the kiwi-ng build.
-
use_kiwi_defaults (root) [default: True ]: If this flag is true, the “root” folder and the kiwi-ng config scripts next to the appliance.kiwi, will be provided to kiwi-ng.
-
kiwi_scripts (root) [default: None ]: List of additional scripts which will be provided to kiwi-ng during the build.
-
kvm (root) [default: True ]: Flag if KVM acceleration shall be used for kiwi-ng builds.
-
image_version (root) [default: 1.0.0 ]: Image version for the generated kiwi-ng image description.
-
type (root) [default: debootstrap ]: Type of the root filesystem generator to use. The supported generators are “debootstrap” and “kiwi”.
-
primary_repo (root) [default: auto selected Ubuntu Jammy repository ]: The primary apt repository for the debootstrap or kiwi-ng build. The main component of this repository is used for debootstrap.
-
primary_distro (root) [default: jammy ]: The name of the distribution used for debootstrap.
-
root_password (root) [default: linux ]: The root password of the generated root filesystem.
-
hostname (root) [default: ebcl ]: The hostname of the generated root filesystem.
-
domain (root) [default: elektrobit.com ]: The domain name of the generated root filesystem.
-
console (root) [default: auto configured ]: The console parameter of the generated root filesystem. If none is given, “ttyS0,115200” is used for amd64, and “ttyAMA0,115200” is used for amd64.
-
sysroot_packages (boot/initrd/root/config) [default: None ]: List of additional packages which shall be installed for sysroot builds. This can be used to add additional development headers.
-
sysroot_defaults (boot/initrd/root/config) [default: True ]: Flag if the default additional packages for sysroot builds shall be added. If yes, in addition to the specified packages the packages “build-essential” and “g++” will be added.
Building an image from scratch
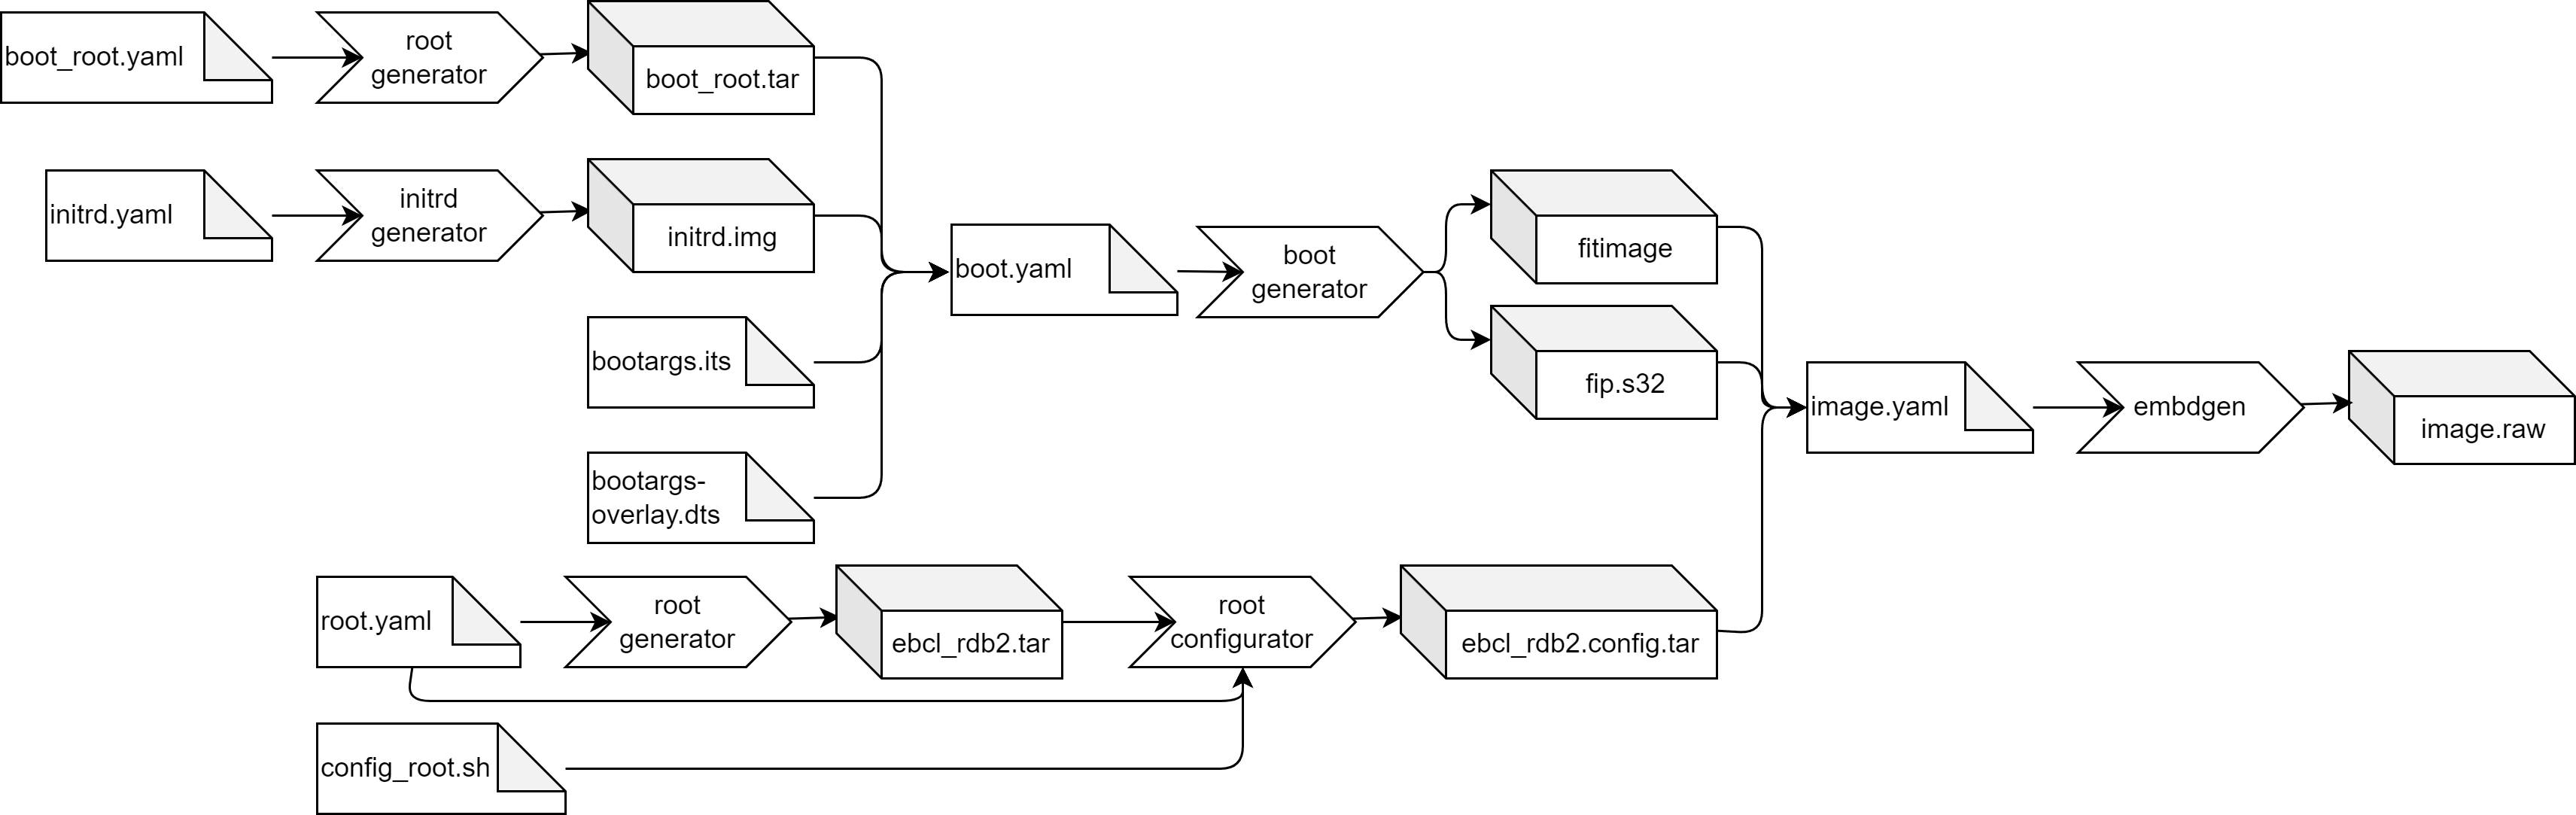
Let’s develop a new EB corbos Linux image step by step, for the NXP RDB2 board using the NXP S32G2 SoC. According to the NXP S32G2 user manual, the following bootloader layout is required:
The space between 0x0 and 0x1d_3000 is occupied by some or all of the following components: IVT, QSPI Parameters, DCD, HSE_FW, SYS_IMG, Application Boot Code Header, TF-A FIP image. The actual layout is determined at boot time and can be obtained from the arm-trusted-firmware.
IVT: Offset: 0x1000 Size: 0x100 AppBootCode Header: Offset: 0x1200 Size: 0x40 U-Boot/FIP: Offset: 0x1240 Size: 0x3d400 U-Boot Environment: Offset: 0x1e0000 Size: 0x2000
For SD/eMMC the partitioned space begins at 0x1d_3000.
For our SD card image, this means, the first 256B of the FIP image containing the ATF and the U-Boot needs to be written to block 0, then a gap of 0x2000 B is required, at position 0x1e0000 B, for the U-Boot env, and then the remaining part of the ATF and U-Boot image can be written. The partition table and partitions come afterwards.
Further the user manual describes that the kernel can be provided as a FIT image, and one way to provide this FIT image is to put it on the first partition, which has to be FAT32, using the name fitimage.
All these requirements can be fulfilled with the following embdgen image description:
# Partition layout of the image
# For more details see https://elektrobit.github.io/embdgen/index.html
image:
  type: mbr
  boot_partition: boot

  parts:
    - name: u-boot part 1
      type: raw
      start: 0
      size:  256 B
      content:
        type:  raw
        file:  out/fip.s32

    - name: u-boot part 2
      type: raw
      start:  512 B
      content:
        type:   raw
        file:   out/fip.s32
        offset: 512 B

    - name: uboot.env
      type:  empty
      start: 0x1e0000 B
      size:  0x2000 B

    - name: boot
      type: partition
      fstype: fat32
      content:
        type: fat32
        content:
          type: files
          files:
            - out/fitimage
      size: 100 MB

    - name: root
      type: partition
      fstype: ext4
      size: 2 GB
      content:
        type: ext4
        content:
          type: archive
          archive: out/ebcl_rdb2.config.tar
You may notice that this image description requires three artifacts:
-
fip.s32: This is the binary image containing the arm trusted firmware (ATF) and the U-Boot bootloader.
-
fitimage: This is the binary flattened image tree (FIT) containing the kernel and device tree.
-
ebcl_rdb2.config.tar: This is a tarball containing the contents of our Linux root filesystem.
Since the NXP S32G2 SoC is supported by EB corbos Linux, a FIP image and a kernel binary is provided as part of the releases and free download. The fip.s32 image is contained in the Debian package arm-trusted-firmware-s32g, and provided on https://linux.elektrobit.com/eb-corbos-linux/1.2 as part of the distribution ebcl_nxp_public in the component nxp_public. The kernel binary and modules are provided by the same distro and component, packaged as linux-image-unsigned-5.15.0-1042-s32-eb-optimized, linux-modules-5.15.0-1042-s32-eb-optimized and linux-modules-extra-5.15.0-1042-s32-eb-optimized.
The tooling to build the fitimage is contained in the packages u-boot-s32-tools, arm-trusted-firmware-s32g, device-tree-compiler, and nautilos-uboot-tools. We need to install these tools in some environment to be able to build the fitimage. Adding them to the root filesystem would be a possibility, but not a good one, since this would bloat the root filesystem and also gives very useful tools to an attacker trying to hack our embedded solution. Since the tooling is only needed during build time, a better approach is to install it in a separate environment. This could be our build host, but since we want reproducible builds, the better solution is to use the root generator to define and create a well specified chroot build environment.
Let’s first define some common settings used by our image overall, as base.yaml:
# Kernel package to use
kernel: linux-image-unsigned-5.15.0-1023-s32-eb
# CPU architecture
arch: arm64
# Add the EB corbos Linux apt repo
use_ebcl_apt: true
# Add repo with NXP RDB2 packages
apt_repos:
  - apt_repo: http://linux.elektrobit.com/eb-corbos-linux/1.2
    distro: ebcl_nxp_public
    components:
      - nxp_public
    key: file:///build/keys/elektrobit.pub
    gpg: /etc/berrymill/keyrings.d/elektrobit.gpg
This base.yaml states that we want to use the kernel package linux-image-unsigned-5.15.0-1042-s32-eb-optimized, build an arm64 image, and task use of the default EBcL apt repository, and the EBcL NXP additions. Now we can base on this file and define our fitimage build environment as boot_root.yaml:
# Derive values from base.yaml - relative path
base: base.yaml
# Name of the boot root archive
name: boot_root
# Packages for boot_root.tar
packages:
  - linux-image-unsigned-5.15.0-1023-s32-eb
  - linux-modules-5.15.0-1023-s32-eb
  - linux-modules-extra-5.15.0-1023-s32-eb
  - u-boot-s32-tools
  - arm-trusted-firmware-s32g
  - device-tree-compiler
  - nautilos-uboot-tools
We install all the above mentioned packages into this environment. For building the fitimage, and for extracting the fip.s32, we can task use of the boot generator:
# Derive values from base.yaml - relative path
base: base.yaml
# Reset the kernel value - we don't want to download and extract it
kernel: null
# Do not pack the files as tar
tar: false
# do not download and extract these packages, they are already installed in the boot_root.tar
use_packages: false
# Name of the boot root archive
base_tarball: $$RESULTS$$/boot_root.tar
# Files to copy form the host environment
host_files:
  - source: bootargs-overlay.dts
    destination: boot
  - source: bootargs.its
    destination: boot
  - source: $$RESULTS$$/initrd.img
    destination: boot
    base_dir: .
# Scripts to build the fitimage and fip.s32
scripts:
  - name: build_fitimage.sh # Build the fitimage in the boot_root.tar environment
    env: chroot
# Files to copy to the build folder
files:
  - boot/fip.s32
  - boot/fitimage
The kernel is already part of the chroot tarball environment, and we don’t need to download it again.
We need to provide the fitimage and fip.s32 binaries directly to embdgen, so we don’t want to pack it.
The tarball created by the root generator will be named “boot_root.tar”, because of the name given in the boot_root.yaml. Because of the “base_tarball” parameter, the boot generator will pick up the tarball, extract it and chroot into this environment.
The boot generator will also replace the string $$RESULTS$$ with the path to the given output folder.
In addition, we need the files “bootargs-overlay.dts”, “bootargs.its” and $$RESULTS$$/initrd.img in the host environment.
These files will be copied into the chroot environment and used for building the fitimage.
The script build_fitimage.sh implements the fitimage building.
When this script has done its job, the files fip.s32 and fitimage will be copied to the output folder.
To use this recipe, we first need the input artifacts. The bootargs.its is the fitimage description we need to provide. The following description will do the job:
/dts-v1/;
/ {
  description = "BaseOS Boot Image";
  #address-cells = <1>;
  images {
    kernel-1 {
      description = "Linux kernel image";
      data = /incbin/("Image");
      type = "kernel";
      arch = "arm64";
      os = "linux";
      compression = "none";
      load = <0x80000000>;
      entry = <0x80000000>;
      hash-1 { algo = "md5"; };
    };
    fdt-1 {
      description = "Flattened device tree blob";
      data = /incbin/("target.dtb");
      type = "flat_dt";
      arch = "arm64";
      compression = "none";
      hash-1 { algo = "md5"; };
    };
    ramdisk-1 {
      description = "Initial ramdisk image";
      data = /incbin/("initrd");
      type = "ramdisk";
      arch = "arm64";
      os = "linux";
      compression = "gzip";
      load =  <0x90000000>;
      entry = <0x90000000>;
      hash-1 { algo = "md5"; };
    };
  };
  configurations {
    default = "config-1";
    config-1 {
      description = "Default boot config";
      kernel = "kernel-1";
      ramdisk = "ramdisk-1";
      fdt = "fdt-1";
    };
  };
};
It describes a fitimage consisting of a kernel binary, a device tree and an initrd.img.
The bootargs-overlay.dts is the U-Boot configuration:
/dts-v1/;
/plugin/;

&{/chosen} {
    bootargs = "console=ttyLF0,115200 earlycon nohz=off coherent_pool=64M root=/dev/mmcblk0p2 selinux=0 rw";
};
The initrd.img is the initial ramdisk we want to use. We can use the initrd generator to create such an initrd.img which fits our needs. As long as we don’t want to implement secure boot, your needs are quite small. We just want to use /dev/mmcblk0p2 as root partition, which is partition two of the internal eMMC storage.
# Derive values from base.yaml - relative path
base: base.yaml
# Reset the kernel value - we don't want to download and extract it
kernel: null
# Root device to mount
root_device: /dev/mmcblk0p2
Running the initrd generator with this spec will create us a minimal initrd.img.
The final missing input is the script to generate the fitimage. We can use the following script:
#!/bin/sh

set -e

#======================
# Get NXP S32G ATF (secure boot image)
#---------------------------------------
cp /usr/lib/arm-trusted-firmware-s32g/s32g274ardb2/fip.s32 \
    /boot/fip.s32

#======================
# Rename kernel
#---------------------------------------
echo "Rename kernel..."
if [ ! -f /boot/vmlinuz ]; then
    mv /boot/vmlinuz-* /boot/Image
fi
mv /boot/vmlinuz /boot/Image
mv /boot/initrd.img /boot/initrd

#======================
# Get NXP S32G device tree
#---------------------------------------
cp /lib/firmware/*/device-tree/freescale/s32g274a-rdb2.dtb \
    /boot/fsl-s32g274a-rdb2.dtb

#======================
# Create fit image
#---------------------------------------
cd /boot

dtc -I dts -O dtb -o bootargs-overlay.dtbo bootargs-overlay.dts

fdtoverlay -i fsl-s32g274a-rdb2.dtb -o target.dtb bootargs-overlay.dtbo
ls -lah bootargs-overlay.dtbo

mkimage -f bootargs.its fitimage
Now we are prepared to build our fitimage, and get the fip.s32 binary.
We can build the initrd.img using the command initrd_generator initrd.yaml ./build,
then we can build the boot_root.tar using the command root_generator boot_root.yaml ./build,
and finally we can build the fitimage using the command boot_generator boot.yaml ./build.
To avoid typing all these commands by hand, we can use Taskfile. Most of these build steps are very generic, and it makes sense to use some template tasks to avoid repetition. You can find these template tasks at images/tasks. Let’s make use of these tasks to build our image.
To build the initrd.img, we can make use of the build task of the images/tasks/InitrdGenerator.yml.
# yaml-language-server: $schema=https://taskfile.dev/schema.json
version: '3'

tasks:
  build:
    desc: The initrd image is build using the initrd generator.
    vars:
      result_folder: '{{.result_folder | default "./build/"}}'
      base_spec: '{{.base_spec | default "base.yaml"}}'
      initrd_spec: '{{.initrd_spec | default "initrd.yaml"}}'
      initrd_img: '{{.initrd_img | default "initrd.img"}}'
    cmds:
      - mkdir -p {{.result_folder}}
      - set -o pipefail && initrd_generator {{.initrd_spec}} {{.result_folder}} 2>&1 | tee {{.result_folder}}{{.initrd_img}}.log
    sources:
      - '{{.base_spec}}'
      - '{{.initrd_spec}}'
    generates:
      - '{{.result_folder}}{{.initrd_img}}'
The default variable values fit for our image description, and we can build the initrd.img by calling this task from your Taskfile.yml.
# yaml-language-server: $schema=https://taskfile.dev/schema.json
version: '3'

vars:
  common_tasks: /workspace/images/tasks/

includes:
  initrd: '{{.common_tasks}}InitrdGenerator.yml'

tasks:
  default:
    aliases: [build]
    desc: Build the NXP RDB2 image
    cmds:
      - task: initrd:build
    method: none
Using a common_tasks variable makes it easy to change the template tasks location.
The default task, which is executed if we run task in the image folder,
will make use of the build task form the initrd import, to build our initrd.img.
The alias build ensures that the default task is also executed when we run task build
in the image folder.
Next we need to prepare the fitimage build environment, which we specified in boot_root.yaml. To do this, we can make use of the build task of the template tasks file images/tasks/RootGenerator.yml.
...

tasks:
  build:
    desc: |
            Use the root generator to build the base root filesystem tarball.
            This fist step only installs the specified packages. User configuration
            is done as a second step, because the build of this tarball is quite
            time consuming and configuration is fast. This is an optimization for
            the image development process.
    vars:
      result_folder: '{{.result_folder | default "./build/"}}'
      base_spec: '{{.base_spec | default "base.yaml"}}'
      root_spec: '{{.root_spec | default "root.yaml"}}'
      base_root_spec: '{{.base_root_spec | default "../root_common.yaml"}}'
      base_tarball: '{{.base_tarball | default "root.tar"}}'
    cmds:
      - mkdir -p {{.result_folder}}
      - set -o pipefail && root_generator --no-config {{.root_spec}} {{.result_folder}} 2>&1 | tee {{.result_folder}}{{.base_tarball}}.log
    preconditions:
      - test -f {{.root_spec}}
    sources:
      - '{{.base_spec}}'
      - '{{.root_spec}}'
      - '{{.base_root_spec}}'
    generates:
      - '{{.result_folder}}{{.base_tarball}}'

...
This time, we need to adapt some of the default variables. We can do this by defining the variables as part of the task step.
# yaml-language-server: $schema=https://taskfile.dev/schema.json
version: '3'

vars:
  common_tasks: /workspace/images/tasks/

includes:
  initrd: '{{.common_tasks}}InitrdGenerator.yml'
  root: '{{.common_tasks}}RootGenerator.yml'

tasks:
  default:
    aliases: [build]
    desc: Build the NXP RDB2 image
    cmds:
      - task: initrd:build
      - task: root:build
        vars:
          root_spec: boot_root.yaml
          base_tarball: boot_root.tar
    method: none
Now, we are ready to run the boot_generator and build the fitimage. Also for this step, we can make use of a template task. The file images/tasks/BootGenerator.yml contains a fitting task.
...
tasks:
  ...

  build_fitimage:
    desc: The boot generator is used to build the fitimage.
    vars:
      result_folder: '{{.result_folder | default "./build/"}}'
      base_spec: '{{.base_spec | default "base.yaml"}}'
      boot_spec: '{{.boot_spec | default "boot.yaml"}}'
      fitimage: '{{.kernel | default "fitimage"}}'
      build_script: '{{.build_script | default "build_fitimage.sh"}}'
      fitimage_config: '{{.build_script | default "bootargs.its"}}'
      bootloader_config: '{{.build_script | default "bootargs-overlay.dts"}}'
    cmds:
      - mkdir -p {{.result_folder}}
      # Delete old modules folder if exists
      - sudo rm -rf {{.result_folder}}modules
      - set -o pipefail && boot_generator {{.boot_spec}} {{.result_folder}} 2>&1 | tee {{.result_folder}}{{.fitimage}}.log
    preconditions:
      - test -f {{.boot_spec}}
    sources:
      - '{{.base_spec}}'
      - '{{.boot_spec}}'
    generates:
      - '{{.result_folder}}{{.kernel}}'
...
This will extract the fip.s32 Arm Trusted Firmware binary and build the fitimage, which includes the kernel binary and our initrd.img binary. To complete the image, we need a root filesystem which provides an init manager. For this image, we make use of systemd as init manager. In addition we add udev to automatically create the device nodes, and util-linux to provide the basic tools. The following root.yaml specifies everything we need.
base: ../base.yaml
packages:
  - systemd
  - udev        # udev will create the device node for ttyS0
  - util-linux
# Scripts to configure the root tarball
scripts:
  - name: config_root.sh # Name of the script, relative path to this file
    env: sudo
In addition to the packages, we need a config script to link our init manager as /sbin/init, which is the location expected by the kernel. The config_root.sh takes care of this.
#!/bin/sh

# Link systemd as init
ln -s /usr/lib/systemd/systemd ./sbin/init
To build the root filesystem tarball, we could run root_generator root.yaml ./build, or we extend our Taskfile.yml to also take care of this artifact.
# yaml-language-server: $schema=https://taskfile.dev/schema.json
version: '3'

vars:
  common_tasks: /workspace/images/tasks/

includes:
  initrd: '{{.common_tasks}}InitrdGenerator.yml'
  root: '{{.common_tasks}}RootGenerator.yml'
  boot: '{{.common_tasks}}BootGenerator.yml'

tasks:
  default:
    aliases: [build]
    desc: Build the NXP RDB2 image
    cmds:
      - task: initrd:build
      - task: root:build
        vars:
          root_spec: boot_root.yaml
          base_tarball: boot_root.tar
      - task: boot:build_fitimage
      - task: root:build
      - task: root:config
    method: none
The template tasks splits the image installation and the configuration step of building the root tarball. This is useful if you expect changes for the configuration, because the installation step is quite time consuming, and the configuration step is quite fast. This optimization can save you a lot of build time.
Finally we need to run embdgen to build our binary image.
This can be done manually running embdgen image.yaml ./build,
but we can also add it to our Taskfile.yaml.
We can make use of the template task provided in images/tasks/Embdgen.yml to run Embdgen.
tasks:
  build:
    desc: Use embdgen to build the disc image
    vars:
      result_folder: '{{.result_folder | default "./build/"}}'
      partition_layout: '{{.partition_layout | default "image.yaml"}}'
      disc_image: '{{.disc_image | default "image.raw"}}'
      root_tarball: '{{.root_tarball | default "root.config.tar"}}'
      firmware: '{{.firmware | default "fip.s32"}}'
      fitimage: '{{.fitimage | default "fitimage"}}'
    cmds:
      - mkdir -p  {{.result_folder}}
      - set -o pipefail && embdgen -o {{.result_folder}}{{.disc_image}} {{.partition_layout}} 2>&1 | tee {{.result_folder}}{{.disc_image}}.log
    preconditions:
       - test -f {{.partition_layout}}
       - test -f {{.result_folder}}{{.root_tarball}}
    sources:
       - '{{.partition_layout}}'
       - '{{.result_folder}}{{.root_tarball}}'
       - '{{.result_folder}}{{.firmware}}'
       - '{{.result_folder}}{{.fitimage}}'
    generates:
       - '{{.result_folder}}{{.disc_image}}'
The complete build process is then given in the following Taskfile.yml:
# yaml-language-server: $schema=https://taskfile.dev/schema.json
version: '3'

vars:
  common_tasks: /workspace/images/tasks/

includes:
  initrd: '{{.common_tasks}}InitrdGenerator.yml'
  root: '{{.common_tasks}}RootGenerator.yml'
  boot: '{{.common_tasks}}BootGenerator.yml'
  boot: '{{.common_tasks}}Embdgen.yml'

tasks:
  default:
    aliases: [build]
    desc: Build the NXP RDB2 image
    cmds:
      - task: initrd:build
      - task: root:build
        vars:
          root_spec: boot_root.yaml
          base_tarball: boot_root.tar
      - task: boot:build_fitimage
      - task: root:build
      - task: root:config
      - task: embdgen:build
    method: none
Now you have an image which you can flash to your NXP RDB2 board.
The overall build flow of our final NXP RDB2 image is:
EB corbos Linux Images
As described in the previous chapters, a EB corbos Linux image typically consists of a Taskfile and specification yaml files. The build steps for different SoCs have many similarities, and generic build steps are provided as template tasks in images/tasks. This folder also contains central image build descriptions for QEMU, Raspberry Pi and NXP RDB2, to minimize the redundancy between the image taskfiles.
The example images are contained in the images folder of the EB corbos Linux template workspace,
and are structured by CPU architecture, distribution and further variant descriptions.
The example image for arm64 and the QEMU target, using the 1.x line of the EBcL distribution
is contained in images/arm64/qemu/ebcl_1.x,
and you can build and run it by executing task in this folder.
The runtime configuration of Linux is highly independent form the hardware, and the final runtime configuration of the different images is very similar. To avoid redundancy, most aspects of the image descriptions are centralized in images/common. For more details about the structuring of this configuration, take a look at the README.md contained in the folder.
Please be aware that the example images are only considered for educational purposes. These images are not pre-qualified and provide a userland for interactive usage and exploration. If you are an EB corbos Linux customer, and want to start a new industrial embedded Linux project which requires qualification and maintenance, please choose one of the provided reference images as a starting point. These images provide a minimized userland, are already pre-qualified and get up to 15 years of maintenance.
The example images
EB corbos Linux comes with arm64 based example images for rpi4 and nxp s32g boards at the moment. To ease development and testing we also provide QEMU arm64 images.
For arm64/qemu we provide example images for EB corbos Linux (EBcL) and for Ubuntu Jammy and Ubuntu Noble. The difference between EBcl and Ubuntu is, that EBcL provides some additional components, like the crinit init-manager and the elos logging and event framework, and that EBcL provides a qualified security maintenance release every three months, while Jammy is proving updates continuously, using less strict qualification and documentation. Additionally there is are amd64 and arm64 example image provided for application development. You can find more about application development in later chapters.
Build-flow for QEMU images
QEMU requires three artifacts to run an image. These artifacts are a kernel binary, a initrd.img binary, and a disc image providing a root filesystem. The build flow, to get these artifacts, is the same for all QEMU images, and we defined it in images/tasks/QEMU_image.yml.
...
  build:
    desc: Build and run the qemu image
    cmds:
      - task: boot:extract_kernel
      - task: root:build
      - task: root:config
      - task: initrd:build
      - task: embdgen:build
    method: none
...
The build steps are:
- The boot:extract_kernel task of the BootGenerator.yml runs the boot_generator to extract the kernel.
- The root:build task of the RootGenerator.yml runs the root_generator to install the defined packages.
- The root:config task of the RootGenerator.yml runs the root_generator to apply the configuration.
- The initrd:build task of the InitrdGenerator.yml runs the initrd_generator build the initrd.img.
- The embdgen:build task of the Embdgen.yml runs the Embdgen to generate the image.raw disc image.
This generic QEMU build task is used by all QEMU images.
The ebcl_1.x QEMU image
In images/arm64/qemu/ebcl_1.x you can find a basic example image demonstrating how to use the EB corbos Linux SDK. The root.yml and the boot.yaml and initrd.yaml include the common images/common/qemu/arm64/base.yaml, which defines the kernel package and the APT repositories used by all QEMU arm64 EBcL images.
The boot.yaml further includes the images/common/qemu/boot.yaml, which describes how to extract the kernel binary in an architecture independent way. Using this includes makes reading the specification a bit harder to ready, but it is a really good way to avoid redundancy and simplify the maintenance of related images.
The initrd.yaml includes the common images/common/qemu/initrd.yaml and images/common/qemu/initrd_jammy.yaml files. The file images/common/qemu/initrd.yaml defines the common parts of all initrd.img used by QEMU, and the file images/common/qemu/initrd_jammy.yaml adds some specifics for the images based on the EBcL 1.x and Ubuntu 22.04 packages. There is another images/common/qemu/initrd_noble.yaml which does the same for the EBcL 2.x and Ubuntu 24.04 packages.
The root.yaml includes the common images/common/arm64/crinit/root.yaml. This file describes the common root filesystem configuration for all arm64 images using the crinit init manager, and also brings in the common crinit and elos runtime configuration.
These includes mechanism and hierarchy allows to structure the runtime configuration of an image as reusable features, similar to the layer mechanism used by Yocto, and the sharing of these configurations allows building up a base of easy usable features, which can be easily integrated in any Debian package based image, using our SDK approach.
Lets take a close look at these configuration fragments. The file images/common/qemu/arm64/base.yaml looks like:
# CPU architecture
arch: 'arm64'
# Kernel package to use
kernel: linux-image-generic
use_ebcl_apt: true
This yaml file defines the used target architecture as arm64, and the used kernel package as linux-image-generic.
The line use_ebcl_apt: true is a convenience function to specify the EB corbos Linux public APT repository,
and it makes use of the arch parameter.
The kernel package specification is used by the boot_generator, to find the right deb package containing the kernel binary,
and by the initrd_generator to decide which kernel modules ar used.
The file images/common/qemu/boot.yaml looks like:
# Download dependencies of the kernel package - necessary if meta-package is specified
download_deps: true
# Files to copy from the packages
files:
  - boot/vmlinuz*
  - boot/config*
# Do not pack the files as tar - we need to provide the kernel binary to QEMU
tar: false
The download_deps parameter enables the download of packages specified as dependencies in the Debian package metadata. Setting this flag to true allow using a meta-package like linux-image-generic, instead of a specific kernel version. The files define a list of glob-matches for files which shall be copied to the build folder. This is used to make the kernel binary available for QEMU, and also to get the kernel configuration for information and inspection. If the tar parameter is set to true, the extracted file will be put into a tar archive, which helps to preserve the file attributes, but is not needed for using the kernel with QEMU.
The file images/common/qemu/initrd.yaml looks like:
# Root device to mount
root_device: /dev/vda1
# List of kernel modules
modules:
  # virtio modules
  - virtio_blk
  - failover
  - net_failover
  - virtio_net
  # graphics support
  - sysimgblt
  - sysfillrect
  - syscopyarea
  - fb_sys_fops
  - drm
  - drm_kms_helper
template: init.sh
packages:
  # Tools for checking ext4 partitions.
  - e2fsprogs
It specifies the root device as /dev/vda1 and a bunch of kernel modules required for full QEMU support.
Without virtio_blk, the boot for QEMU would fail, because the root partition is provided as VirtIO device.
The template parameter allows to provide a user specific init.sh script,
and the path is relative to the configuration file.
You can find the used script at images/common/qemu/init.sh.
The package e2fsprogs to fix an ext4 filesystem which was mounted in an unclean way,
and without this tools in the initrd.img, you can brick your image by killing QEMU or doing a power cut.
Please be aware that the initrd_generator only extracts the packages and not runs any install scripts.
We handle it this way, because our initrd is intended to be as small as possible,
and therefore misses a lot of packages which are expected to be available for any Debian root filesystem.
The file images/common/qemu/initrd_jammy.yaml add a bunch of additional kernel modules, required for the the firewall, Docker, Podman, graphics support and systemd.
# List of kernel modules
modules:
  # virtio modules
  - veth
  # bridge support - requried by dockerd and podman
  - br_netfilter
  # nttabes kernel modules - required by dockerd and podman
  - nft_compat
  - xt_addrtype
  - nft_counter
  - nf_conntrack_netlink
  - nft_chain_nat
  - xt_conntrack
  - xt_comment
  - xt_MASQUERADE
  - overlay
  - xfrm_user
  # dm-verity modules
  - dm-verity
  # graphics support
  - cec
  - virtio-gpu
  # systemd
  - autofs4
The file images/common/arm64/crinit/root.yaml looks like:
base: ../root.yaml
# Additional packages for the crinit variant
packages:
  # Init manager
  - crinit
  - crinit-ctl
  # Elos for logging
  - elos
  - elos-coredump
  - elos-plugin-backend-json
  - elos-plugin-backend-dummy
  - elos-plugin-scanner-kmsg
  - elos-plugin-scanner-syslog
  - elos-plugin-scanner-shmem
  - elos-plugin-client-tcp
  # Network manager
  - netifd
  - udhcpc
  - netbase
  # NTP time client
  - ntpdate
# Crinit configuration
host_files:
  - source: config/*
# Scripts to configure the root tarball
scripts:
  - name: config_root.sh # Name of the script, relative path to this file
    env: chroot # Type of execution environment
It adds the crinit and elos specific packages, and the common packages defined in images/common/root.yaml. Please be aware that the file images/common/root.yaml resets the kernel package because we don’t want to have it installed in the root filesystem. The host_files and the scripts specify the runtime configuration for the packages, which is added during the root filesystem configuration step. These parameters also support glob, and the paths are also relative to the yaml file.
The arm64 Jammy image
In images/arm64/qemu/jammy you can find a basic example image demonstrating how to use the EB corbos Linux SDK to build images for other Debian distributions. It makes use of images/common/qemu/arm64/jammy.yaml, which looks like:
# CPU architecture
arch: 'arm64'
# Kernel package to use
kernel: linux-image-generic
# CPU architecture
apt_repos:
  - apt_repo: http://ports.ubuntu.com/ubuntu-ports
    distro: jammy
    components:
      - main
      - universe
  - apt_repo: http://ports.ubuntu.com/ubuntu-ports
    distro: jammy-security
    components:
      - main
      - universe
  - apt_repo: http://ports.ubuntu.com/ubuntu-ports
    distro: jammy-updates
    components:
      - main
      - universe
The difference to the ebcl_1.x image is, that instead of the EB corbos Linux apt repositories,
the Ubuntu Jammy arm64 APT repositories are used.
The boot and initrd specifications are identical to the ebcl_1.x image,
only the root specification is different, because the systemd init manager instead of crinit is used.
Additionally, another config folder is specified, which overwrites the /etc/hostname file form the common configuration.
The arm64 Noble image
The arm64 Ubuntu Noble image is identical to the arm64 Ubuntu Jammy image, except two deviations. Instead of the Jammy APT repositories, the Noble APT repositories are specified in images/common/qemu/arm64/noble.yaml, in for the initrd, instead of the Jammy specific kernel modules, the Noble specific kernel modules are used.
This image also gives an example how easy EB corbos Linux images can be upgraded to newer versions or even other base distributions. The restriction that the packages are considered as the smallest building blocks of a image, and that no patching or re-compiling is allowed, results in a highly reduced maintenance effort.
The EB corbos Linux for Safety Applications image
This image (located in images/arm64/qemu/ebclfsa) is an example for a typical EBcLfSA image. It generates an image with the EB corbos Hypervisor running two virtual machines.
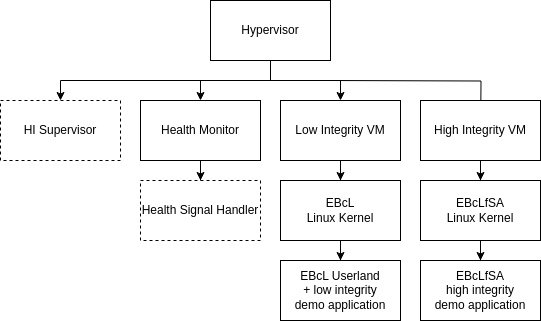
One virtual machine (li-vm) is the low integrity VM. This VM is a standard EB corbos Linux using crinit and elos. It can be used just like any other EB corbos Linux image.
The second virtual machine (hi-vm) is the high integrity VM. In a production release applications and the Linux kernel running in this VM are supervised by a component in the hypervisor (HI Supervisor). The supervisor is not part of the free download version. But as long as nothing unexpected happens (e.g. misbehavior of the Linux kernel), it is unlikely that the presence of the supervisor can be noticed. The most noticeable impact of the supervisor is the limitation of allowed syscalls. This however is implemented in the Linux kernel itself in a way, that prints a message to the console, when a prohibited syscall is executed. Note that the list of allowed syscalls is subject to change rapidly during the ongoing development.
This high integrity partition only starts the initial high integrity application, there is no init process (like crinit or systemd) at the moment. In the future this is also subject to change.
Another component running in the hypervisor is the Health Monitor. This component implements a watchdog that is periodically triggered by the high integrity application. In a production environment there would also be a Health Signal Handler that can implement a reaction to missing health indication (e.g. toggle a GPIO pin).
For communication between the low and high integrity applications and between high integrity applications there are shared memory segments provided by the hypervisor. These shared memory segments are called “proxycom” and “hicom” for communication between high and low integrity and between high integrity respectively. The demo application provides an example how to use these shared memory segments for communication.
For the included applications see: EBcLfSA Demo Application.
How to build and run
- Unpack the hypervisor archive you received into the folder results/packages
- Open a terminal in vscode (View -> Terminal -> New Terminal, select “workspace”)
- In the terminal enter
gen_sign_key && GNUPGHOME=/workspace/gpg-keys/.gnupg gen_app_apt_repo && serve_packages(If this was executed already previously, it will ask if the files Release.gpg and InRelease should be overwritten. This has to be confirmed withy). This creates an apt repository and serves the packages on http://localhost:8000. - Navigate to images/arm64/qemu/ebclfsa in the explorer view, right click on ebclfsa and select “Open in Integrated Terminal”
- In the new terminal run
task. This will build the image and run it in qemu. - Refer to the EBcLfSA Demo Application documentation for further information.
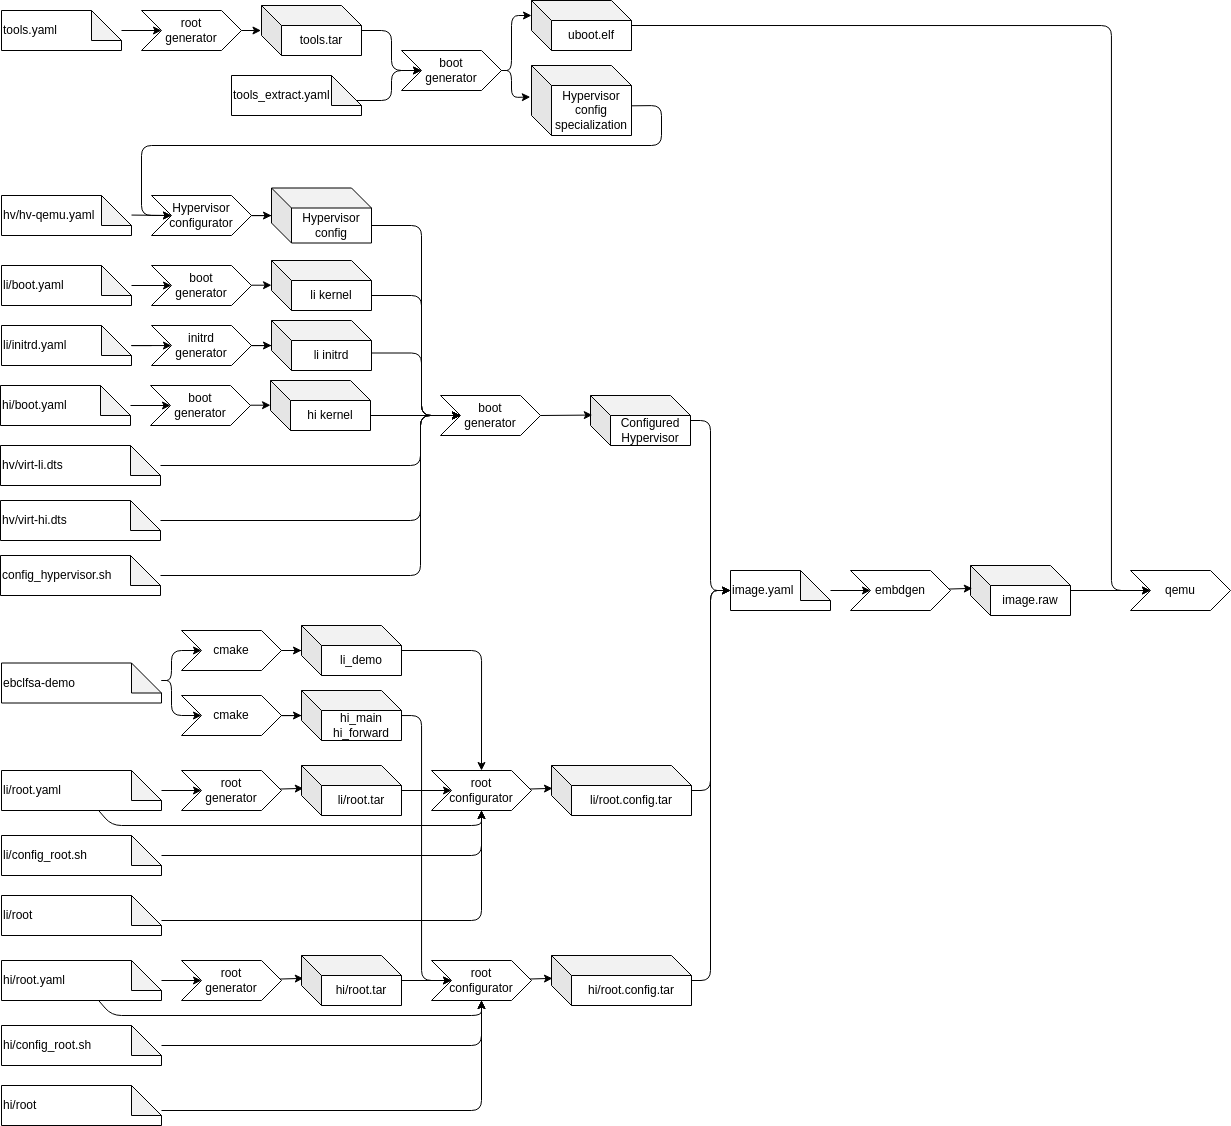
Buildprocess
Building the image for ebclfsa uses the same tools as other images and additionally the hypervisor configurator and the demo application. The main differences are:
- It builds two root file systems, one for the high and one for the low integrity virtual machine
- It configures the hypervisor to start the two virtual machines
- It builds and includes the EBcLfSA demo application
The whole process is depicted in the image below
This documentation will only describe the configuration of the hypervisor.
Hypervisor configuration
Step 1: Extract the hypervisor specialization
As described in the hypervisor config tool description, the tool allows specialization of the configuration model. In the first step a tools root filesystem is generated. The unconfigured hypervisor and the config specialization are installed in this filesystem. At the end of this step the configuration specialization and u-boot used to boot the image are extracted.
Step 2: Generate the hypervisor configuration
In this step the extracted specialization is used together with the configuration yaml file (hv/hv-qemu.yaml) to generate all configuration files.
Parallel to this generation, the linux kernels for the high and low integrity VM are extracted and the initrd for the low integrity VM is generated.
Step 3: Build the final hypervisor
For this step several files are copied into the generated tools filesystem in order to generate the final hypervisor binary. These files are:
- The generated configuration
- The extracted kernels
- The initrd for the low integrity VM
- The device tree sources for the high and low integrity VM
These files are then processed by config_hypervisor.sh inside of the tools root filesystem. First the two device trees are compiled using linux’s device tree compiler, then the configured hypervisor is generated.
At the end of this step the configured hypervisor is extracted from the tools filesystem, so it can be installed onto the boot partition by embdgen.
EB corbos Linux example images for the Raspberry Pi 4
EBcL 1.x Raspberry Pi 4 image
The EB corbos Linux example image for the Raspberry Pi 4 board is contained in images/arm64/raspberry/pi4/ebcl_1.x.
EB corbos Linux comes with development support for the Raspberry Pi 4. This means, you can use a Raspberry Pi 4 board for early development and demos, and you get support, but it’s not qualified for mass production. The Raspberry Pi 4 example images make use of the kernel and firmware packages provided by Ubuntu Ports. These repositories are specified in images/common/raspberry/pi4/base.yaml:
# CPU architecture
arch: arm64
# Kernel package to use
kernel: linux-image-raspi
use_ebcl_apt: true
# Additional apt repos
apt_repos:
  # Get Ubuntu Raspberry Pi packages
  - apt_repo: http://ports.ubuntu.com/ubuntu-ports
    distro: jammy
    components:
      - main
      - universe
      - multiverse
      - restricted
  # Get latest security fixes
  - apt_repo: http://ports.ubuntu.com/ubuntu-ports
    distro: jammy-security
    components:
      - main
      - universe
      - multiverse
      - restricted
  # Get Latest Community Tested Package Fixes
  # This Repository is solely added for one reason:
  # The flash-kernel postinstall script will try to execute
  # and write files to memory. This will not work in our build env (chroot).
  # flash-kernel will not do this on a system that is running in EFI Mode and
  # in updated versions where it can detect the chroot environment better.
  # Try running 'ls /sys/firmware/efi' if you have this dir, you can remove
  # This apt_repo safely.
  - apt_repo: http://ports.ubuntu.com/ubuntu-ports
    distro: jammy-updates
    components:
      - main
      - universe
      - multiverse
      - restricted
Please not that the EB corbos Linux APT repository is enabled in parallel to the Ubuntu repositories. This is in general possible, but the resulting image will contain the newer package versions form Ubuntu, which are not qualified with the EB corbos Linux configuration and config and compatibility issues may happen. Please also be aware that jammy-updates may provide upgraded libraries which are not supported with EB corbos Linux, since we only base on jammy-security, to minimize the impact of the security maintenance to existing solutions.
For booting, the Raspberry Pi expects to find a fat32 partition as first partition on the SD card, and this partition is expected to contain the firmware and kernel binaries and devicetrees, and some configuration files. For this image, we make use of the split archive feature of embdgen. This feature allows the distribution of the content of one tarball to multiple partitions. The images/common/raspberry/pi4/image.yaml gets the content of build/ebcl_pi4.config.tar, and puts the content of the /boot folder to the boot partition and puts the remaining content to the root partition.
# Partition layout of the image
# For more details see https://elektrobit.github.io/embdgen/index.html
contents:
  - name: archive
    type: split_archive
    archive: build/root.config.tar
    splits:
      - name: boot
        root: boot
    remaining: root

image:
  type: mbr
  boot_partition: boot

  parts:
    - name: boot
      type: partition
      fstype: fat32
      size: 200 MB
      content:
        type: fat32
        content: archive.boot

    - name: root
      type: partition
      fstype: ext4
      size: 5 GB
      content:
        type: ext4
        content: archive.root
The commandline.txt and config.txt are just taken from a prebuilt Raspberry Pi OS image.
The shared config_root.sh creates a hostname and hosts file, and makes sure the kernel, bootloader and device trees are available at the expected location and name.
#!/bin/sh

# Create a hostname file
echo "ebcl-pi4" > ./etc/hostname

# Create /etc/hosts
cat > ./etc/hosts <<- EOF
127.0.0.1       localhost
::1             localhost ip6-localhost ip6-loopback
ff02::1         ip6-allnodes
ff02::2         ip6-allrouters
EOF

# Copy Raspi device trees
cp ./usr/lib/firmware/5.15.0-*-raspi/device-tree/broadcom/bcm2711*.dtb ./boot/
# Copy device tree overlays
cp -R ./usr/lib/firmware/5.15.0-*-raspi/device-tree/overlays ./boot/
# Copy raspi firmware
cp ./usr/lib/linux-firmware-raspi/* ./boot/

# Copy kernel as the expected name
cp ./boot/vmlinuz-* ./boot/kernel8.img || true
# Copy initrd as the expected name
cp ./boot/initrd.img-* ./boot/initramfs8 || true

# Delete the symlinks
rm ./boot/vmlinuz || true
rm ./boot/initrd.img || true
Raspberry Pi 4 Jammy image
We also provide an example image for the Raspberry Pi 4 using Ubuntu Jammy. This image description is contained in images/arm64/raspberry/pi4/jammy. The main differences to the ebcl_1.x image is that it makes use of the systemd init manager, and the Ubuntu Jammy APT repositories.
Raspberry Pi 4 Noble image
The Raspberry Pi 4 Noble image, defined in images/arm64/raspberry/pi4/noble, is similar to the Raspberry Pi 4 Jammy image, but makes use of the Ubuntu Noble packages.
EB corbos Linux example images for the NXP RDB2 board
The folder_images/arm64/nxp/rdb2_ contains the EB corbos Linux (EBcL) example images for the NXP RDB2 development board, which is equipped with an NXP S32G SoC. The S32G has very specific storage layout requirements, and if you are interested into more details about required base configuration, take a look at Building an image from scratch.
# Kernel package to use
kernel: linux-image-unsigned-5.15.0-1034-s32-eb
# CPU architecture
arch: arm64
# Add the EB corbos Linux apt repo
use_ebcl_apt: true
# Add repo with NXP RDB2 packages
apt_repos:
  - apt_repo: http://linux.elektrobit.com/eb-corbos-linux/1.2
    distro: ebcl_nxp_public
    components:
      - nxp_public
    key: file:///build/keys/elektrobit.pub
    gpg: /etc/berrymill/keyrings.d/elektrobit.gpg
The packages for the NXP RDB2 board are provided as a separate distribution, called ebcl_nxp_public, as component nxp_public. For the RDB2 images, the kernel package linux-image-unsigned-5.15.0-1034-s32-eb is used. This package contains a Linux kernel image for the S32G2, and has slightly different kernel configuration than the Ubuntu Jammy default.
Please be aware that the firmware for different peripherals, like the LLCE and the PFE, is proprietary and we are not allow to distribute it publicly, so if you build an image using the public EB corbos Linux repository, you will not be able to make use of the CAN ports attached to the LLCE, or the network ports attached to the PFE. If you are a paying customer, and have signed the NXP redistribution agreement, you will get access to ebcl_nxp, which is identical to ebcl_nxp_public, except the fact that it also provides these proprietary firmware.
The image.yaml describes the required storage layout, the initrd.yaml is a very minimal initrd.img specification, just defining the root partition. The boot_root.yaml defines the environment used for building the fitimage. The bootargs* files, contained in images/common/nxp/rdb2, are the S32G2 specific configurations for the fitimage layout and kernel command line. The script images/common/nxp/rdb2/build_fitimage.sh is executed in the mentioned chroot environment, and automates the fitimage building. The boot.yaml wraps all the before mentioned, and is used together with the boot generator to automatically build the fitimage.
The build flow for all NXP RDB2 images is specified in images/tasks/RDB2_image.yml, included by the Taskfile.yml of the different image descriptions, and described in detail in Building an image from scratch.
EBcL 1.x RDB2 crinit image
The EBcL 1.x RDB2 crinit image is contained in the folder images/arm64/nxp/rdb2/ebcl_1.x_crinit. This image contains crinit, elos, and netifd to provides a Linux image for interactive exploration.
The crinit_config folder contains a small implementation to load kernel modules using the crinit init manager. The crinit task images/common/nxp/rdb2/crinit/config/etc/crinit/crinit.d/modprobe.crinit runs the script images/common/nxp/rdb2/crinit/config/usr/sbin/load_modules.sh which loads all modules state in images/common/nxp/rdb2/crinit/config/etc/kernel/runtime_modules.conf. This is a bit more involved, and requires more knowledge about the used hardware, as using udev would need, but it is also much more lightweight and faster than udev.
EBcL 1.x RDB2 systemd image
The EBcL 1.x RDB2 systemd image description is contained in images/arm64/nxp/rdb2/ebcl_1.x_systemd. It’s quite similar to the EBcL 1.x RDB2 crinit image, but makes use of systemd and udev.
Kernel development
If you do the bring-up for a new board, you may need to adapt the kernel configuration. This section continues where “Building an image from scratch” ended.
Please be aware that EB corbos Linux allows you to “open the box”, but if you modify the provided binary packages the support and maintenance for these packages is not covered with the base offer. You can get support, qualification and long term maintenance as an add-on to the base offer, as a yearly fee for each package.
Nevertheless, let’s see how we can build our own kernel. To build a custom kernel package we need the kernel sources and the base kernel config. We can get the kernel sources and build dependencies using apt:
mkdir -p kernel
cd kernel
apt -y source linux-buildinfo-5.15.0-1034-s32-eb
sudo apt -y build-dep linux-buildinfo-5.15.0-1034-s32-eb
For extracting the kernel config, we can again make use of the boot generator:
# Derive values from base.yaml - relative path
base: base.yaml
# Do not pack the files as tar
tar: false
# download and extract the kernel package incl. depends
use_packages: true
# Files to copy to the build folder
files:
  - boot/config*
We can copy this config as .config into the kernel source and build the kernel using task.
To make use of our local built kernel binary we need and adapted boot.yaml:
# Derive values from base.yaml - relative path
base: base.yaml
# Reset the kernel value - we don't want to download and extract it
kernel: null
# Do not pack the files as tar
tar: false
# do not download and extract these packages, they are already installed in the boot_root.tar
use_packages: false
# Name of the boot root archive
base_tarball: $$RESULTS$$/boot_root.tar
# Files to copy form the host environment
host_files:
  - source: ../bootargs-overlay.dts
    destination: boot
  - source: ../bootargs.its
    destination: boot
  - source: $$RESULTS$$/initrd.img
    destination: boot
  - source: $$RESULTS$$/vmlinuz
    destination: boot
# Scripts to build the fitimage and fip.s32
scripts:
  - name: ../build_fitimage.sh # Build the fitimage in the boot_root.tar environment
    env: chroot
# Files to copy to the build folder
files:
  - boot/fip.s32
  - boot/fitimage
The only change compared to the old boot.yaml is that we add $$RESULTS$$/vmlinuz to the host_files.
This means our kernel binary is copied to the /boot folder of the fitimage build environment,
and will overwrite the one from the kernel Debian package.
This will give us the following build flow:
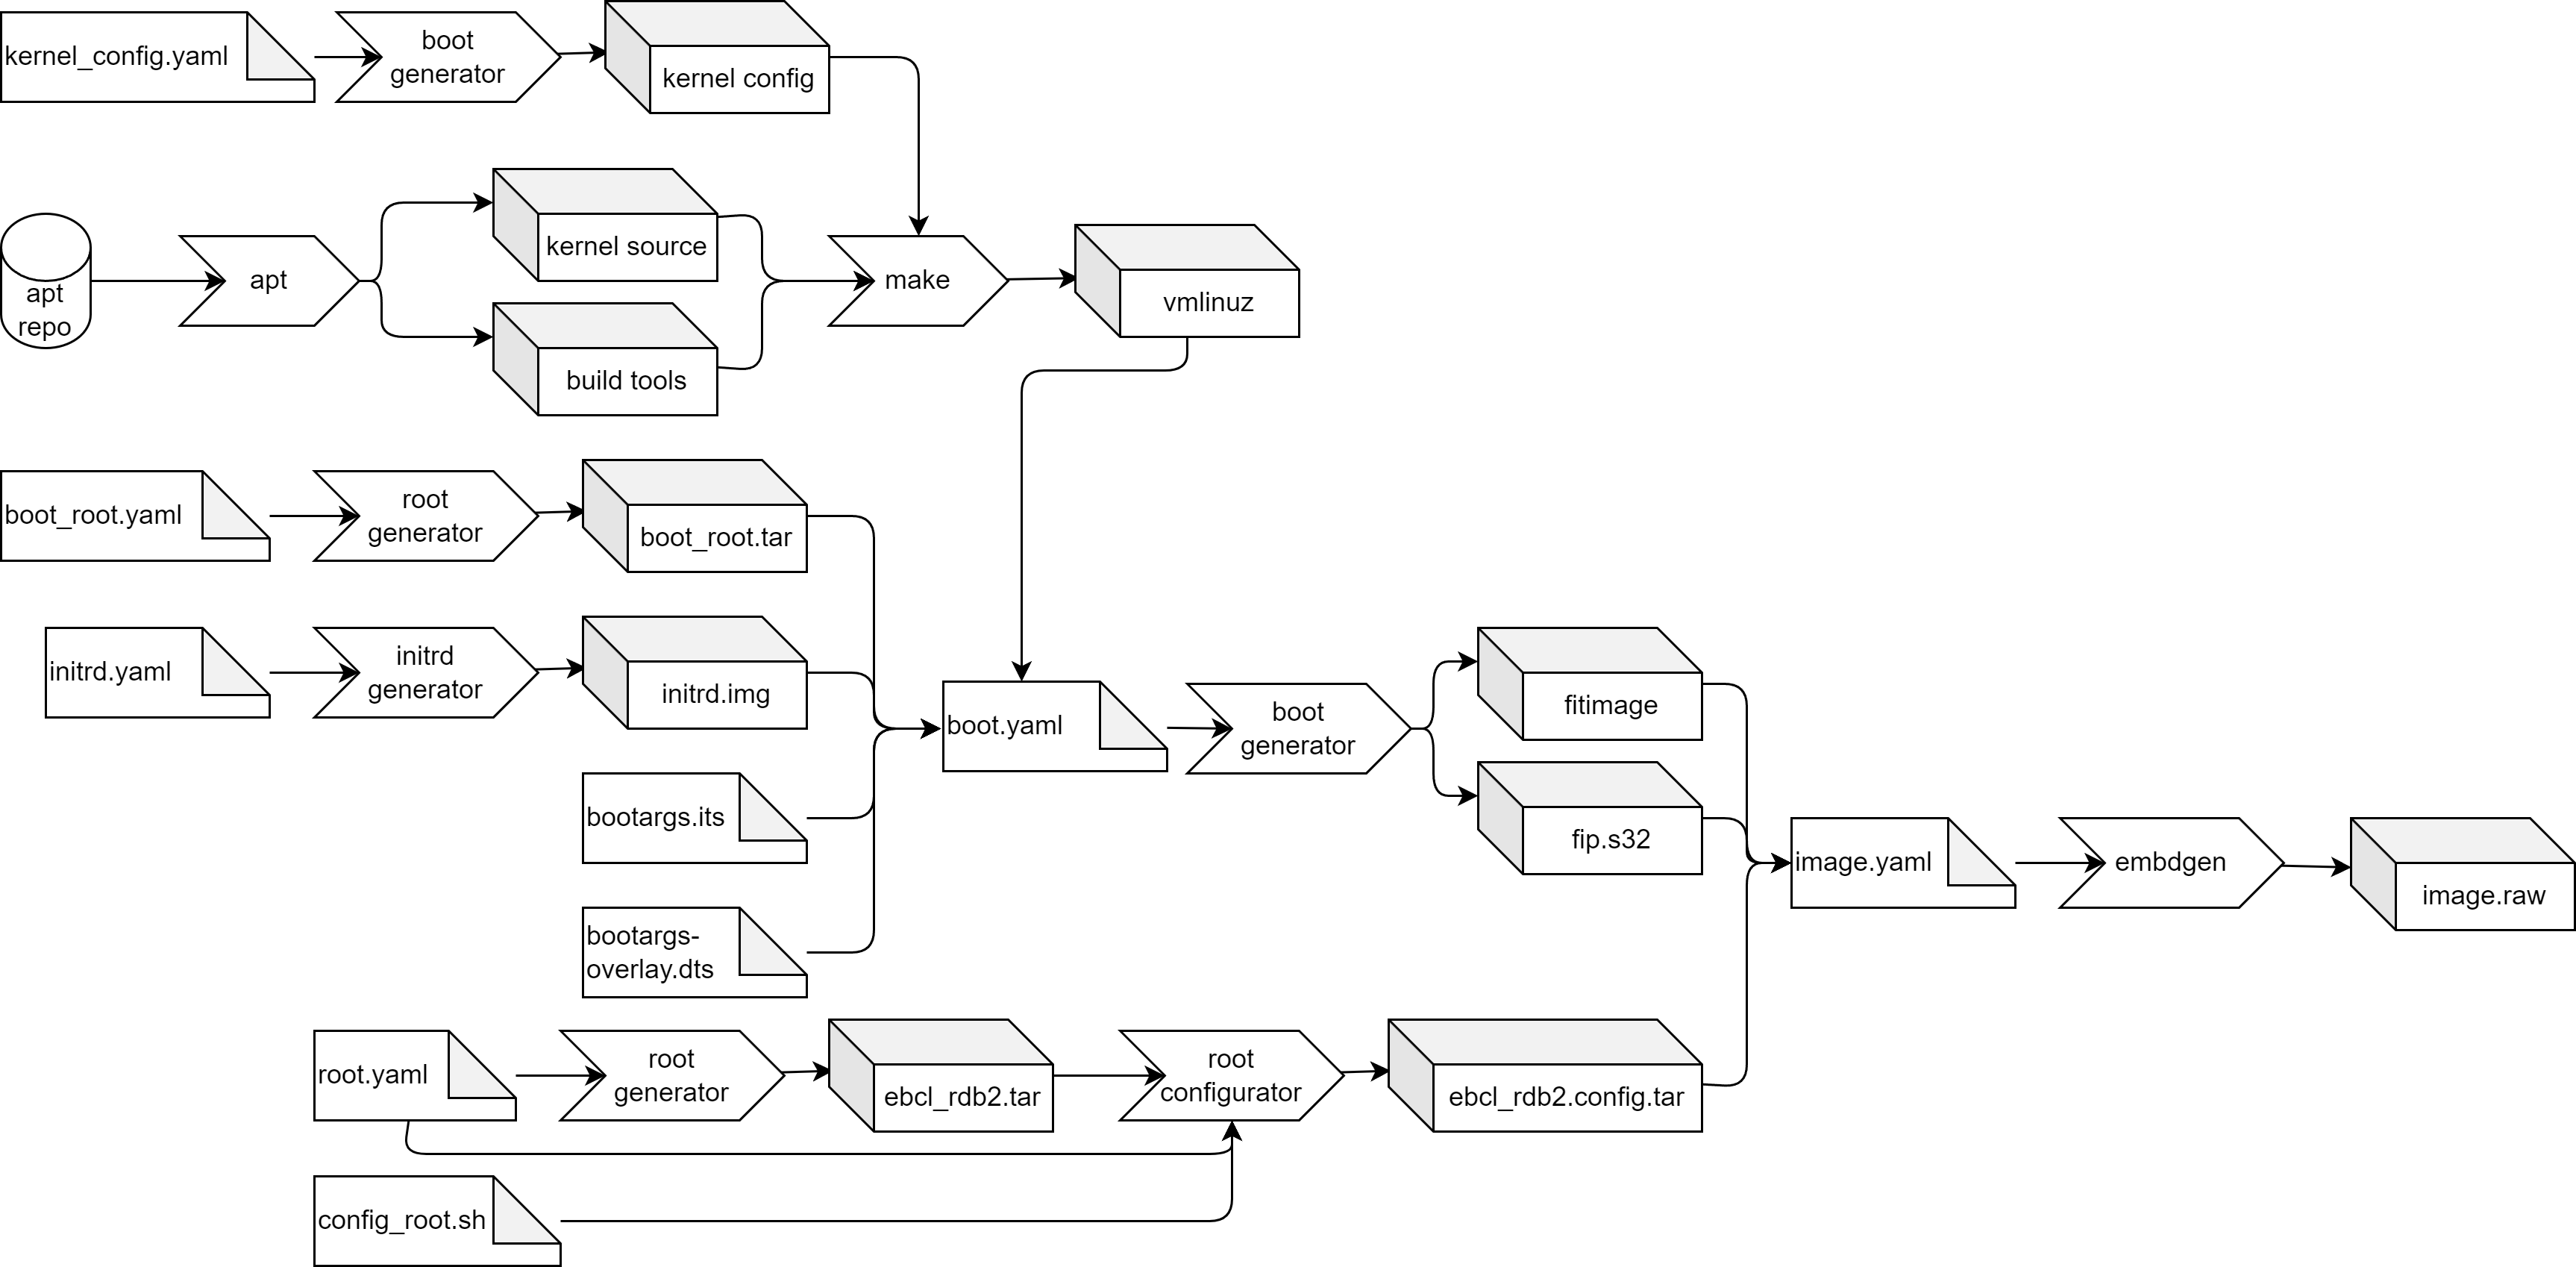
This build flow is implemented in the generic build_with_local_kernel task of images/tasks/RDB2_image.yml.
...
tasks:
...
  build_with_local_kernel:
    desc: Build NXP RDB2 image using a local built kernel binary from Debian package sources.
    vars:
      boot_root_spec: '{{.boot_root_spec | default "boot_root.yaml"}}'
      boot_tarball: '{{.boot_tarball | default "boot_root.tar"}}'
    cmds:
      - task: kernel:build
      - task: initrd:build
      - task: root:build
        vars:
          root_spec: '{{.boot_root_spec}}'
          base_tarball: '{{.boot_tarball}}'
      - task: boot:build_fitimage
      - task: root:build
      - task: root:config
      - task: embdgen:build
    method: none
The additional steps for downloading the kernel sources and building the kernel locally are implemented in images/tasks/Kernel.yml.
...
tasks:
  build:
    desc: Build kernel form Debian package sources.
    vars:
      result_folder: '{{.result_folder | default "./build/"}}'
      base_spec: '{{.base_spec | default "base.yaml"}}'
      kernel_config: '{{.kernel_config | default "kernel_config.yaml"}}'
      kernel: '{{.kernel | default "vmlinuz"}}'
    cmds:
      - task: source
      - task: kconfig
      - task: build_kernel
      - task: build_modules
    preconditions:
      - test -f {{.kernel_config}}
    sources:
      - '{{.base_spec}}'
      - '{{.kernel_config}}'
    generates:
      - '{{.result_folder}}{{.kernel}}'
...
The build task of images/tasks/Kernel.yml:
- Downloads the kernel sources, and installs the build dependencies in the container.
- Extracts the kernel configuration from the binary Debian kernel package, and updates the config.
- Builds the kernel binary,
- and builds the kernel modules.
For more details, please take a look at the file.
Developing apps
The workspace provides two simple applications to explain the development workflow and interactions with the operating system.
For applications development, interaction with different target types is handled via a set of predefined, generic, Visual Studio Code tasks. Currently, the example workspace provides four different CMake presets for building, corresponding to four possible deployment targets. The supported presets are the following:
| Preset | Arch | Sysroot | Image |
|---|---|---|---|
| qemu-x86_64 | x86_64 | sysroot_x86_64 | /workspace/images/amd64/appdev/qemu/[crinit|systemd] |
| qemu-aarch64 | aarch64 | sysroot_aarch64 | /workspace/images/arm64/appdev/qemu/[crinit|systemd] |
| hardware | aarch64 | sysroot_aarch64 | /workspace/images/arm64/appdev/[rdb2|pi4]/[crinit|systemd] |
The different columns represent the name of the preset, CPU architecture, the sysroot the application is built against and a path to a possible image configuration with either crinit or systemd as init daemon.
For each preset a configuration entry in /workspace/apps/common/deployment.targets is present, defining target address, ssh settings and user credentials as well as the gdb port used for debugging.
Target access via ssh is based on the TARGET_IP, SSH_USER, SSH_PORT and SSH_PREFIX.
In the current example configurations for remote targets, the SSH_PREFIX is used to handover the login password via sshpass -p {password}.
Build, execute and debug demo applications
The following section explains how to build, execute and debug the included example applications. All required steps are handled by Visual Studio Code tasks. Some of the mentioned tasks will reference an “active build preset”. This means that Visual Studio code will determine the application for which the task will be executed for. For this mechanism to work properly make sure, that the focused editor window shows a file of the application you want the task to run for. This file may belong to the application folder or any of its subfolders.
Build
Before you can build any of the example applications, please make sure to run task sysroot:install for the used image configuration.
As an example, for the amd64 qemu image with crinit as init daemon, building the sysroot would be done like this:
cd /workspace/images/amd64/appdev/qemu/ebcl_1.x_crinit
task sysroot:install
In order to build the applications, use the Visual Studio Code CMake extension on the Visual Studio Code bottom ribbon:
- Choose active project as
my-json-appormeminfo-reader - Choose active configure preset
qemu-x86_64,qemu-aarch64orhardware - Click on
Build
Alternatively to the use of Visual Studio Code tasks, building can also be done directly via cmake.
The following commands will configure, build and install the my-json-app for the qemu-x86_64 preset.
cd /workspace/apps/my-json-app/
cmake . --preset qemu-x86_64
cmake --build --preset qemu-x86_64
After building is done, the artifacts will be available in /build/results/apps/{application}/{preset}/build/install/.
Pre-execute steps
Before you can start the application for any of the available presets, you need to start the corresponding image. Again, we take the amd64 qemu crinit image as example. The following command will start the qemu instance, as well as builds the image beforehand if needed:
cd /workspace/images/amd64/appdev/qemu/ebcl_1.x_crinit
task
Afterwards, you can run task Deploy app from active build preset to deploy the required artifacts for the currently active build preset.
Run demo applications
The applications can be started with the task Run app from active build preset.
Based on the build preset, the ssh connection parameters are derived from /workspace/apps/common/deployment.targets and the application is called on the target via an ssh session.
All output messages of the application, will be displayed in a terminal window associated to the used run task.
Alternatively, you could also login via ssh to the target and call the application from there directly.
Post-execute steps
This step is not required for the provided example applications, since both terminate directly and don’t include any continuous loops.
Nevertheless, your own applications, may behave differently.
In order to stop the execution of an application you can either press CTRL-C in the corresponding terminal window or stop the parent task.
To stop the parent task click on the Stop icon in the task Run app from active build preset to stop the application.
Debugging demo applications
Visual Studio Code can be used as a gdb frontend for debugging. In order to debug the application from the current active preset press “F5”. Before Visual Studio Code starts the gdb and after debugging, the following tasks are executed automatically.
Pre debug:
- Build and check target connection
- Trigger incremental application build
- Perform ssh connection test and update ssh keys, if needed
- Build and check target connection
- Update application deployment
- Prepare application specific gdbinit file
- Start gdbserver on remote target
Post debug:
- Stop gdbserver on remote target
Create your own application
You can create a new application from a predefined template. This task simplifies the process by automating several steps:
Open the Command Palette in Visual Studio Code (Ctrl+Shift+P ) search for and run the task labeled “Create new App”.
When prompted, enter the desired name for your new application. The task will create the application directory, copy and configure the templates for CMake.
EB corbos Linux for Safety Applications Demo Application
The demo application (located in ebclfsa-demo) shows the basics of EBcLfSA and shared memory communication. It consists of three separate binaries. Two of them are high integrity applications (hi_main and hi_forward) and one is a low integrity application (li_demo). This is used to demonstrate three core concepts:
- Communication over shared memory between low and high integrity applications
- Starting of additional high integrity applications
- Communication between high integrity applications
How to build
Integrated into image build
The easiest way to build the application is to build the EBcLfSA demo image. When this image is built it automatically builds / rebuilds the application, so all changes to the application are always reflected in the image.
Manual build and debug low integrity application
It is also possible to manually build the image using cmake. The high and low integrity applications use different toolchains. For the low integrity application the same toolchain is used as is used for normal EBcL applications. The high integrity application uses musl and gcc and has to be compiled statically.
The required toolchains are selected using cmake presets.
To compile the application the vscode cmake integration can be used or just cmake --preset li-app ... for the low integrity application or cmake --preset hi-app ... for the high integrity application.
The vscode integration also allows debugging of the low integrity application in gdb (See Debugging demo applications).
The high integrity application cannot be debugged right now.
NOTE: musl and gcc are just an intermediate solution used here for demonstration purposes and will change in the future.
Execution
When the image is started the high integrity applications are started automatically.
On the low integrity VM the application has to be started manually using li_demo.
When it is executed the following output is expected:
li_demo: INFO: Hello from ebclfsa low integrity demo application
li_demo: DEBUG: Base addr of hv_proxycomshm is: 0x4a1fa000 - 0x4a3f9fff
li_demo: DEBUG: Opened /dev/mem: 3
li_demo: DEBUG: Mapped shared memory: 0x0000ffff93180000
li_demo: DEBUG: Base addr of hv_fbshm is: 0x471fa000 - 0x4a1f9fff
li_demo: DEBUG: Opened /dev/mem: 3
li_demo: DEBUG: Mapped shared memory: 0x0000ffff90180000
li_demo: INFO: Waiting for high integrity apps to start...
li_demo: INFO: high integrity app is available, starting communication
li_demo: INFO: Sending 'Hello hi_app 0'
vm-hi | hi_main: DEBUG: Received 'Hello hi_app 0' from li
vm-hi | hi_forward: DEBUG: Received 'You said 'Hello hi_app 0', I say 'hello li_app 1'' from hi_demo
li_demo: INFO: Got response: YOU SAID 'HELLO HI_APP 0', I SAY 'HELLO LI_APP 1'
li_demo: INFO: Sending 'Hello hi_app 1'
vm-hi | hi_main: DEBUG: Received 'Hello hi_app 1' from li
vm-hi | hi_forward: DEBUG: Received 'You said 'Hello hi_app 1', I say 'hello li_app 2'' from hi_demo
li_demo: INFO: Got response: YOU SAID 'HELLO HI_APP 1', I SAY 'HELLO LI_APP 2'
[...]
The first few messages show the retrieval of the shared memory addresses from the device tree and the mapping into the process memory. Then the application looks for the shared memory partitions used by the two high integrity applications. After that the first message is send to the hi_main application. It is received, modified and forwarded to hi_forward, which in turn sends it back to li_demo. The messages starting with “vm-hi | hi_” are directly generated by the high integrity applications.
This continues for 10 roundtrips and then li_demo terminates.
Communication
The demo uses two shared memory segments:
- proxycom: This is used to communicate from a low integrity application to a high integrity application. In the demo it is partitioned into multiple chunks, one for each running high integrity application. The high integrity applications register themselves in this memory with a UUID, that is used to find the correct partition by the low integrity application.
- hicom: This is used to communicate between high integrity applications. It cannot be accessed by low integrity applications
Messages are passed between applications using the shared memory and a ringbuffer.
The following sequence of messages is sent:
- li_demo sends a message over the proxycom shared memory to hi_main.
- The message is received by hi_main, manipulated and send to hi_forward over the hicom shared memory.
- hi_forward then sends the message back to hi_demo using proxycom.
Note: The actual partitioning of the shared memory segments and the usage of UUIDs is just exemplary.
Apart from using shared memory it is also possible to do communication between the applications using tcp/ip sockets.
Health Signal
As explained in the EBcLfSA demo image description there is a Health Signal Manager running in the hypervisor that expects periodical triggering via a shared memory interface.
Since there is only one health signal interface available, aggregation of health signals is the responsibility of the (first) high integrity application. Therefor the second high integrity application (hi_forward) signals its health signal to the first high integrity application (hi_main) using the hicom shared memory. Then hi_main can trigger the Health Signal Manager.
The Health Signal Manager leaves the system some time to completely boot up before arming itself. For qemu this timeout is rather long (~50s), because qemu performance can vary a lot. A message is printed to the console, when this timeout is expired and the Health Signal Manager is active:
HealthSigHdl: msg received mr[0]=3855 eol
From now on the health signal must be triggered periodically, if it is not triggered any more the following message is printed.
This can be triggered by running li_demo -s, which tells li_main to stop triggering the health signal.
SafeHM: (ERROR) Heartbeat not received from Client with id = 12
SafeHM: (ERROR) safe_state (exit_code=-1)
The health signal cannot be restarted and the system has to be rebooted.
NOTE: For qemu this has no further effect, because there is no Health Signal Handler.
Not allowed syscalls
Not all syscalls are allowed in EBcLfSA high integrity applications. In the qemu setup calling a prohibited syscall does not have any effect apart from a message on the console. On a productive system calling a prohibited syscall will trigger a transition to the safe state and execute a reaction in the Health Signal Handler.
To test executing a not allowed syscall li_demo -p can be executed, which calls ioctl(0, 0) and yields the following message:
SDK:handler_do_el0_svc_pre: syscall __NR_ioctl (29) is not allowed
NOTE: The current state of the syscalls whitelist does not reflect the final list of allowed syscalls!
Packaging applications for EB corbos Linux
EB corbos Linux makes use of Debian packages, which are described in full detail in the Debian Policy Manual. On a high level, there are two types of packages, source packages and binary packages.
The source packages consist of a dsc file containing the metadata of the package and typically referencing source tarballs belonging to this package. As an example, you can take a look at the dsc of the nano editor. The source tarball contains a debian subfolder, and this subfolder contains all metadata of this package, and the binary packages which can be built using this source package, including the build instructions. Debian tooling like pbuilder can be used to build the binary packages out of a source package, for all supported platforms and variants.
The binary packages are Unix AR archives containing a file debian-binary, giving the version number of the used Debian binary package format, a control.tar.gz, containing the metadata of the package, a data.tar.gz, which is extracted to the filesystem when the package is installed, and potentially further metadata files. The advantage of using Debian binary packages and apt repositories is that you have a signature chain from your copy of the public key of the apt repository to the Debian binary package you download, which ensures that the package was provided by the right vendor, and was not manipulated on the way. Bundling the metadata with the software allows apt to ensure that the package is compatible with the target environment, and that all dependencies are fulfilled. For all installed packages, the package information is installed into /usr/share/doc. You can consult this folder to get the changelog and license information for your installed packages.
If you develop applications for EB corbos Linux, which shall be installed in the root filesystem, especially during build time, we recommend to package these applications, since this ensures that the right version is installed, all dependencies are available, and allows an easy reuse. If you develop applications which shall not be part of the root filesystem, e.g. to update them separately from the root image, a bundling according to the needs of the update solution is necessary, and a Debian packaging is not required.
We don’t recommend apt as an update tool for embedded solutions, since it doesn’t support an A/B update schema, and it’s not prepared to be used together with a read-only and dm-verity protected root filesystem, which you may use if you implement a secure boot solution. For such scenarios, the existing embedded update solutions, and containers are much better solutions. If you need a customized update solution, or consulting for building online updatable HPC platforms, please contact us.
Preparing the Debian package metadata
The first step to create a Debian package is to add the required metadata. You don’t need to do this by hand, there are various tools which will generate template metadata. We recommend dh_make to generate the metadata. If you want to explore other tooling for creating packages from a source, refer to https://wiki.debian.org/Packaging/SourcePackage.
The dh_make tool has some expectations about the folder name, and as a comfort feature the EBcL SDK provides a helper script prepare_deb_metadata to generate the metadata for an app.
To generate the Debian metadata for an app contained in the apps folder fo the workspace, you can run prepare_deb_metadata [name of the app], e.g.
prepare_deb_metadata my-json-app. For the example applications, you can also make use of the corresponding build task EBcL: Generate Debian metadata for app, which shows up in the build tasks menu (Ctrl + Shift + B). This will add a new subfolder debian to the app folder.
The generated metadata is just a template, and needs to be adjusted for successful building a package. Open the new debian/control and complete it. At minimum, you need to change the value of Section to misc or another valid value, and fill out the Description. If your app has build-time dependencies, you also need to add it to the Build-Depends list. For the my-json-app, the dependencies are:
Build-Depends: debhelper-compat (= 13), cmake, pkg-config, libjsoncpp-dev
Debian packages use several different metadata files. The most important ones are:
-
control: This file contains the details of the source and binary packages. For more details, refer to https://www.debian.org/doc/debian-policy/ch-controlfields.html.
-
rules: This file contains the package build rules that will be used to create the package. This file is a kind of Makefile. For more details, refer to https://www.debian.org/doc/debian-policy/ch-source.html#main-building-script-debian-rules.
-
copyright: This file contains the copyright of the package in a machine-readable format. For more details, refer to https://www.debian.org/doc/debian-policy/ch-archive.chtml#copyright-considerations.
-
changelog: The changelog of the package itself. It contains version number, revision, distribution, and urgency of the package. For more details, refer to https://www.debian.org/doc/debian-policy/ch-source.html#debian-changelog-debian-changelog.
-
patches: This folder can contain patches that are applied on top of the original source. For more details, refer to https://www.debian.org/doc/debian-policy/ch-source.html#vendor-specific-patch-series.
Packaging the application
If the package metadata is prepared, you can build the Debian packages for amd64 using pbuilder. The EBcL SDK provides also for pbuilder a comfort script to build application packages.
You can run build_package [name of the app] [architecture], e.g.
prepare_deb_metadata my-json-app amd64, to build the Debian binary package for your application.
The results will be written to results/packages. For packaging the example applications, you can also make use of the corresponding build tasks EBcL: Package app, which shows up in the build tasks menu (Ctrl + Shift + B).
Adding the package to an image
To make the new Debian package available for image builds, we need to provide it as part of an apt repository.
An apt repository can simply be a folder or a static server directory on the web, containing a Release and a Packages.gz file describing the contained packages.
When we have an apt repository containing our new package, we can add this repository to your image specification, and then add the package to the list of installed packages.
As mentioned before, apt repositories are signed, so we need a GPG key to sign the metadata of the local apt repository, which we will set up to provide our locally built packages.
There is again a comfort script and a VS Code build task to generate the key, but before generating the key, you should update the identity information contained in identity/env. When you have put your contact data in, you can generate the GPG key by running the task EBcL: Generate signing key, or running gen_sign_key in a shell.
To use an existing key, you can copy the keyring into the workspace folder gpg-keys/.gnupg.
When the key is available, you can generate the apt repository metadata by running the VS Code build task EBcL: Prepare local repository, or the command prepare_repo_config. The command adds the needed index files and signatures to the folder_results/packages_. Please be aware that all found packages are added to the apt index, and if you have multiple builds of the same package in the folder, it’s somehow random which package is picked.
It’s best to delete the old build, and re-run prepare_repo_config to ensure the expected package will be used.
To be able to use the repository in an image build, you need to serve it.
You can do this by running the VS Code task EBcL: Serve local repository or the command serve_packages. Then you can add the apt repository to your image configuration using the IP address of the container, which get with ip addr:
apt_repos:
  - apt_repo: http://<Container IP>
    distro: local
    components:
      - main
The build tools
In below example of the build flow for the s32g you can see all currently supported tools marked in color. An explanation of the flow is already given in the Section “Building an image from scratch”.
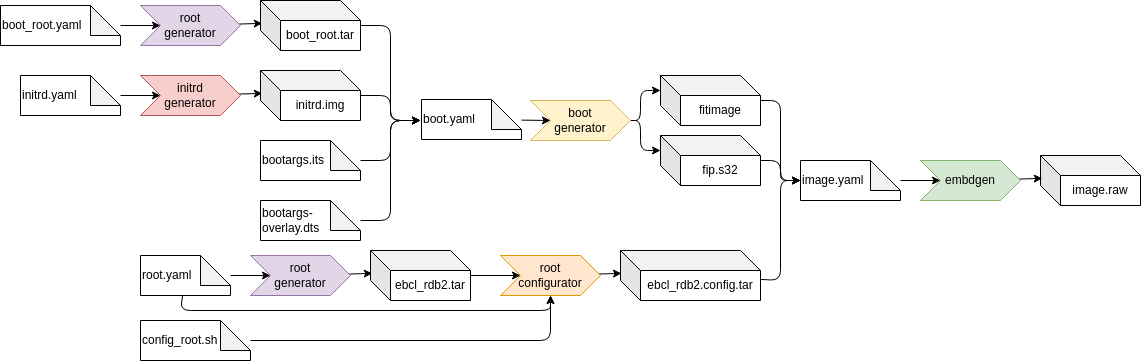
The idea behind the set of build tools in this SDK follows the UNIX philosophy to make each program do one and only one thing well and by adding new features through connecting the output from one program to another program that again does one job well. This modular approach offers high flexibility and is easy to maintain.
Initrd generator
An initrd can be generated with the initrd generator.
initrd_generator — Built an initrd
Description
Creates a custom initial RAM disk (initrd) based on busybox using YAML configuration file.
The synopsis is initrd_generator <initrd>.yaml <output_path>

The internal steps are:
- Read in YAML configuration file
- Add BusyBox binary
- Download and extract additional packages
- Add kernel modules, extracts the specified modules
- Creates device nodes for initrd image based on the configuration.
- Copy all specified files and directories into the initrd image
- Generate the init script
- Generate initrd based on all the files using
cpio
Configuration options
# Derive values from base.yaml - relative path
base: <base.yaml>
# Download dependencies of the kernel package - necessary if meta-package is specified
download_deps: <true|false>
# Files to copy from the packages
files:
  - boot/vmlinuz*
  - boot/config*
# Do not pack the files as tar - we need to provide the kernel binary to QEMU
tar: false
# Add kernel modules
modules:
  - <path_to_module_1>
  - ...
modules_urls: [<module.deb>]
# Url to download the busybox from
# if none given busybox-static from mirrors defined in base.yaml will be used
busybox_url: '<url.deb>'
# If not using the kernel meta-package specify a concrete version
kernel_version: <version>
# Root device to mount
root_device: dev/<root_device>
# devices to be available in init, type can be block ot char
devices:
  - name: <name>
    type: <block|char>
    major: <major_number>
    minor: <minor_number>
  - ...
# Packages to add, e.g. e2fstools
packages:
  - <package name>
  - ...
Root generator
A root tarball can be generated with the root generator.
root_generator — Built a root tarball
Description
Creates a custom, root tarball using YAML configuration file.
It can be used for example to build a normal rootfs, but also the build chroot build environments containing tooling needed for building other artifacts.
The synopsis is root_generator <root>.yaml <output_path> --no-config --sysroot

The internal steps are:
- Read in YAML configuration file
- If sysroot is configured add generic sysroot packages like g++
- Depending on the configuration build the image with kiwi or debootstrap
- If configuration is not skipped run config.sh script if present
- Copy image tar to output folder
Configuration
Parameters
–no-config, -n: Skip the root filesystem configuration step
–sysroot, -s: Build a sysroot inside of a normal root tarball
Yaml file
Potential configuration parameters are documented in the section “Configuration parameters” and examples are given in the section “The example images”
Root configurator
A root tarball can be configured with user scripts by the root generator.
root_configurator — Built a root tarball
Description
Configures a tarball with user provided scripts.
Splitting the root tarball generation from the configuration allows for fast configuration adaptions.
The synopsis is root_configurator <root>.yaml <input>.tar <output>.tar

The internal steps are:
- Read in YAML configuration file
- If sysroot is configured add generic sysroot packages like g++
- Depending on the configuration build the image with kiwi or debootstrap
- If configuration is not skipped run config.sh script if present
- Copy image tar to output folder
Configuration
# You can define multiple configuration scripts that will run "in" the tarball
scripts:
  - name: <name.sh>
    env: <chroot|fake|sudo|shell>
  - name: ...
Boot generator
An initrd can be generated with the initrd generator.
boot_generator — Built an initrd
Description
Creates a custom initial RAM disk (initrd) based on busybox using YAML configuration file.
The synopsis is boot_generator <boot>.yaml <output_path>
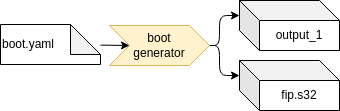
The internal steps are:
- Read in YAML configuration file
- Download debian packages
- In a temporary folder
- Extract debian packages into the folder
- Copy all specified (host)files and directories into the folder
- Run config scripts in the folder
- Generate boot tarball from the temporary folder, if configured
Configuration options
# Derive values from base.yaml - relative path
base: <base.yaml>
kernel: as in base yaml, if build locally set to null
tar: <true|false>
use_packages: <true|false>
# Name of the boot root archive, if given will be used as initial tarball base
base_tarball: $$RESULTS$$/boot_root.tar
# Files to copy form the host environment
host_files:
  - source: <file>
    destination: <folder>
# Files to copy to the build folder
files:
  - <file_path>
# You can define multiple configuration scripts that will run "in" the tarball
scripts:
  - name: <name.sh>
    env: <chroot|fake|sudo|shell>
Embdgen
Creates a disk image for embedded devices
embdgen — embedded disk generator.
Description
Creates a disk images mainly for embedded devices.
The configuration is given in a YAML file that gives a declarative image in a hierarchial way.
It used to combine all artifacts from the previous build steps - for example a Disk image, Initrd and Kernel binary - together to the (final) image.
The synopsis is embdgen <config>.yaml

Please find the upstream documentation as well here: https://elektrobit.github.io/embdgen/index.html
Hypervisor Configurator
Creates a configuration for the hypervisor
Description
The hypervisor configuration is a rather complex topic. This tool enables configuring the hypervisor using yaml files to describe the VMs, hardware configuration, shared memory configuration and more.
To generate a configuration the tool uses a set of files:
- A configuration schema that describes the yaml configuration model (schema.yaml)
- A python model of that schema to allow postprocessing of the loaded configuration (model.py)
- A set of templates to generate the configuration from
A basic set of these files that should fit all versions of the hypervisor is delivered with the toolchain. Additionally a directory containing specialization for the files can be passed to the hypervisor. This specialization should be bundled together with the hypervisor version used. It allows adding features to the configurator based on the hypervisor version used.
See Hypervisor config generator documentation for details.
Testing
This repository provides Robot Framework tests for the images, and a Robot Framework library which helps to write environment independent tests.
The core interfaces of the test library are:
- Image: Abstraction for building images.
- Power: Abstraction for power state management.
- Comm: Abstraction for image interaction.
Image
The Image class provides a generic interface for building images. To implement this, it makes use of an image_interface in the background. The image_interface provides implementations of the Build and Clear keywords for a specific build framework like our taskfiles.
A example using the Image class is:
Clear    ${path}    task mrproper
${image}=    Build    ${path}
The first line Clear the build folder,
i.e. removes previous build artifacts to ensure a clean build.
It makes use of a specific command, task mrproper, instead of relying on the defaults.
The task mrproper also deletes all local caches,
to simulate a clean workspace and ensures that also the download of all used packages works.
The Build keyword runs the image build, relying on defaults. The path parameter gives the subfolder containing the image specification. The Image class also provides an init parameter to set a base path for all images.
Power
The Power class provides a generic interface for running images. To implement this, it makes use of an power_interface in the background. The power_interface provides implementations of the Power On and Power Off keywords. The power_qemu implementation implements these keywords for running images in QEMU.
A example using the Power class to run an image:
${process}= Power On ${image}
The Power On keyword gets a path to an image file, and runs this image using QEMU.
To do this, it makes use of the task run_qemu command.
This command is executed in a fresh shell, and the shell is the returned process.
This process can be used afterwards with Comm to interact with the running image.
Hardware interfaces may use setup specific commands to power on an attached hardware, and should provide a process wrapping a serial connection session.
The Power Off keyword shall turn of the hardware. In case of QEMU, it kills the process. In case of a real hardware, it should do a power cut.
Comm
The Comm class provides a generic interface for interacting with the running image, and is the base for easy transferable and hardware independent tests. In the background, it makes use of the ProcIO class to send commands and collect the outputs. The Connect keyword attaches to the process providing the serial interface, and the Disconnect keyword detaches from the process and stops it. The test keywords provided by Comm are:
- Login To Vm: This keyword automates the login to a getty session. It’s typically used after Power On and Connect.
- Execute: This keyword runs the given command and provides the output
generated by the command. It detects the end of the output by using an
echocommand, so it requires a shell session and a shell environment which has theechocommand. - Wait For Line: This keyword reads the lines appearing at the serial terminal, and search for the given substring in the lines. If a match is found, all lines until the match, including the matching line, is returned. It can be used to wait for a given log signalling an expected system state.
- Wait for Regex: This keyword is like Wait For Line, but searches using a regular expression. This may be necessary if the searched log is more complex.
These keywords build on low level keywords which should not be needed for tests. These low level keywords are:
- Send Message: Sends a message to the serial terminal. A return (“\n”) is automatically added.
- Send Key: Sends a key to the serial terminal.
- Read Line: Reads the next output line from the serial terminal.
Util
The Util class provides useful more complex keywords implemented in Python. These keywords are:
- Filter Lines Containing: This keyword filters lines containing a given string from a string containing multiple lines. It’s used to filter the startup and init manager logs for known lines which would be detected as issue.
Performance
See Performance.
Other classes
The test library contains some more helper classes. These classes are not intended for usage in tests and the interface may change over time.
- ProcIO: Helper class for interfacing with a running subprocess. It runs threads to read and tag the lines generated by the process, and provides methods for sending messages to the process.
- Fakeroot: Fakeroot offers methods to run commands on the test host environment.
Performance tests
The EBcL test library provides a very simple setup for performance tests. The idea of those performance tests are to implement a continuous monitoring, and detecting changes early. It is not the idea to provide precise and stable performance measurements for the system under test.
The performance tests require special images, which are configured to automatically shutdown when the startup is completed. These images are assembled using a test overlay which is provided in a second partition, and mounted in the early userspace, if the kernel cmdline parameter test_overlay, pointing to the partition, is provided. This is implemented for the arm64/qemu/ebcl images. You can find the implementation in the init.sh.template.
These test overlays provide a quite simple way to extend images with test extensions in a very controlled manner, and make it easy to fully understand the impact of the test extensions. They may be also helpful for other kind of tests which require modified images.
In general, we expect that also test extensions and manipulations are done during image build, and not during test execution time. If a test requires image manipulations, a test specific build target is created, which shall implement all changes in an easy to understand and reproducible way. This helps not only for the quality argumentation, but also helps in maintaining these modifications when the images change over time, reduces the requirements for the test execution environment, and allows to inspect the result of the manipulations.
The performance tests implemented in qemu_performance.robot make use of the Image class to build the test-specific images. For a CI or hardware setup, this step needs to be separated, but for the local QEMU build it helps to simplify the tests.
For executing the tests, the Performance class is used. This class runs the image, and expects that the image shuts down automatically. During the run, the logs are collected by ProcIO and extended with host timestamps. After the run, the Performance class collects the logs, searches for given keywords as measurement points, evaluates the times using the host timestamps, and generates a test report.
This approach doesn’t allow for highly precise and stable performance numbers, since there is some variation and delay by reading the logs, but it is simple and portable and should provide numbers in a precision of a few 10 ms. From our point of view, it’s good enough to get a first idea of image changes, and to setup some monitoring for performance degrades.
This test setup may change over time. For more details, please consult the implementation.