
Product release 2.0.0-beta2

Elektrobit Automotive GmbH
Am Wolfsmantel 46
91058 Erlangen, Germany
Phone: +49 9131 7701-0
Fax: +49 9131 7701-6333
https://www.elektrobit.com
Public Information
MIT License

Copyright (c) [2025] [Elektrobit Automotive GmbH]

Permission is hereby granted, free of charge, to any person obtaining a copy
of this software and associated documentation files (the "Software"), to deal
in the Software without restriction, including without limitation the rights
to use, copy, modify, merge, publish, distribute, sublicense, and/or sell
copies of the Software, and to permit persons to whom the Software is
furnished to do so, subject to the following conditions:

The above copyright notice and this permission notice shall be included in all
copies or substantial portions of the Software.

THE SOFTWARE IS PROVIDED "AS IS", WITHOUT WARRANTY OF ANY KIND, EXPRESS OR
IMPLIED, INCLUDING BUT NOT LIMITED TO THE WARRANTIES OF MERCHANTABILITY,
FITNESS FOR A PARTICULAR PURPOSE AND NONINFRINGEMENT. IN NO EVENT SHALL THE
AUTHORS OR COPYRIGHT HOLDERS BE LIABLE FOR ANY CLAIM, DAMAGES OR OTHER
LIABILITY, WHETHER IN AN ACTION OF CONTRACT, TORT OR OTHERWISE, ARISING FROM,
OUT OF OR IN CONNECTION WITH THE SOFTWARE OR THE USE OR OTHER DEALINGS IN THE
SOFTWARE.
Introduction
EB corbos Linux for Safety Applications (also EBcLfSA and Linux for Safety Applications), is a Linux-based operating system that provides supervised management and execution of custom application software running in the Linux userland.
The EB corbos Toolkit is a software system that facilitates the development and packaging of custom application software for the EBcLfSA operating system, and the integration of software packages into images that are ready to be deployed on a target.
The targets supported by the EB corbos Toolkit include QEMU emulation on a development host and a reference hardware.
Quick Start
This section gives a short walkthrough from obtaining the EB corbos Toolkit’s delivery tarball, building an image, to eventually running the target image in a QEMU system emulation.
Ensure that the host of the EB corbos Toolkit meets the following system requirements:
-
The host is a native Linux machine or a Windows machine capable of running version 2 of Windows Subsystem For Linux (WSL).
-
At least 10 GB of free disk space.
-
At least 8 GB of RAM (recommended is at least 16 GB of RAM).
The EB corbos Toolkit is based on a development container (or dev container for short) intended to run in an OCI compliant container engine on any recent Linux distribution. This chapter describes the use of Docker as the container engine, and assumes Ubuntu 24.04 as the Linux distribution running either on a native Linux machine or on a Windows machine in WSL.
Install Docker
Install the Docker container engine, if not done already. In Ubuntu you can use the docker.io package.
sudo apt update
sudo apt install -y docker.io
sudo usermod -aG docker $USER
Adding the user to the docker group allows you to run the docker command without root privileges.
To let the new group setting take effect, open a new terminal.
Check the successful installation of Docker by running the "hello-world" container from the Docker Hub.
docker run hello-worldOn successful installation, this results in a greeting from Docker.
Obtain EB corbos Toolkit
Set environment variables for the URL of the EB corbos Toolkit’s delivery tarball and its extraction directory, so that you can reference them in subsequent commands. Make sure that the path of the extraction directory does not contain any spaces as these will lead to errors. On a Windows machine, avoid the use of a Windows partition for the extraction directory as this significantly slows down the EB corbos Toolkit.
export DELIVERY_TARBALL_URL=<delivery tarball download URL>
export DELIVERY_EXTRACT_DIR=<delivery tarball extraction directory>
export DELIVERY_TOP_LEVEL_DIR=eb_corbos_toolkit
Get the EB corbos Toolkit’s delivery tarball, if not done already.
wget $DELIVERY_TARBALL_URL -O eb_corbos_toolkit.tar.gzCreate the extraction directory, and extract the tarball into it.
mkdir -p $DELIVERY_EXTRACT_DIR
tar -xzf eb_corbos_toolkit.tar.gz -C $DELIVERY_EXTRACT_DIR
After extraction, the directory contains, below a top-level directory
-
a
README.txtfile, -
a
containersdirectory with image archive files for the development container and the build container, -
a
docdirectory with the user manual in HTML and PDF format, and -
a
workspacedirectory.
The workspace directory contains
-
an
appdevdirectory with example application source files and a corresponding BitBake layer, -
a
layersdirectory with several BitBake layers, -
a
kasdirectory with Kas project configurations, -
a
prebuiltdirectory with prebuiltfastdevtarget images and corresponding SDK root filesystems, and -
a
scriptsdirectory with several helper scripts.
In particular, the scripts directory contains
-
a
run.shscript to run the development container, -
a
qemu.shscript to run ARM64 QEMU images, -
a
target.shscript to interact with running targets, and -
a
import_sdk_archive.shscript to import an image-specific SDK root filesystem archive.
|
The |
Enter Development Container
Load the development container’s image archive file from the delivery tarball.
docker load < $DELIVERY_EXTRACT_DIR/$DELIVERY_TOP_LEVEL_DIR/containers/devcontainer-trixie-ebclfsa-amd64.docker-archive.zstYou can use the docker image ls command to check that the image ghcr.io/elektrobit/eb-corbos-toolkit-devcontainer-amd64 is loaded.
Enter the development container by using the provided run.sh script.
Pass the -d flag, so that the script runs the loaded development container rather than the default build container.
$DELIVERY_EXTRACT_DIR/$DELIVERY_TOP_LEVEL_DIR/workspace/scripts/run.sh -d -- bashWithin the development container, the bash shell runs as user developer and the current working directory is the workspace directory which is accessible as /workspace within the container.
Run Prebuilt Target Image
Boot the prebuilt fastdev target image from the delivery tarball in a QEMU system emulation by using the provided qemu.sh script within the development container.
./scripts/qemu.sh -d prebuilt/fastdev/image/ -t fastdevSetting the -d option of the qemu.sh script starts the QEMU system emulation booting the fastdev image from the prebuilt directory.
After booting, you are logged in as user root.
To stop the fastdev image, use
crinit-ctl poweroffAlternatively, you can use the key sequence Ctrl-a x to exit the QEMU system emulation.
Rebuild and Run Target Image
Rebuild the fastdev target image by using the recipe provided by the kas/public.yml Kas project configuration.
kas build --target fastdev kas/public.ymlAfter a successful build, the target image and related artifacts can be found in the build/tmp/deploy/images/ebcl-qemuarm64 deployment directory of the workspace.
To boot the rebuilt fastdev target image in a QEMU system emulation, use the provided qemu.sh script without the -d option within the development container.
By default, the qemu.sh script boots the image from the deployment directory.
./scripts/qemu.sh -t fastdevRefer to the previous Run Prebuilt Target Image step on how to stop the fastdev image.
Rebuild and Run Target Image for Raspberry Pi 4B
The delivery of the EB corbos Toolkit provides a prebuilt fastdev target image for the Raspberry Pi 4B.
To rebuild it, use the additional rpi4b.yml Kas project configuration.
kas build --target fastdev kas/public.yml:kas/targets/rpi4b.ymlAfter a successful build, the fastdev-trixie-ebclfsa-rpi4b.wic target image and related artifacts can be found in the build/tmp/deploy/images/rpi4b deployment directory of the workspace.
To boot the image on a Raspberry Pi 4B, flash it to an SD card first. There are several options for this. If you are on a Windows machine, you can use a native tool such as Rufus to create a bootable SD card.
If you are on a Linux host with access to the SD card device file, you can use the dd command.
First, set an environment variable for the device file so you can reference it in the following command.
export DEV_SDCARD=<device file of SD card>To monitor the progress of the dd command, pipe it through the pv utility to display a progress bar.
export _F=build/tmp/deploy/images/rpi4b/fastdev-trixie-ebclfsa-rpi4b.wic
dd if=$_F | pv -s $(wc -c < $_F) | sudo dd of=$DEV_SDCARD bs=4M && sync
Once the image is flashed to the SD card, you can boot it on a Raspberry Pi 4B.
The fastdev image uses the static IP address 192.168.7.2.
If the Raspberry Pi 4B is reachable at this address from the development container, you can access it using the generated SSH keys and SSH client configuration already set up in the development container.
Refer to Fast Development Image and Accessing Target Image With SSH Keys for further information.
ssh fastdev-rpi4bAfter successful authentication, you are logged in as user root.
To use a different IP address, you can modify the following files:
-
.devcontainer/setup_targets.d/hosts/public: Hostname lookup table in the development container. Changes take effect after you re-enter the development container. -
layers/meta-ebclfsa/meta-ebclfsa-public/meta-ebclfsa-public-images/recipes-config/fastdev/ebclfsa-fastdev-network_1.0.bb: Network configuration used when building thefastdevimage. Changes take effect after you rebuild the image.
You can inspect and also modify the network configuration of a running target image directly, in the file /etc/config/network.
Rebuild and Run Target Image With Graphics
In order to facilitate the development of graphical applications, the Linux kernel of the fastdev target image supports the "Direct Rendering Infrastructure" (DRI) for direct rendering on the framebuffer.
To use the kernel DRI support, rebuilt the fastdev target image with the additional graphics.yml Kas project configuration.
This adds the userspace interface to the kernelspace portion of the DRI, the mesa OpenGL graphics library and the kmscube demonstration program to the fastdev image.
kas build --target fastdev kas/public.yml:kas/includes/graphics.ymlBesides the basic graphics support added by the graphics.yaml Kas configuration, the kas/includes directory contains additional Kas configurations to add the weston compositor or a set of Qt libraries to the fastdev image.
Refer to the Weston documentation and the Qt documentation pages for further information.
To view the graphical display provided by the VNC server of a QEMU system emulation, install a VNC viewer on the Linux host, if not done already.
In Ubuntu you can use the tigervnc-viewer package.
sudo apt update
sudo apt install -y tigervnc-viewer
Re-enter the development container.
Use the -x option of the run.sh script to pass a docker option for publishing the port used by a VNC server in the development container, so that a VNC viewer running on the Linux host can connect to it.
$DELIVERY_EXTRACT_DIR/$DELIVERY_TOP_LEVEL_DIR/workspace/scripts/run.sh -d -x "-p 5900:5900" -- bashBoot the rebuilt fastdev target image in a QEMU system emulation by using the provided qemu.sh script with the --display vnc option.
This option starts the VNC server provided by the QEMU system emulation.
./scripts/qemu.sh -t fastdev --display vncThere are further display types available for the --display option, which pose additional requirements on your setup, but have improved display performance.
Refer to Display options in the QEMU documentation for further information.
Start the graphical demonstration program in the running target image.
kmscubeOpen a new terminal on the Linux host and start the VNC viewer connected to the VNC server running in the development container.
vncviewer localhost:5900The VNC viewer shows the spinning cube of the kmscube demo.
Concepts and Overview
VS Code Support
The EB corbos Toolkit offers VS Code support in order to use the development container of the delivery as an alternative to running the development container via the run.sh script.
Using VS Code with the EB corbos Toolkit’s development container requires the same prerequisites as running the development container as described in the Quick Start section up to loading the development container’s image archive file of the [_enter_the_development_container] step. Additional prerequisites specific to VS Code are:
-
VS Code installed on the Linux host or, when working in WSL, VS Code installed on Windows with its WSL integration enabled.
-
The Dev Containers extension installed in VS Code.
-
Optionally, a
~/.sshdirectory on the host with a private key andknown_hostsfile, which is bind-mounted into the development container in the same way as forrun.sh.
The EB corbos Toolkit provides an eb-corbos-toolkit.code-workspace multi-root workspace file which, besides the workspace root, includes roots for the example application sub-directories in the appdev directory.
Refer to What is a VS Code workspace for further information.
The workspace can be opened directly in VS Code or from a Linux Shell by using the code command as follows.
code $DELIVERY_EXTRACT_DIR/$DELIVERY_TOP_LEVEL_DIR/workspace/eb-corbos-toolkit.code-workspace
Opening the workspace in VS Code and selecting "Reopen in Container" (or accepting the corresponding prompt), starts the development container of the loaded container image, mounts the workspace directory as /workspace, and attaches its integrated terminal to the running development container.
This way, the integrated terminal can be used to execute commands in the Dev Container Shell.
The workspace file also predefines several tasks related to application development. Refer to Develop Application Software Using VS Code for further information.
Fast Development Image
The Fast Dev Image is an image to facilitate the development and debugging of HI Applications and LI Applications for the EBcLfSA. HI Applications are elements of the Linux Userland executed in a supervised execution environment, whereas LI Applications are elements of the Linux Userland executed in an unsupervised execution environment.
The supervised execution environment of the EBcLfSA imposes certain constraints on HI Applications.
In particular, not all of the system calls offered by the Linux kernel are allowed to be invoked by HI Applications.
For example, the ioctl() system call is not allowed to HI Applications due to its flexibility which hinders the supervision of the Linux kernel when executing the system call.
The Fast Dev Image does not provide the supervised execution environment of the EBcLfSA. Instead, the Fast Dev Image rather monitors the system calls invoked by an HI Application, and reports the usage of disallowed system calls.
Figure 1, “Fast Dev Image” shows the components of the Fast Dev Image.

Table 1, “Components of the Fast Dev Image” gives short descriptions of the components of the Fast Dev Image.
| Component | Description |
|---|---|
Fast Dev Linux Kernel |
Patched Linux kernel which implements the monitoring feature of the Fast Dev Image |
HI Init |
Simplified init process running as a HI Application to start other HI Applications and LI Applications |
Other LI Application(s) |
Other "Low-Integrity" programs and services incl. example LI Applications and a SSH server to interact with a running Fast Dev Image |
Crinit |
Init daemon running as a LI Application to start other LI Applications |
Other HI Application(s) |
Other "High-Integrity" programs and services incl. example HI Applications |
On startup, the Linux kernel start the HI Init process.
The HI Init process in its turn starts further HI Applications, including an executable /usr/bin/hi_app, if present, and then starts the Crinit init daemon as a LI Application.
This startup sequence adheres to the assumption of use of the EBcLfSA, that a HI Application can only be started by another HI Application.
The Crinit init daemon starts the SSH server of the Fast Dev Image.
The SSH client in the development container allows access to the Fast Dev Image without password using fastdev-qemuarm64 as the hostname of the Fast Dev Image.
All required hostname and SSH client configuration entries are generated during development container start.
The referenced SSH private key is taken from the prebuilt directory for the prebuilt Fast Dev Image, or generated at build-time when rebuilding the Fast Dev Image.
In both cases, a matching SSH public key will be present in the `root’s home directory of the Fast Dev Image.
Refer to Accessing Target Image With SSH Keys for further information.
Developing Application Software
This section describes how to build application software by using a prebuilt SDK root filesystem, and how to run the resulting application in a target image without rebuilding the image.
Prerequisites of this user task are:
-
A target image which can run in a QEMU system emulation.
-
An SDK root filesystem suitable for the target image.
-
The EB corbos Toolkit’s development container in the local Docker image store.
Refer to the Quick Start section on how to obtain the EB corbos Toolkit.
The delivery includes a prebuilt fastdev target image, an SDK root filesystem suitable for the fastdev target image, and an image archive file of the EB corbos Toolkit’s development container.
The Quick Start section further describes how to load the development container’s image archive file, and how to enter the development container.
Steps to be performed by the user to accomplish this user task are:
-
Create the source files for the application software.
-
Import the SDK root filesystem.
-
Build the application software.
-
Run the target image.
-
Deploy and run the application.
This section describes the development of both LI application and HI application software. For a LI application, there are two alternatives for deploying and running the application:
-
Deploy and run the application interactively. This alternative runs the application immediately on request by the user.
-
Deploy and run the application on startup. This alternative runs the application only after the user reboots the target image.
For a HI application, it is not admissible to run the application interactively, as this would violate the assumption of use that a HI application can only be invoked by another HI application. Hence, for a HI application, only deploying and running the application on startup applies.
Building the application software uses cross-compilation. Cross-compilation can avoid time consuming native compilation on a host whose architecture is different from the target architecture. To configure the toolchain for cross-compilation and for further build settings, the EB corbos Toolkit provides several CMake Presets for usage with the CMake build tool. In particular,
-
fastdev-li-qemuarm64CMake Presets for building LI application software, and -
fastdev-hi-qemuarm64CMake Presets for building HI application software.
Both CMake Presets are suitable for the fastdev image running in a QEMU system emulation.
Refer to the cmake-presets manual page for further information on CMake Presets.
The EB corbos Toolkit provides a target image tool which facilitates the interaction with a running target image, including the deployment of application software and its invocation based on given CMake Presets.
The target image tool is provided as a target.sh script included in the EB corbos Toolkit’s delivery.
The user task is illustrated in Figure 2, “Interaction for Developing Application Software” as an interaction between the user, the target image tool, and the running target image.
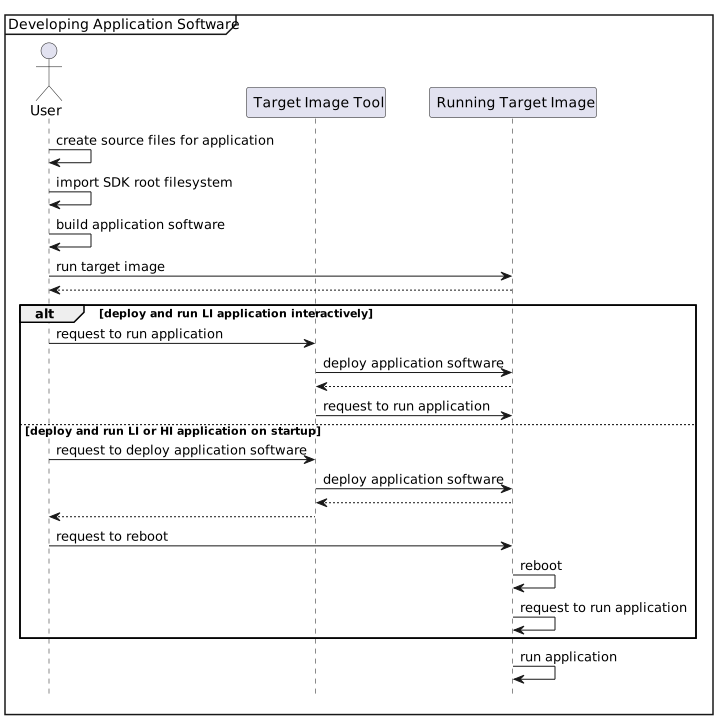
The remainder of this section gives instructional information about this user task, separately for developing LI application software and HI application software.
Developing LI Application Software
This section describes the steps performed by the user for developing LI application software following the sequence shown in Figure 2, “Interaction for Developing Application Software”.
Create Source Files for LI Application Software
Create the source files for the application software for building with the CMake build tool based on the provided fastdev-li-qemuarm64 CMake Presets.
As a running example for developing LI application software, consider a simplistic "Hello World" application which is provided in the appdev/apps/hello-world directory.
The source files for the application comprise a hello.c C program file, a hello.crinit.template file for a corresponding Crinit task, and a CMakeLists file.
// Copyright 2025 Elektrobit. All rights reserved.

#include <stdio.h>
#include <unistd.h>

#define NR_RUNS 5 // Run the loop 5 times
#define SLEEP   1 // Sleep 1s between runs

int main() {
  unsigned int i = 0;

  printf("Hello world!\n");

  for(i=0; i < NR_RUNS; i++) {
    sleep(SLEEP);
    printf("Hello again #%u!\n", i);
  }

  return 0;
}
The hello.c program first prints "Hello world!" and then "Hello again!" several times in sequence to facilitate spotting the printed messages in a terminal cluttered by startup messages stemming from booting the target image.
NAME = hello
COMMAND = /@CMAKE_INSTALL_BINDIR@/hello
DEPENDS = ""
RESPAWN = NO
The hello.crinit.template file uses the CMAKE_INSTALL_BINDIR CMake variable which will be instantiated by CMake during build time.
# Copyright 2025 Elektrobit. All rights reserved.

cmake_minimum_required(VERSION 3.23)
project(Hello LANGUAGES C)

# Define hello executable
add_executable(hello hello.c)

# Include GNUInstallDirs to determine the correct values for CMAKE_INSTALL_*
include(GNUInstallDirs)

# Install binary
install(TARGETS hello DESTINATION ${CMAKE_INSTALL_BINDIR})

# Process crinit file and install
# Enable the following two lines for crinit integration
configure_file(${CMAKE_CURRENT_SOURCE_DIR}/hello.crinit.template ${CMAKE_CURRENT_BINARY_DIR}/hello.crinit USE_SOURCE_PERMISSIONS)
install(FILES ${CMAKE_CURRENT_BINARY_DIR}/hello.crinit DESTINATION ${CMAKE_INSTALL_SYSCONFDIR}/crinit/crinit.d/)

# Create gdbinit
if (${CMAKE_BUILD_TYPE} STREQUAL "Debug")
  configure_file(${CMAKE_CURRENT_SOURCE_DIR}/app_gdbinit.template ${CMAKE_CURRENT_BINARY_DIR}/.gdbinit USE_SOURCE_PERMISSIONS)
endif()
The CMakeLists file defines the executable hello build from the hello.c source file, and a hello.crinit Crinit task file.
The CMakeLists file further defines a gdbinit file for interactively debugging the application.
Debugging an application, however, is not in the scope of this user task.
Import SDK root filesystem
Enter the development container, and extract the SDK root filesystem archive from the delivery into the workspace, so that the extracted SDK root filesystem is accessible in the development container.
You can use the import_sdk_archive.sh script for this step, which extracts the archive into a suitable location within the workspace directory.
./scripts/import_sdk_archive.sh -s prebuilt/fastdev/sysroot/fastdev-sdk-trixie-ebclfsa-ebcl-qemuarm64.tar.gzThe script also performs some additional cleanup as the archive is created by the ISAR do_populate_sdk task and contains some files which are not suitable for the EB corbos Toolkit.
On success, the extracted SDK root filesystem is located under sysroots/fastdev-sdk-trixie-ebclfsa-ebcl-qemuarm64/ in the workspace directory.
Build LI Application Software
Build the LI application software using the CMake build tool and the provided fastdev-li-qemuarm64 CMake Presets for building a LI application and its corresponding Crinit task for the fastdev target image.
cd appdev/apps/hello-world/
cmake . --preset fastdev-li-qemuarm64
cmake --build --preset fastdev-li-qemuarm64
cd -
The first cmake command sets and reports the CMake variables and the environment variables according to the fastdev-li-qemuarm64 CMake Presets.
The second cmake command builds the hello executable and generates the hello.crinit Crinit task file.
On successful completion of this build step, the hello executable together with its hello.crinit task file is stored in the build/fastdev-li-qemuarm64 subdirectory of the application’s appdev/apps/hello-world source directory.
Run Target Image
Boot the prebuilt fastdev target image in a QEMU system emulation by using the provided qemu.sh script within the development container.
The prebuilt fastdev target image is located in the prebuilt/fastdev/image directory.
Boot the fastdev target image as a background process to allow running further commands without blocking the terminal.
Redirect the output of the QEMU system emulation to a log file to avoid cluttering the terminal.
./scripts/qemu.sh -d prebuilt/fastdev/image/ -t fastdev < /dev/null > qemu.log 2>&1 &The log file qemu.log is located in the workspace directory.
You can inspect the log file or watch the log file while the target image is running by opening a new terminal and using, e.g., a cat or tail -f command.
After the fastdev target image boots successfully, you can find a "Debian GNU/Linux" welcome message in the log file.
Deploy and Run LI Application Interactively
To deploy and run the application interactively, you can use the provided target image tool with the -c run command option, the fastdev-li-qemuarm64 CMake preset and the appdev/apps/hello-world source directory.
./scripts/target.sh -c run -a appdev/apps/hello-world/build/fastdev-li-qemuarm64 -b helloThe target image tool first employs the running ssh server to copy the executable application to the running image, and then invokes the executable hello application as given by the -b hello option.
The -p fastdev-li-qemuarm64 options for the CMake Presets and the -a appdev/apps/hello-world option for the application base directory determine the source and target locations of the deployed build artifacts.
On success, the target.sh reports the deployed artifacts and the hello application prints "Hello World" and "Hello again" according to the hello.c source file shown in step Create Source Files for LI Application Software.
Deploy and Run LI Application on Startup
To deploy and run the LI application on the startup of the target image, you can use the provided target image tool with the -c deploy command option, and then reboot the target image.
./scripts/target.sh -c deploy -a appdev/apps/hello-world/build/fastdev-li-qemuarm64To reboot the target image without further interaction, you can provide the target image with the crinit-ctl reboot command via ssh.
Refer to Fast Development Image for further information about SSH access to the fastdev target image.
ssh fastdev-qemuarm64 crinit-ctl rebootOn success, the qemu.log log file in the workspace directory shows the reboot of the target image and the "Hello World" and "Hello again" messages according to the hello.c source file shown in step Create Source Files for LI Application Software.
Developing HI Application Software
This section describes the development of HI application software according to the sequence shown in Figure 2, “Interaction for Developing Application Software”. The steps for importing the SDK root filesystem and for running the target image are identical to the corresponding steps for developing LI application software. Refer to Import SDK root filesystem and Run Target Image in the Developing HI Application Software section for instructional information.
The steps for creating source files for HI application software, building HI application software, and for deploying and running a HI application on startup, however, differ from the corresponding steps for developing LI application software. These steps are described in the following subsections.
Create Source Files for HI Application Software
Create the source files for the application software for building with the CMake build tool based on the provided fastdev-hi-qemuarm64 CMake Presets.
As a running example for developing HI application software, consider a simplistic "Hello Safety" application which is provided in the appdev/apps/hello-safety directory.
The source files for the application comprise a hello.c C program file, and a CMakeLists file.
// Copyright 2025 Elektrobit. All rights reserved.

#include <stdio.h>
#include <unistd.h>

#include <sys/ioctl.h>

#define SLEEP   1 // Sleep 1s between runs

int main() {
  unsigned int i = 0;

  // Disable buffering as the required syscall isn't allowed in HI mode.
  // NOLINTNEXTLINE(bugprone-unsafe-functions,cert-msc24-c,cert-msc33-c)
  setbuf(stdout, NULL);

  printf("Hello safety!\n");

#if defined(IS_FASTDEV)

  // Let's explicitly do a forbidden syscall and trigger a kernel message
  // for demo purpose. This only works in fastdev environments, as in
  // full integrations the OS safety monitor would detect this and trigger
  // the health signal handler.
  ioctl(0, 0);

#endif

  while(1) {
    sleep(SLEEP);
    i++;
    // Use the following line to spam the serial console
    // printf("Hello safety #%u!\n", i);
  }

  return 0;
}
The hello.c program first prints "Hello safety!", and then enters an infinite loop.
The hello.c program also uses a ioctl syscall to illustrate the monitoring feature of the fastdev image.
# Copyright 2025 Elektrobit. All rights reserved.

cmake_minimum_required(VERSION 3.23)
project(Hello LANGUAGES C)

# Define hello executable
add_executable(hi_app hello.c)

# Include GNUInstallDirs to determine the correct values for CMAKE_INSTALL_*
include(GNUInstallDirs)

# Install binary
install(TARGETS hi_app DESTINATION ${CMAKE_INSTALL_BINDIR})

# Mark application as safety application
target_enable_hi(hi_app)

# Create gdbinit
if (${CMAKE_BUILD_TYPE} STREQUAL "Debug")
  configure_file(${CMAKE_CURRENT_SOURCE_DIR}/app_gdbinit.template ${CMAKE_CURRENT_BINARY_DIR}/.gdbinit USE_SOURCE_PERMISSIONS)
endif()
The CMakeLists file defines the executable hi_app built from the hello.c source file, which is to be installed in the /usr/bin directory on the target image as determined by the CMake Presets.
The fastdev target image is configured so that if a /usr/bin/hi_app executable is present, then it is invoked on startup as the first HI application.
Hence, in contrast to the CMakeLists file for a LI application, there is no need to create a Crinit task to run the HI application on startup.
Furthermore, the CMakeLists file applies the function target_enable_hi to the hi_app executable in the CMake build.
This function marks a HI Application so that its status as a HI Application is recognized when it is started.
The function uses the High Integrity marker tool lisa_elf_enabler of the EB corbos Toolkit.
Finally, the CMakeLists file defines a gdbinit file for interactively debugging the application.
Debugging an application, however, is not in the scope of this user task.
Build HI Application Software
Build the HI application software using the CMake build tool and the provided fastdev-hi-qemuarm64 CMake Presets for building a HI application for the fastdev target image.
cd appdev/apps/hello-safety/
cmake . --preset fastdev-hi-qemuarm64
cmake --build --preset fastdev-hi-qemuarm64
cd -
The first cmake command sets and reports the CMake variables and the environment variables according to the fastdev-hi-qemuarm64 CMake Presets.
The second cmake command builds the hi_app executable.
On successful completion of this build step, the hi_app executable is stored in the build/fastdev-hi-qemuarm64 subdirectory of the application’s appdev/apps/hello-safety source directory.
Deploy and Run HI Application on Startup
To deploy and run the HI application on the startup of the target image, you can use the provided target image tool with the -c deploy command option, and then reboot the target image.
./scripts/target.sh -c deploy -a appdev/apps/hello-safety/build/fastdev-hi-qemuarm64To reboot the target image without further interaction, you can provide the target image with the crinit-ctl reboot command via ssh.
This instruction is identical to the corresponding instruction for rebooting the target image with a LI application.
ssh fastdev-qemuarm64 crinit-ctl rebootOn success, the qemu.log log file in the workspace directory shows the reboot of the target image, and a "Hello safety!" message according to the hello.c source file shown in step Create Source Files for HI Application Software.
The log file further shows a "syscall __NR_ioctl (29) is not allowed" message for the unsupported ioctl() syscall.
Develop Application Software Using VS Code
This section describes the steps of a user for application development using the VS Code Support of the EB corbos Toolkit.
As prerequisites of this section, the workspace provided by the eb-corbos-toolkit.code-workspace workspace file is opened in VS Code, and the integrated terminal is attached to the running development container via "Reopen in Container".
The workspace file predefines tasks to build and deploy an application, and to run it on a target image by invoking the target.sh script.
The predefined tasks refer to an "active build preset" corresponding to a CMake Presets file in the source directory of the application.
Once a CMake Presets file is selected for either an LI Application or an HI Application, the steps of this section are identical for developing LI Application or HI Application software, except that running an application interactively is not admissible for an HI Application.
Select CMake Presets
To select a CMake Presets file as the "active build preset", open the Command Palette (Ctrl+Shift+P), then type and select "CMake: Select Active Folder". This will display a list of folders defined in the workspace file, allowing you to choose the CMake Presets file contained in that folder.
For the "Hello World" examples, either choose the hello-world folder or the hello-safety folder for developing LI Application or HI Application software, respectively.
Import SDK root filesystem
Open an integrated terminal attached to the running development container in the workspace directory, and use the import_sdk_archive.sh script to extract the SDK root filesystem archive from the delivery into the workspace.
./scripts/import_sdk_archive.sh -s prebuilt/fastdev/sysroot/fastdev-sdk-trixie-ebclfsa-ebcl-qemuarm64.tar.gzBuild Application Software
Open the Command Palette (Ctrl+Shift+P), then type and select "Run Task". This will display a list of tasks defined in the workspace file, allowing you to choose the predefined build task for the application.
Build app from active build presetRun Target Image
You can use the open terminal (or use a new terminal) to boot the prebuilt fastdev target image by using the provided qemu.sh script within the development container.
./scripts/qemu.sh -d prebuilt/fastdev/image/ -t fastdevDeploy and Run Application Interactively
Choose the predefined task for running the LI Application. This step is only admissible for the "Hello World" LI Application.
Run app from active build presetOn success, the terminal with the running target image shows the "Hello World" and "Hello again" messages of the hello LI Application.
Deploy and Run Application on Startup
Choose the predefined task for deploying the application from the Command Palette.
Deploy app from active build presetUse the terminal with the running target image to provide the target image with a reboot command.
crinit-ctl rebootOn success, the terminal shows the reboot of the target image and the messages of one of the "Hello World" application examples.
Adding Custom BitBake Layer
This section describes how to add a custom BitBake layer to the project. A custom BitBake layer allows isolating custom BitBake metadata from the BitBake metadata of the EB corbos Toolkit’s delivery, and facilitates the development of custom packages and images while retaining the BitBake metadata from the delivery.
A prerequisite of this user task is:
-
The EB corbos Toolkit’s development container is loaded in the local Docker image store.
Refer to the Quick Start section on how to obtain the EB corbos Toolkit, load the development container image, and enter the development container.
Steps to be performed by the user are:
-
Create a custom BitBake layer.
-
Create a Kas project configuration for the custom BitBake layer.
-
Include the Kas project configuration for the custom BitBake layer.
The naming convention for BitBake layers is to prepend the name of the corresponding directory with the string "meta-".
BitBake layers typically contain a conf subdirectory for configuration, a classes subdirectory for BitBake classes, and one or more directories for BitBake recipes which are prefixed with "recipes-".
This section describes how to include the Kas project configuration via the command line. For further options refer to Project Configuration in the Kas documentation.
The progression of the user task is depicted in Figure 3, “Interaction for Adding Custom BitBake Layer”.
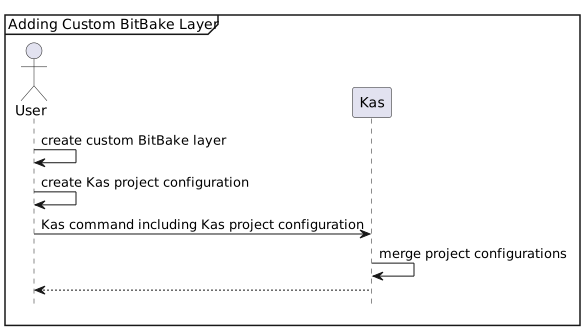
The following sub-sections describe the steps of this user task. The steps are illustrated with adding the example application layer from the EB corbos Toolkit’s delivery as a working example.
Create Custom Layer
Create the layer directory structure following the BitBake naming convention, and add a configuration file in the layer’s conf subdirectory.
For the example application layer consider the appdev/meta-appdev directory.
The directory contains a recipes-apps subdirectory for example application recipes and a conf subdirectory.
The conf subdirectory contains the layer.conf configuration file of the layer.
# Copyright 2025 Elektrobit. All rights reserved.

# We have a conf and classes directory, add to BBPATH
BBPATH .= ":${LAYERDIR}"

# We have recipes-* directories, add to BBFILES
BBFILES += "${LAYERDIR}/recipes-*/*/*.bbappend ${LAYERDIR}/recipes-*/*/*.bb"
The BitBake variables used in the configuration file are:
-
BBPATH: BitBake’s search path for class (.bbclass) and configuration (.conf) files. -
BBFILES: Location of recipes in a layer.
For further variables which may be used in a layer’s configuration file refer to Understanding and Creating Layers in the Yocto documentation.
Create Kas Project Configuration
Specify the location and possibly further properties of the BitBake layer in a Kas project configuration.
For the example application layer, the Kas project configuration is in the kas directory.
# Copyright 2026 Elektrobit. All rights reserved.

header:
  version: 18

repos:
  meta-appdev:
    path: "appdev/meta-appdev"
    layers:
      .:
Refer to Configuration reference in the Kas documentation for further properties which can be specified in a Kas project configuration.
Include Kas Project Configuration
Run a Kas command with the additional project configuration included on the command line.
For the example application layer, and as an example Kas command, you can use the kas dump command to examine the merged project configuration with the additional example application layer.
kas dump kas/public.yml:kas/example-apps.ymlThe result is the merged Kas project configuration in YAML format with a meta-appdev list item under the repos key.
Accessing Target Image With SSH Keys
This section describes how to set up passwordless SSH access to a target image using SSH authentication keys, facilitating interaction with a running target image during development. It describes two alternative ways of providing the SSH authentication keys: keys generated during the build of a target image, and keys provided by the user.
For all target images in the delivery of the EB corbos Toolkit, passwordless SSH access with generated keys is already set up. Refer to Fast Development Image for a short description. Hence this section is only relevant for setting up (or disabling) passwordless SSH access for new or modified target images.
For generated SSH keys, the private key is only deployed to the workspace. Hence, passwordless SSH access using generated keys is not possible without access to the workspace.
The user performs the following steps:
-
Optionally generate SSH keys, or provide the public key of own SSH keys to the target image build. This is only relevant for user-provided SSH keys.
-
Configure the SSH setup during the target image build, including key generation and deployment.
-
Configure the SSH client on the host to simplify the SSH access to a running target image.
-
Build the target image.
-
Run and access the target image.
BitBake variables related to the SSH setup during the target image build are:
-
EBCL_SSH_TARGET_ACCESS: Generate or use user-provided SSH keys. Possible values are:-
0: Disable SSH setup. -
1: Enable SSH setup. -
auto: Enable SSH setup only if a SSH server package is in the list of packages which are installed in the target image. This is the default value.
-
-
EBCL_SSH_AUTHORIZED_PUBKEY: Filename of the user-provided public SSH key file. If left unset, generate SSH keys. -
EBCL_SSH_SERVER_PACKAGES: List of SSH server packages to look for in the list of installed packages. Only relevant ifEBCL_SSH_TARGET_ACCESSis set toauto. Defaults toopenssh-serveranddropbear.
Setting up SSH in the target image happens during the postprocessing task of an image recipe that inherits the ebcl-image BitBake class.
For generated SSH keys, the image recipe performs the following steps:
-
Generate the SSH keys.
-
Deploy the generated SSH private key in the workspace.
-
Deploy the generated SSH public key in the target image.
For user-provided keys, the image recipe performs the following step:
-
Fetch the user-provided SSH public key.
-
Deploy the user-provided SSH public key in the target image.
The progression of the user task is depicted in Figure 4, “Interaction for Accessing Target Image With SSH Keys”.
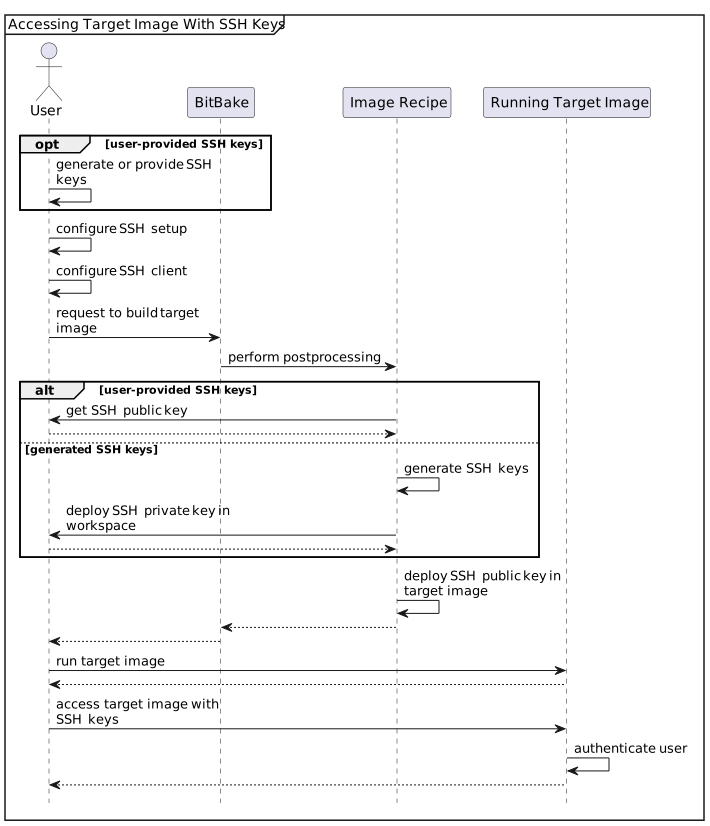
The following sub-sections describe the steps of this user task for the two alternative ways of providing the SSH keys.
Both variants are illustrated with a copy of the fastdev target image as a working example.
Accessing Target Image With Generated SSH Keys
In this variant, the SSH keys are generated during the build of the target image, and the generated private key is deployed to the workspace of the development container.
Configure SSH Setup
Copy the fastdev image recipe to a myfastdev image recipe in the example application layer and set the EBCL_SSH_TARGET_ACCESS variable to auto.
mkdir -p /workspace/appdev/meta-appdev/recipes-images/myfastdev
cp layers/meta-ebclfsa/meta-ebclfsa-public/meta-ebclfsa-public-images/recipes-images/fastdev/fastdev_1.0.bb appdev/meta-appdev/recipes-images/myfastdev/myfastdev_1.0.bb
echo "EBCL_SSH_TARGET_ACCESS = \"auto\"" >> appdev/meta-appdev/recipes-images/myfastdev/myfastdev_1.0.bb
Setting the EBCL_SSH_TARGET_ACCESS variable to auto in the copied recipe is only for the sake of clarity, and can be omitted as this is the default value for the variable.
Since the EBCL_SSH_AUTHORIZED_PUBKEY variable is left unset in the copied recipe, SSH keys are generated during the build.
Configure SSH Client
Configure the SSH client on the host to enable simple SSH access with destination myfastdev-qemuarm64, using the generated private key for connecting to the myfastdev target image.
cat <<EOF >> ~/.ssh/config
Host myfastdev-qemuarm64
    HostName 127.0.0.1
    Port 10022
    User root
    StrictHostKeyChecking no
    UserKnownHostsFile /dev/null
    IdentityFile /workspace/build/tmp/deploy/images/ebcl-qemuarm64/myfastdev-trixie-ebclfsa-ebcl-qemuarm64-ssh-target-key
EOF
The settings concerning the host authentication allow access without further user interaction.
Build the Target Image
Build the myfastdev target image.
kas build --target myfastdev kas/public.yml:kas/example-apps.ymlDuring postprocessing, the image recipe generates the SSH keys, deploys the private key to the workspace, and deploys the public key to the target image.
After a successful build, the generated private key can be found in the /workspace/build/tmp/deploy/images/ebcl-qemuarm64 deployment directory of the workspace.
Run and Access Target Image
Run the myfastdev target image in the background so that it can be accessed via SSH without switching to another terminal.
./scripts/qemu.sh -t myfastdev < /dev/null > qemu.log 2>&1 &Access the running target image via SSH.
ssh myfastdev-qemuarm64The target image authenticates the connection using the generated keys.
After successful authentication you are logged in as user root without any further interaction.
Accessing Target Image With User-Provided SSH Keys
In this variant, the user provides own SSH keys, and the public key is deployed to the target image during the build. No SSH keys are generated during the build, and no private key is deployed to the workspace.
The steps for running and accessing the target image are identical to the corresponding steps for using generated keys and are therefore omitted in this section.
Generate or Provide SSH Keys
Set an environment variable for the user-provided key file of the SSH private key, so that you can reference
both the private key file and the corresponding public key file (with .pub extension) in subsequent commands.
export MY_EBCL_SSH_KEY=<my SSH private key file>Optionally generate SSH keys. If you already own suitable SSH keys, skip this command.
ssh-keygen -q -f "$MY_EBCL_SSH_KEY" -N ""Configure SSH Setup
Copy the fastdev image recipe to a myfastdev image recipe in the example application layer and set the EBCL_SSH_AUTHORIZED_PUBKEY variable.
mkdir -p /workspace/appdev/meta-appdev/recipes-images/myfastdev
cp layers/meta-ebclfsa/meta-ebclfsa-public/meta-ebclfsa-public-images/recipes-images/fastdev/fastdev_1.0.bb appdev/meta-appdev/recipes-images/myfastdev/myfastdev_1.0.bb
echo "EBCL_SSH_AUTHORIZED_PUBKEY = \""$MY_EBCL_SSH_KEY".pub\"" >> appdev/meta-appdev/recipes-images/myfastdev/myfastdev_1.0.bb
Configure SSH Client
Configure the SSH client on the host to enable simple SSH access with destination myfastdev-qemuarm64, using the user-provided private key for connecting to the myfastdev target image.
cat <<EOF >> ~/.ssh/config
Host myfastdev-qemuarm64
    HostName 127.0.0.1
    Port 10022
    User root
    StrictHostKeyChecking no
    UserKnownHostsFile /dev/null
    IdentityFile $MY_EBCL_SSH_KEY
EOF
Build the Target Image
Build the myfastdev target image.
kas build --target myfastdev kas/public.yml:kas/example-apps.ymlDuring postprocessing, the image recipe fetches the user-provided SSH public key and deploys it to the target image.
Packaging Application Software
This section describes how to package application software as Debian packages in order to integrate the application software into a target image.
Prerequisites of this user task are:
-
The availability of the sources of the application software.
-
The EB corbos Toolkit’s development container in the local Docker image store.
Refer to the Quick Start section on how to obtain the EB corbos Toolkit. The delivery includes an image archive file of the EB corbos Toolkit’s development container and example application sources. The Quick Start section further describes how to load the development container’s image archive file, and how to enter the development container.
Steps to be performed by the user for this user task are:
-
Create Debian package specification files.
-
Create a package recipe for the application software.
-
Build the packages of the application software.
-
Optionally deploy the package on a running target image.
The Debian package specification files are required to build Debian packages from sources. Refer to the Debian Policy Manual and the Guide for Debian Maintainers for further details on Debian packaging.
ISAR provides a deb_debianize function to generate rudimentary Debian package specification files, which may be sufficient for packaging the application software.
The deb_debianize function adds only those Debian package specification files which are not already provided as sources.
Refer to the implementation of the debianize.bb BitBake class for the generated Debian package specification files.
The debianize.bb BitBake class is located in the workspace directory under layers/isar/meta/classes.
A package recipe is a BitBake recipe which inherits the dpkg BitBake class provided by ISAR.
The tasks of a package recipe include:
-
Fetch the application sources from specified location(s).
-
Build source and binary packages for the application.
-
Store the resulting packages in the local ISAR Apt repository.
Building the binary package(s) for the application takes place in an sbuild chroot environment via the Debian sbuild utility.
The creation of the sbuild chroot environment is a dependent task of a package recipe.
The progression of the user task is illustrated in Figure 5, “Interaction for Packaging Application Software”. The interaction includes a "Source Location" participant which represents one or more locations which are accessible by the BitBake fetcher.
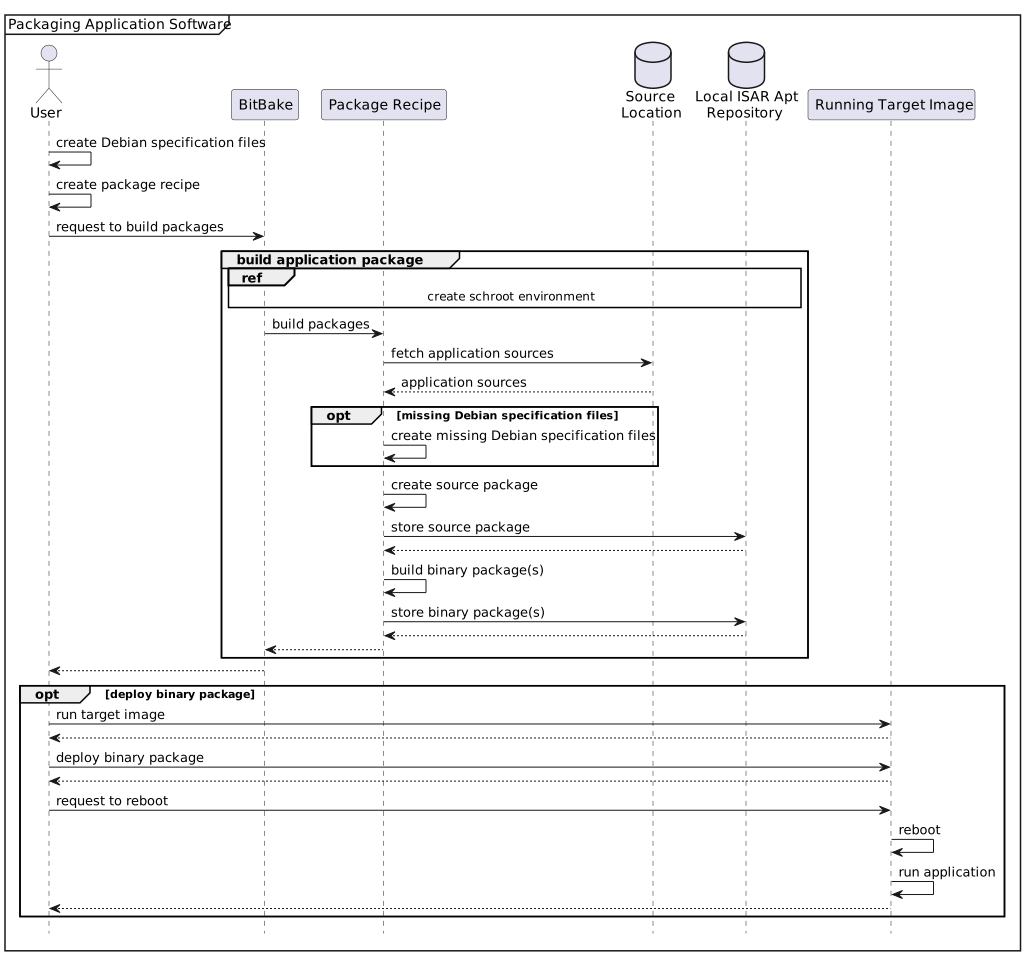
Packaging LI Application Software
This section describes the packaging of LI Application software according to the sequence shown in Figure 5, “Interaction for Packaging Application Software”.
Create Debian Package Specification Files for LI Application
Required specification files are the Debian rules, control and changelog file.
If you use the ISAR deb_debianize function, you can restrict yourself to those specification files for which the generated files are not suitable for the application.
Building the "Hello World" example in the appdev/apps/hello-world directory is based on a CMake toolchain file.
The specification of the CMake toolchain file can be included in a Debian rules file.
#!/usr/bin/make -f

# Copyright 2025 Elektrobit. All rights reserved.

# Enable hardening flags
export DEB_BUILD_MAINT_OPTIONS = hardening=+all

%:
	dh $@

ifeq ($(DEB_HOST_ARCH),arm64)
CMAKE_ARGS += -DCMAKE_TOOLCHAIN_FILE=$(CURDIR)/cmake/toolchain/fastdev-arm64/toolchain-fastdev-li-arm64.cmake
export TOOLCHAIN_BASE=${CURDIR}/cmake/toolchain
endif

override_dh_auto_configure:
	dh_auto_configure -- $(CMAKE_ARGS)
Create Package Recipe for LI Application
Create a BitBake package recipe which inherits the dpkg BitBake class. Specify the source location(s), build-time dependencies, and further settings related to Debian packaging.
If you use the ISAR deb_debianize function, provide additional metadata for the generation of the Debian package specification files.
For the "Hello World" example in the appdev/apps/hello-world directory, consider the following package recipe.
# Copyright 2025 Elektrobit. All rights reserved.

DESCRIPTION = "Hello World application"
MAINTAINER = "Hello World maintainer"

inherit dpkg

SRC_URI = " \
    file:///workspace/appdev/apps/hello-world/ \
    file:///workspace/appdev/cmake/toolchain \
    file://rules \
"

# Copy source and CMake toolchain files from fetched directories.
prepare_app_source(){
    cp ${WORKDIR}/workspace/appdev/apps/hello-world/hello.c ${S}
    cp ${WORKDIR}/workspace/appdev/apps/hello-world/CMakeLists.txt ${S}
    cp ${WORKDIR}/workspace/appdev/apps/hello-world/hello.crinit.template ${S}
    cp -r ${WORKDIR}/workspace/appdev/cmake ${S}
}

do_prepare_build[cleandirs] += "${S}/debian"
do_prepare_build() {
    prepare_app_source
    deb_debianize
}

# BitBake recipe dependencies
DEPENDS:append = "cmake"

# Build dependencies for the debian/control file
DEBIAN_BUILD_DEPENDS:append = "cmake"
The BitBake variables used in this recipe are:
-
DESCRIPTION: Textual description of the package. -
MAINTAINER: Maintainer of the package. -
SRC_URI: Location(s) of source files to be fetched for building the packages. -
WORKDIR: The top-level work directory for the package recipe. -
S: Directory for the files of the source package. -
DEPENDS: This recipe’s build-time dependencies on other BitBake package recipes. These dependencies make corresponding Debian packages available for installation in theschrootenvironment which is used to build the binary Debian package. -
DEBIAN_BUILD_DEPENDS: This recipe’s build-time dependencies on Debian packages which will be installed viaaptin theschrootenvironment used to build the binary Debian package.
The MAINTAINER and DEBIAN_BUILD_DEPENDS variables are used by the deb_debianize function to create the Debian control file required to build a Debian package via sbuild.
For further variables which can be used for the deb_debianize function refer to section Packages without source in the ISAR User Manual and the debianize.bb BitBake class which is located in the workspace directory under layers/isar/meta/classes.
The package recipe uses the file:// protocol with an absolute path in the SRC_URI variable.
Fetching sources with such a protocol copies the sources together with their complete directory hierarchy to the top-level work directory for the package recipe.
Therefore, the hello-world_0.1.bb package recipe further defines a function prepare_app_source to place the source files fetched via the SRC_URI variable into the S directory as expected by the recipe’s build task for the source package.
Build Package of LI Application
Enter the development container and request the BitBake tool to build the package. Make sure that the package recipe resides in a layer which is accessible by BitBake as specified in the Kas configuration files.
For the "Hello World" example, you can use the following command.
kas build --target hello-world kas/public.yml:kas/example-apps.ymlOn successful completion of this step, the local ISAR Apt repository contains source and binary Debian packages for the "Hello World" application.
You can use the reprepro tool to query the ISAR Apt repository about the packages.
cd build/tmp/deploy/isar-apt/trixie-ebclfsa-arm64/
reprepro -b apt/trixie-ebclfsa --dbdir ./db/trixie-ebclfsa/ ls hello-world
cd -
To locate the related artifacts within the ISAR Apt repository you can use the find command.
find build/tmp/deploy/isar-apt/trixie-ebclfsa-arm64 -name hello-world*.*Deploy LI Application Package on Target Image
Boot the target image in a QEMU system emulation, and provide the running target image with the binary package of the LI Application. Then install the package and reboot the target image to run the LI Application on startup. To reiterate this packaging task from the pristine state of the target image, you can additionally uninstall the package again.
To deploy the "Hello World" example package on the fastdev target image, boot the fastdev target image in a QEMU system emulation.
Refer to Run Target Image for further information.
./scripts/qemu.sh -d prebuilt/fastdev/image/ -t fastdev < /dev/null > qemu.log 2>&1 &Provide the running fastdev target image with the hello-world_0.1_arm64.deb binary package by using the scp command.
Refer to Fast Development Image for further information about SSH access to the fastdev target image.
cd build/tmp/deploy/isar-apt/trixie-ebclfsa-arm64/apt/trixie-ebclfsa
scp pool/main/h/hello-world/hello-world_0.1_arm64.deb fastdev-qemuarm64:~/
cd -
Install the hello-world_0.1_arm64.deb binary package in the running fastdev target image by using the apt install command.
Setting the DEBIAN_FRONTEND variable prevents the underlying debconf tool from writing warning messages concerning unavailable frontends.
ssh fastdev-qemuarm64 DEBIAN_FRONTEND=noninteractive apt install ./hello-world_0.1_arm64.debReboot the fastdev target image to run the "Hello World" application on startup.
ssh fastdev-qemuarm64 crinit-ctl rebootOn success, the qemu.log log file in the workspace directory shows the reboot of the target image and the "Hello world" and "Hello again" messages according to the hello.c source file shown in step Create Source Files for LI Application Software.
To uninstall the hello-world package, you can use the apt remove command.
ssh fastdev-qemuarm64 apt remove -y hello-worldPackaging HI Application Software
This section describes the packaging of HI Application software according to the sequence shown in Figure 5, “Interaction for Packaging Application Software”. The generic descriptions of the steps for packaging HI Application software are identical to the descriptions of the steps for LI Application software in Packaging LI Application Software. This section describes only the differences between packaging HI Application and LI Application software related to the example HI Application.
Create Debian Package Specification Files for HI Application
As for the "Hello World" example in Create Debian Package Specification Files for LI Application, the "Hello Safety" example in the appdev/apps/hello-safety directory is based on a CMake toolchain file.
The specification of the CMake toolchain file can be included in a Debian rules file.
#!/usr/bin/make -f

# Copyright 2025 Elektrobit. All rights reserved.

# Enable hardening flags
export DEB_BUILD_MAINT_OPTIONS = hardening=+all

%:
	dh $@

# Workaround for dh_dwz failing to parse the default debug symbol format from clang-20
CFLAGS += -gdwarf-4

ifeq ($(DEB_HOST_ARCH),arm64)
# Use toolchain file for HI arm64 musl-clang builds:
CMAKE_ARGS += -DCMAKE_TOOLCHAIN_FILE=$(CURDIR)/cmake/toolchain/fastdev-arm64/toolchain-fastdev-hi-arm64.cmake
export TOOLCHAIN_BASE=${CURDIR}/cmake/toolchain
else
# For other architectures, just use plain clang as there is no lisa-libc for anything but arm64
CC := clang-20
endif

override_dh_auto_configure:
	dh_auto_configure -- $(CMAKE_ARGS)
Create Package Recipe for HI Application
For the "Hello Safety" example in the appdev/apps/hello-safety directory, consider the following package recipe which requires additional build-time dependencies.
# Copyright 2025 Elektrobit. All rights reserved.

DESCRIPTION = "Hello Safety application"
MAINTAINER = "Hello Safety maintainer"

inherit dpkg

SRC_URI = " \
    file:///workspace/appdev/apps/hello-safety/ \
    file:///workspace/appdev/cmake/toolchain \
    file://rules \
"

# Copy source and CMake toolchain files from fetched directories.
prepare_app_source(){
    cp ${WORKDIR}/workspace/appdev/apps/hello-safety/hello.c ${S}
    cp ${WORKDIR}/workspace/appdev/apps/hello-safety/CMakeLists.txt ${S}
    cp -r ${WORKDIR}/workspace/appdev/cmake ${S}
}

do_prepare_build[cleandirs] += "${S}/debian"
do_prepare_build() {
    prepare_app_source
    deb_debianize
}

# BitBake recipe dependencies
DEPENDS:append = " \
    clang-20 \
    cmake \
    libclang-20-dev \
    libclang-rt-20-dev \
    lisa-elf-enabler-native \
    lld-20 \
    llvm-20-dev \
"

# lisa-libc is only available for arm64
DEPENDS:append:arm64 = " \
    lisa-libc-dev \
    lisa-libc-tools-clang \
"

# Build dependencies for the debian/control file
DEBIAN_BUILD_DEPENDS:append = " , \
    clang-20:native, \
    cmake, \
    libclang-20-dev:native, \
    libclang-rt-20-dev, \
    lisa-elf-enabler, \
    lisa-libc-tools-clang [arm64], \
    lld-20:native, \
    llvm-20-dev:native, \
"
Build Package of HI Application
For the "Hello Safety" example, you can use the following command in the development container.
kas build --target hello-safety kas/public.yml:kas/example-apps.ymlOn successful completion of this step, the local ISAR Apt repository contains source and binary Debian packages for the "Hello Safety" application.
You can use the reprepro tool to query the ISAR Apt repository about the packages.
cd build/tmp/deploy/isar-apt/trixie-ebclfsa-arm64/
reprepro -b apt/trixie-ebclfsa --dbdir ./db/trixie-ebclfsa/ ls hello-safety
cd -
To locate the related artifacts within the ISAR Apt repository you can use the find command.
find build/tmp/deploy/isar-apt/trixie-ebclfsa-arm64 -name hello-safety*.*Deploy HI Application Package on Target Image
To deploy the "Hello Safety" example package on the fastdev target image, boot the fastdev target image in a QEMU system emulation as in the step Deploy LI Application Package on Target Image.
./scripts/qemu.sh -d prebuilt/fastdev/image/ -t fastdev < /dev/null > qemu.log 2>&1 &Provide the running fastdev target image with the hello-safety_0.1_arm64.deb binary package by using the scp command.
cd build/tmp/deploy/isar-apt/trixie-ebclfsa-arm64/apt/trixie-ebclfsa
scp pool/main/h/hello-safety/hello-safety_0.1_arm64.deb fastdev-qemuarm64:~/
cd -
Install the hello-safety_0.1_arm64.deb binary package in the running fastdev target image by using the apt install command.
ssh fastdev-qemuarm64 DEBIAN_FRONTEND=noninteractive apt install ./hello-safety_0.1_arm64.debReboot the fastdev target image to run the "Hello Safety" application on startup.
ssh fastdev-qemuarm64 crinit-ctl rebootOn success, the qemu.log log file in the workspace directory shows the reboot of the target image, and a "Hello safety!" message according to the hello.c source file shown in step Create Source Files for HI Application Software.
To uninstall the hello-safety package, you can use the apt remove command.
ssh fastdev-qemuarm64 apt remove -y hello-safetyIntegrating Application Software
This section describes how to integrate already packaged application software into a target image.
Prerequisites of this user task are:
-
The application software is packaged.
-
The EB corbos Toolkit’s development container is in the local Docker image store.
Refer to the Quick Start section on how to obtain the EB corbos Toolkit, load the development container image, and enter the development container. Refer to Packaging Application Software on how to package application software.
Steps to be performed by the user are:
-
Add the application package to an image recipe.
-
Build the target image so that the package is installed in the root filesystem of the target image.
-
Optionally run the target image to examine that the integrated application is available at runtime.
An image recipe is a BitBake recipe which inherits the image BitBake class provided by ISAR.
The tasks of an image recipe include:
-
Fetch the packages to be installed.
-
Install the requested packages in the root filesystem of the target image.
The progression of this user task is depicted in Figure 6, “Interaction for Integrating Application Software”. The interaction refers to the sub-sequence "build application package" of Figure 5, “Interaction for Packaging Application Software”.
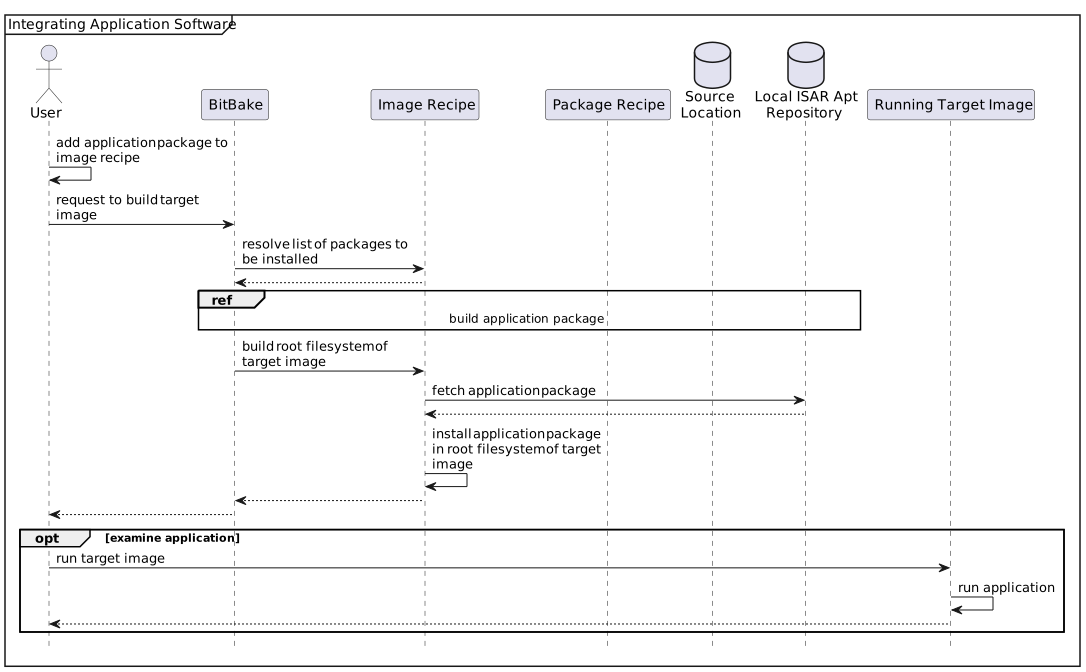
The following sub-sections describe the steps of this user task.
The steps are illustrated with integrating the hello-world package of Packaging LI Application Software into the fastdev target image as a working example.
Add Application Package to Image Recipe
Add the application package to the list of packages to be installed in the target image.
The packages to be installed in a target image are determined by the IMAGE_INSTALL variable of an image recipe.
To add the hello-world package to the fastdev image recipe, copy the fastdev image recipe to a myfastdev image recipe in the example application layer, and append the hello-world package to the IMAGE_INSTALL variable.
mkdir -p appdev/meta-appdev/recipes-images/myfastdev
cp layers/meta-ebclfsa/meta-ebclfsa-public/meta-ebclfsa-public-images/recipes-images/fastdev/fastdev_1.0.bb appdev/meta-appdev/recipes-images/myfastdev/myfastdev_1.0.bb
echo "IMAGE_INSTALL:append = \" hello-world\"" >> appdev/meta-appdev/recipes-images/myfastdev/myfastdev_1.0.bb
You can inspect the extended IMAGE_INSTALL variable by using the bitbake-getvar tool.
kas shell kas/public.yml:kas/example-apps.yml -c "bitbake-getvar -r myfastdev --value IMAGE_INSTALL"On success, the IMAGE_INSTALL variable contains the hello-world package.
Build Target Image With Application
Build the target image with its extended recipe.
To build the myfastdev target image, include the Kas project configuration for the example application layer.
kas build --target myfastdev kas/public.yml:kas/example-apps.ymlAfter a successful build, the myfastdev target image can be found in the build/tmp/deploy/images/ebcl-qemuarm64 deployment directory.
Run Target Image With Application
Run the target image with the integrated application in a QEMU system emulation.
For the myfastdev target image with the "Hello World" application, you can use the provided qemu.sh script.
./scripts/qemu.sh -t myfastdevOn success, the qemu.log log file in the workspace directory shows the "Hello world" and "Hello again" messages on startup according to the hello.c source file shown in step Create Source Files for LI Application Software.
Integrating Prebuilt Packages
This section describes how to integrate a prebuilt package from an upstream Apt repository into a target image when the EB corbos Toolkit does not yet provide recipes for that package and its runtime dependencies.
To make such a package available in a target image, recipes can first be generated for the package and its runtime dependencies. These recipes fetch the required prebuilt packages from the upstream Apt repository and store them in the local ISAR Apt repository, from which the image recipe can install them into the target image.
Prerequisites of this user task are:
-
The prebuilt package is available in the upstream Apt repository.
-
The upstream Apt repository is accessible from the host.
Steps to be performed by the user are:
-
Configure a layer for the prebuilt package.
-
Generate the layer for the prebuilt package with recipes for both the prebuilt package and its runtime dependencies.
-
Create a Kas configuration for the generated layer.
-
Add the prebuilt package to a target image recipe.
-
Build the target image with the prebuilt package.
-
Run the target image with the prebuilt package.
To generate the layer for the prebuilt package, the EB corbos Toolkit provides a Reposync utility. Its configuration includes the specification of the prebuilt package and its upstream Apt repository. Based on its configuration, the Reposync utility performs the following tasks:
-
Request package information for all packages from the upstream Apt repository.
-
Generate a layer with prebuilt package recipes for both the specified package and its runtime dependencies.
The generated prebuilt package recipes in the layer inherit the dpkg-prebuilt BitBake class provided by ISAR.
Their main tasks are:
-
Fetch a prebuilt package from the upstream Apt repository.
-
Store the prebuilt package in the local ISAR Apt repository, so that the package can be installed in the root filesystem of a target image.
The progression of this user task is depicted in Figure 7, “Interaction for Integrating Prebuilt Packages”.
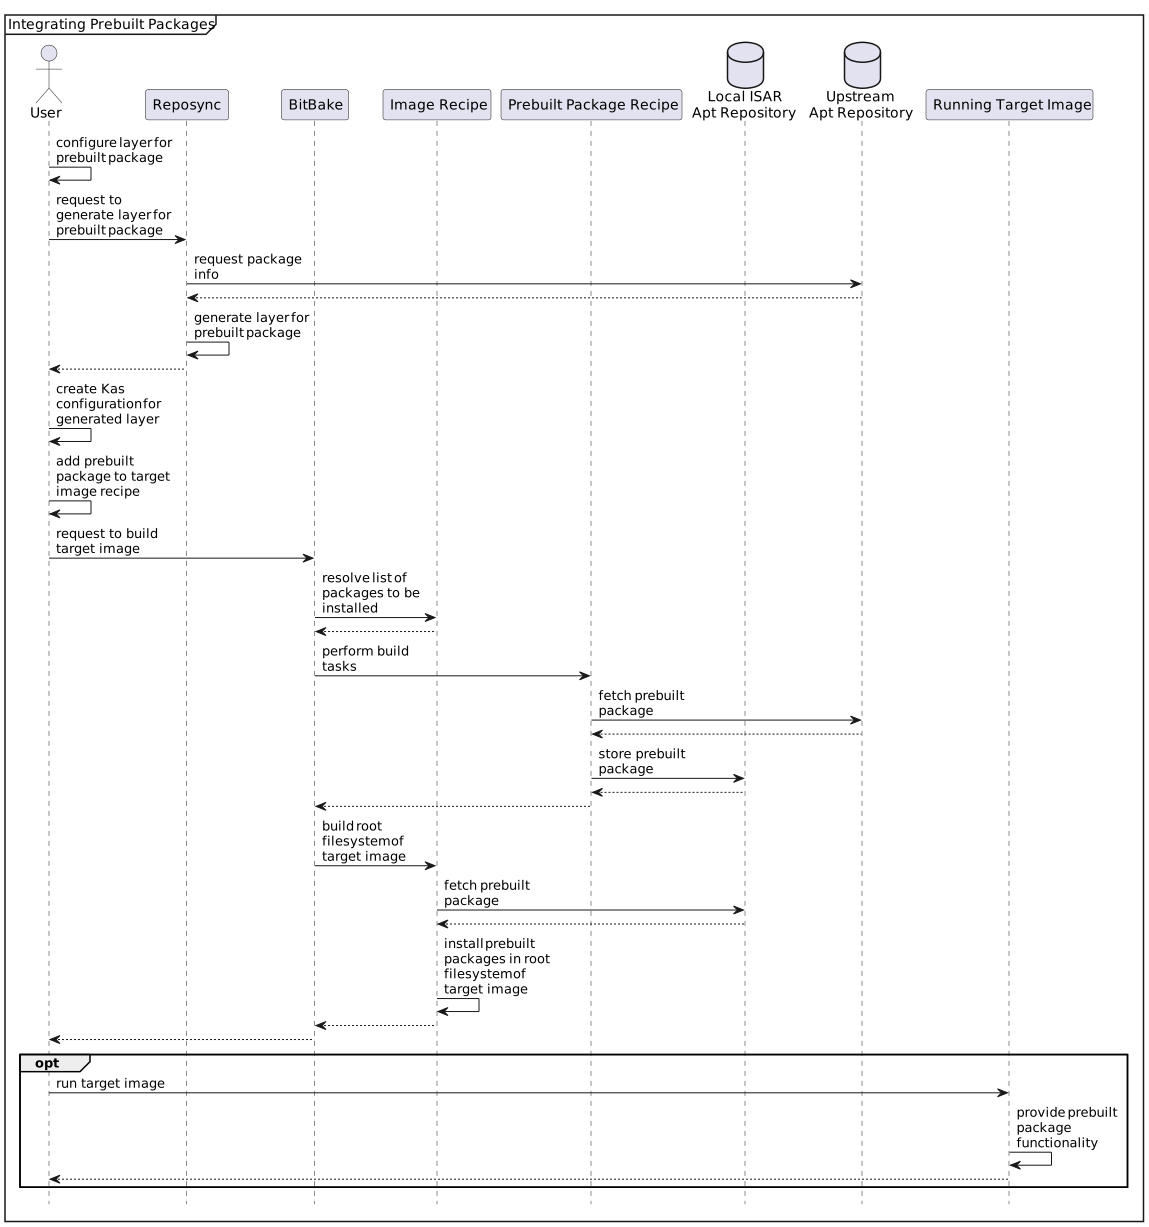
The following sub-sections describe the steps of this user task.
The step for creating a Kas configuration for the generated layer is similar to the steps described for Adding Custom BitBake Layer.
The steps for building and running the target image with the prebuilt packages are similar to the corresponding steps described for Integrating Application Software.
The steps are illustrated with integrating the hello package for the "GNU Hello" program into the fastdev target image as a working example.
Configure Layer for Prebuilt Package
Create a YAML configuration file to generate a layer for the prebuilt package with the Reposync utility, including the name of the prebuilt package, its upstream Apt repository, and the priority of the layer.
For the "GNU Hello" example, consider the following configuration for a meta-example-prebuilt-packages layer.
# Copyright 2026 Elektrobit. All rights reserved.

layer: "meta-example-prebuilt-packages"
layer_priority: 5
repos:
  - name: "EB Upstream Baseline"
    url: "https://artifactory.elektrobit.com/eb_corbos_linux_product-releases-generic-denue/ebcl_input_snapshots/ebcl_2.x_trixie/2026-08-10/upstream/packages"
    distributions:
      - "upstream_baseline"
    components:
      - "trixie_main"
    architectures:
      - "amd64"
      - "arm64"
    packages:
      - "hello" # GNU Hello example
There might be package recipes in the generated layer for which there is already a package recipe in the delivery of the EB corbos Toolkit with identical names but referring to different packages. Integrating the package of the newly generated recipe might therefore lead to the loss of the integrity of already integrated packages in a target image. To maintain the integrity of already integrated packages, the priority of the newly generated layer is chosen as "5" which is lower than the priority of the layers in the delivery of the EB corbos Toolkit.
To avoid a faulty installation of a new prebuilt package, ensure that the dependencies of this package are compatible with existing packages. This can be achieved by using a prebuilt package with no or only new runtime dependencies, or by using an upstream Apt repository for a prebuilt package for which the package has only compatible dependencies.
Generate Layer for Prebuilt Package
Use the Reposync utility to generate the layer for the prebuilt package based on its configuration.
For the "GNU Hello" example, create the meta-example-prebuilt-packages layer from its configuration of the previous step.
cd appdev/meta-appdev
ebcl-reposync -c "meta-example-prebuilt-packages.yml"
cd -
After successful generation, the meta-example-prebuilt-packages layer can be found in the appdev/meta-appdev directory and contains prebuilt package recipes for both the "hello" package and its runtime dependencies.
Create Kas Configuration for Generated Layer
Create a Kas configuration to include the generated layer in the build of a target image.
For the "GNU Hello" example, you can use the following Kas configuration.
# Copyright 2026 Elektrobit. All rights reserved.

header:
  version: 18

repos:
  meta-example-prebuilt-packages:
    path: "appdev/meta-appdev/meta-example-prebuilt-packages"
    layers:
      .:
You can use the kas dump command to examine the merged project configuration with the additional meta-example-prebuilt-packages layer.
kas dump kas/public.yml:kas/example-prebuilt-packages.ymlThe result is the merged Kas configuration in YAML format with a meta-example-prebuilt-packages list item under the repos key.
Add Prebuilt Package to Target Image Recipe
Add the prebuilt package to the list of packages to be installed in a target image.
The packages to be installed in a target image are determined by the IMAGE_INSTALL variable of the image recipe.
For the "GNU Hello" example, copy the fastdev image recipe to a myfastdev image recipe in the example application layer, and append the hello package to the IMAGE_INSTALL variable.
mkdir -p appdev/meta-appdev/recipes-images/myfastdev
cp layers/meta-ebclfsa/meta-ebclfsa-public/meta-ebclfsa-public-images/recipes-images/fastdev/fastdev_1.0.bb appdev/meta-appdev/recipes-images/myfastdev/myfastdev_1.0.bb
echo "IMAGE_INSTALL:append = \" hello\"" >> appdev/meta-appdev/recipes-images/myfastdev/myfastdev_1.0.bb
You can inspect the extended IMAGE_INSTALL variable of the myfastdev image recipe by using the bitbake-getvar tool.
kas shell kas/public.yml:kas/example-apps.yml -c "bitbake-getvar -r myfastdev --value IMAGE_INSTALL"On success, the IMAGE_INSTALL variable contains the hello package.
Build Target Image With Prebuilt Packages
Build the target image with its extended recipe and the generated layer for the prebuilt package.
For the "GNU Hello" example, build the myfastdev target image with Kas configurations for both the example application layer and the generated meta-example-prebuilt-packages layer.
kas build --target myfastdev kas/public.yml:kas/example-apps.yml:kas/example-prebuilt-packages.ymlAfter a successful build, the myfastdev target image can be found in the build/tmp/deploy/images/ebcl-qemuarm64 deployment directory.
Run Target Image With Prebuilt Package
Run the target image with the prebuilt package in a QEMU system emulation.
For the "GNU Hello" example, run the myfastdev image built in the previous step with the qemu.sh script.
./scripts/qemu.sh -t myfastdevYou can examine the functionality of the integrated package by invoking the "GNU Hello" program in the shell of the running target image.
helloOn success, the "GNU Hello" program responds with "Hello, world!".
Troubleshooting
This section collects common problems encountered when using the EB corbos Toolkit and how to resolve them.
BitBake Fails With "Operation not permitted" (Restricted User Namespaces)
A build aborts early with a PermissionError while BitBake tries to disable network access for a task, for example:
ERROR: PermissionError: [Errno 1] Operation not permitted

Traceback (most recent call last):
  File ".../bitbake/bin/bitbake-worker", line 278, in child
    bb.utils.disable_network(uid, gid)
  File ".../bitbake/lib/bb/utils.py", line 1696, in disable_network
    with open("/proc/self/uid_map", "w") as f:
PermissionError: [Errno 1] Operation not permitted

ERROR: Task (.../isar-apt.bb:do_unpack) failed with exit code '1'
Since Ubuntu 23.10, Canonical restricts the creation of unprivileged user namespaces via AppArmor for security reasons.
BitBake relies on user namespaces (for example to write to /proc/self/uid_map when isolating a task from the network), so the restriction makes affected tasks fail.
This is a property of the host kernel and its AppArmor configuration. It therefore also affects BitBake running inside the development container.
The recommended fix adds a small AppArmor profile that grants the userns permission to the BitBake executable, leaving the restriction in place for all other programs.
The EB corbos Toolkit detects the described situation automatically on the host before the development container starts.
It also offers to apply the recommended fix on your host for you after confirmation.
Applying the fix requires sudo access.
In case you want to understand the automatic diagnosis and fixing better, take a look at check_userns_restriction.sh in the .devcontainer sub-directory.
In case you do not want to apply the fix automatically, you can do so manually as described below:
Run the following commands on your host and then restart the build:
sudo tee /etc/apparmor.d/bitbake > /dev/null <<'EOF'
abi <abi/4.0>,
include <tunables/global>
profile bitbake /**/bitbake/bin/bitbake flags=(unconfined) {
  userns,
}
EOF
sudo apparmor_parser -r /etc/apparmor.d/bitbake